Introduction: Rethinking Game-Ready Asset Production
- A conversation sparked the idea of streamlining game-ready model creation without compromising visual quality.
- The goal: achieve nearly indistinguishable results with significantly less time and effort, especially beneficial for indie developers.
Motivation and Industry Challenges
- Traditional AAA pipelines demand rigorous, time-intensive production unsuitable for smaller teams.
- Simplifying workflows can democratize high-quality asset creation in the indie scene.
Recommended Background Knowledge
- Familiarity with modern game-ready workflows is essential.
- For comprehensive foundational learning, the tutorial by Alex Medina on ArtStation Learning is highly recommended.
Software Tools Utilized
- Plasticity: Affordable tool critical for model creation; recent Blender bridge enhances integration.
- Blender: Free and versatile 3D software; addons augment UV and bevel shader management. For essential techniques, see Blender Basics: Navigating and Using Essential Tools for 3D Modeling.
- Substance Painter: Industry-standard tool for texturing game assets; essential for quality results.
Addons Supporting the Workflow
- Textools: Free tool for UV management and baking.
- UV Packmaster: Efficient UV packing solution at a reasonable cost.
- Zan Barbecue: Affordable addon to enhance bevel shader usage.
Key Workflow Insights
- Enabling live link in the Plasticity-Blender bridge ensures consistent surface tolerance and seamless model imports.
- Selecting all objects prior to reacting in Blender prevents import issues.
- Currently, the bridge is in beta and exclusive to Plasticity Studio; Indie version release is forthcoming.
Next Steps
- Detailed techniques and specific method implementations will be discussed in the forthcoming video. To prepare, you might explore Effective 3D Modeling: When and How to Use Fillets and Edge Fills for improving your modeling approach.
This streamlined approach balances quality and efficiency, providing indie developers with powerful tools and processes to accelerate game-ready 3D asset production without sacrificing visual fidelity.
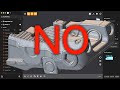
hello there so about a month ago I was talking to a friend of mine showing him some of the new stuff that I've done and
I was surprised to hear that he would have changed a lot if he had to make the game ready version to make it easier to
model I was mad about this how can you make the design noticeably worse if uh you can just spend a bit less time on
the game ready and 99% of people would not notice the difference even if you told them what to look
for and that was someone very flexible with no religious like approach to clean mesh or game ready production in
general so I thought is there really no better way to speed things up I was really motivated because while I knew
that a lot of cutting Corners uh wouldn't fit 95% of a AAA pipeline this would make a huge difference for
Indie industry what if I an indie company that would rather have two things for the price of one with almost
no difference for an average person looking at it I've spent more than a month learning different game ready
pipelines tools and approaches tried really hard to come up with solutions for things I thought could be done
faster or better and I got some results okay let's address a couple of things right away while I am showing the full
process because I thought some of you might find it a good way to start I'm not really a 3y artist I would make a
bad job explaining why I do certain things it's just that there is no one else to show that workflow
currently you must have a good understanding of modern game ready approaches to comfortably use this
method so instead of spending huge effort and coming up with a mediocre explanation of full game ready
production I would rather aim you at the amazing tutorial on Art station learning from Alex
Medina let's now talk about the software for the method I personally use plasticity pixes blender substance while
plasticity is cheap blender is free not counting the addons and substance is basically a must to texture game ready
assets pixes with its price is the elephant in the room here and as I'm finishing all the videos there is a
blender bridge out that has fixed the surface tolerance X Sport now it's calculated the same way for everything
you just have to make sure the live link is enabled and every object is selected before the
reacting after that you can market shop and because it gets the model straight out of plasticity there won't
be any potential issues with card repair on import currently as a beta version it's only available for Studio you will
have to wait uh for it to release for Indie version but I don't think you will regret getting Studio anyway let's
quickly go over the addons I'll be using um text tools it's free for working with UVS and
baking UV packm as the best packing tool for reasonable price and Zan barbecue a very cheap tool
to put our bevel Shader usage on the next level I'll provide all the links in a text
file we'll discuss my techniques used in the method in the next video
The primary goal is to streamline the creation of game-ready 3D assets to achieve results that are nearly indistinguishable from AAA quality but with significantly less time and effort. This approach empowers indie developers to produce high-quality visuals without the extensive resources typical of large studios.
The recommended tools include Plasticity, which is affordable and now offers a Blender bridge for seamless integration; Blender, a free and versatile 3D modeling software enhanced with useful addons for UV and bevel shader management; and Substance Painter, which is essential for professional-level texturing of game assets.
The Plasticity-Blender bridge enables a live link between the two applications, ensuring consistent surface tolerance and smooth model imports. This integration helps prevent common import issues, especially when all objects are selected prior to reacting in Blender, thus maintaining workflow efficiency.
Key addons supporting the workflow include Textools for free UV management and baking, UV Packmaster for efficient UV packing at a reasonable cost, and Zan Barbecue, an affordable addon that enhances bevel shader usage to improve model visual quality.
Indie developers should have familiarity with modern game-ready workflows to effectively implement this pipeline. For foundational learning, tutorials like Alex Medina's on ArtStation Learning offer comprehensive guidance that builds essential skills for streamlined asset production.
Yes, more detailed techniques and specific method implementations are planned for discussion in an upcoming video. To prepare, developers can explore resources such as 'Effective 3D Modeling: When and How to Use Fillets and Edge Fills' to enhance their modeling approaches in anticipation of the deeper tutorial.
Unlike traditional AAA pipelines, which are rigorous and time-intensive, this streamlined approach reduces production complexity and time without sacrificing quality. It democratizes high-quality asset creation by providing accessible tools and efficient processes tailored to the smaller scale and resource constraints common in indie development.
Heads up!
This summary and transcript were automatically generated using AI with the Free YouTube Transcript Summary Tool by LunaNotes.
Generate a summary for freeRelated Summaries

Mastering Asset Texturing and Custom Filters with Instamat SDK
Explore the comprehensive workflow of asset texturing, baking, and custom filter creation using Instamat's latest plug-in SDK. Learn practical techniques for baking high-poly details, layering materials, adding decals, and building pixelation effects with the Atom and Element graphs.
Effective 3D Modeling: When and How to Use Fillets and Edge Fills
This guide explores best practices for adding fillets and filling edges in 3D modeling. Learn why filling every edge is often counterproductive, alternative workflows using ZBrush and Blender for achieving realistic details, and how to balance model complexity with usability.
Creating Game Designs with Stable Diffusion and Photoshop: A Comprehensive Guide to Jungle Piics
Learn how to design a match-three game using Stable Diffusion and Photoshop, from logo creation to game assets.
Blender Basics: Navigating and Using Essential Tools for 3D Modeling
This tutorial introduces beginners to Blender's interface and essential tools for 3D modeling. Learn how to navigate the viewport, use move, rotate, and scale tools, and manage objects effectively to build your first scene.
Creating Sci-Fi Gun Design Concepts Using AI and Photoshop
Learn how to design sci-fi gun concepts with Stable Diffusion AI and Photoshop in this comprehensive guide!
Most Viewed Summaries

A Comprehensive Guide to Using Stable Diffusion Forge UI
Explore the Stable Diffusion Forge UI, customizable settings, models, and more to enhance your image generation experience.

Kolonyalismo at Imperyalismo: Ang Kasaysayan ng Pagsakop sa Pilipinas
Tuklasin ang kasaysayan ng kolonyalismo at imperyalismo sa Pilipinas sa pamamagitan ni Ferdinand Magellan.

Mastering Inpainting with Stable Diffusion: Fix Mistakes and Enhance Your Images
Learn to fix mistakes and enhance images with Stable Diffusion's inpainting features effectively.

Pamamaraan at Patakarang Kolonyal ng mga Espanyol sa Pilipinas
Tuklasin ang mga pamamaraan at patakaran ng mga Espanyol sa Pilipinas, at ang epekto nito sa mga Pilipino.

How to Install and Configure Forge: A New Stable Diffusion Web UI
Learn to install and configure the new Forge web UI for Stable Diffusion, with tips on models and settings.

If you found this summary useful, consider buying us a coffee. It would help us a lot!