Download Subtitles for Lighting Interiors in Unreal Engine 5
Lighting Interiors in Unreal Engine 5
William Faucher
SRT - Most compatible format for video players (VLC, media players, video editors)
VTT - Web Video Text Tracks for HTML5 video and browsers
TXT - Plain text with timestamps for easy reading and editing
Scroll to view all subtitles
in today's video we'll be taking a look
at interior lighting combining the uses
of lumen Hardware R tracing and Patch
racing I'm going to show you how you can
think of lighting in a way that will
help you pick and choose the mood you're
going for by simply lighting a couple of
different lighting scenarios it will
really help you break down how to light
any given interior now full disclosure
this video is sponsored by Nvidia studio
and scan computers everything from the
modeling layout lighting rendering and
editing of this video had been done with
the Asus zbook Pro 16 OLED laptop I
don't get to keep the laptop it's being
sent back and only being used for
reviewing purposes just before we jump
into today's tutorial I'm going to take
a brief moment to talk about the
hardware we're using today the Asus
Zenbook Pro 16 ODed laptop runs on a
beefy RTX 4070 that allows you to fully
utilize Hardware rate tracing and path
tracing and tensor AI cords which is
going to help massively when you're
rendering your shots it's got the Cuda
cords you need which are needed if you
plan on 3D scanning things with an app
like reality capture and since it's the
40 series GPU you can benefit from dss3
which I've talked about in an earlier
video right here it's got 32 gigs of RAM
a core I9 processor which handles
unrealed Shader compilations like an
absolute champ the display on this
laptop is absolutely top-notch 120 HZ
with 100% DCI P3 and 100% srgb color
coverage and it's OLED meaning your
black that can be nice and Inky some
notable quality of life features include
this Nifty hinged keyboard which not
only feels a lot more natural to me when
I'm typing but also seem to help with
the cooling and the trackpad has haptic
feedback which was a nice surprise
Nvidia studio is for creators but Nvidia
GeForce is for gamers right down to the
drivers even on my personal desktop
workstations I'm always using Studio
drivers just because I find them a lot
more reliable than the game drivers for
Creative work specifically if a laptop
or desktop is NVIDIA Studio validated it
means it spec and design meet the needs
of a Creator you can get Nvidia Studio
laptops at scan computers you can check
out the link down below I thought it
would would be fun to make a tutorial
using a laptop for a change because a
lot of people assume that the work I do
in unreal can only be done on a crazy
expensive workstation desktop and that's
just not the case so let's get started
with what you came here for lighting
Interiors in Unreal Engine 5 okay so
since we're getting started I just want
to make sure that you all have the same
project settings that I'm using I am
currently using Unreal Engine 5.3 so by
going to the settings up here we're
going to go to Project settings we're
going to scroll down to the rendering
tab down here and you're going to want
to make sure that support Hardware R
tracing and turned on and pth tracing
and turned on here as well I'm using
virtual Shadow maps and make sure that
used Hardware R tracing when available
is turned on and it should go without
saying but if you want this to work you
need a GPU that is capable of rate
tracing the GPU in this laptop is an RTX
470 so you're not going to have any
issues with it and one last thing we're
in the search panel up top we're going
to search for Direct X and I believe you
need to have direct de 12 enabled at
least that's what I'm using and it works
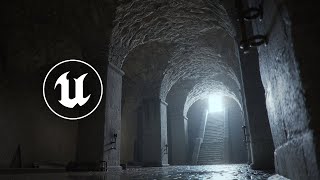
like a charm so here we have a scene
that I made an unreal that is Loosely
inspired by a scene in Game of Thrones
and before we get started with the
lighting let's look at the reference and
try to break down where the light is
coming from notice how there is no
artificial lighting the only thing we're
seeing is light pouring in through that
doorway at the top of the stairs that is
the only light source and the camera is
exposing for the interior making the
exterior completely Overexposed and and
blown out and that is what we're going
to try to mimic here now this laptop
handles this scene like an absolute
champ I'm blazing past 60fps without any
issues and if you want to follow along
with the environment in this tutorial
and reverse engineer how to scene was
lit you can download this project for
free here on gumroad link down below
just to be clear though it's not going
to look exactly the same because I'm
using a lot of Mega scans textures and
models in this level and I'm not legally
allowed to redistribute those assets but
you will have something to work with and
the lighting will look the same so what
we're going to do now is we're going to
completely kill all of our lighting and
we have to create a daylight system
using the environment light mixer as
always so by going to the window tab up
here we're going to go to the
environment light mixer create Skylight
atmospheric light sky atmosphere and
height fog and next we're going to
create a postprocess
volum drag it into our scene here and
make sure we set it to Unbound make sure
this is checked right here you'll see
this is really important for pretty much
everything moving forward in this video
so you'll see obviously this is very
underwhelming when it comes to interior
lighting indirect lighting is everything
and that's the main takeaway here the
easiest way is to increase the
brightness of your Skylight because this
is our main source of light notice in
our reference we don't have any sunlight
coming in there the sun is probably
pointing in a totally different
direction we only want Skylight coming
in so we can select our Skylight and we
can increase intensity scale to
something ridiculous like 20 or 100
1,000 you'll see we're starting to get a
little bit more lighting coming into our
scene but you'll see uh you know it's
not really great it's very splotchy and
I think that's really just because it's
a limitation of lumen right now with the
Skylight it just doesn't have enough
sample to work with and so when that
doesn't work what's next we can increase
the exposure of the scene so we're going
to go to the postprocess volume and
we're going to search for e and I'm
going to check these three boxes here
and uncheck apply physical camera
exposure
and we can adjust the exposure this
way now again this brightens everything
up but it's still pretty splotchy not
really what we're going for it's not
really what we want and we get this
really not so great looking Blue Fog and
that's because we want to make sure that
we select our exponential height fog and
turn on volumetric fog you'll see why
does it important later now in order to
give your Skylight a bit of a boost you
can also increase the brightness of your
directional light to something like I
don't know like 800 or something and
that will also help inject a lot more
light because as you increase your
directional light it increases the
brightness of your sky as well so it
kind of goes both ways honestly I think
a th here is probably a bit too strong I
would rather play around with the
exposure later so now we are getting a
bit of a better result over here but
still this is not what we're going for
and the reason why because the indirect
lighting quality of lummen is great but
Lumen just does not have enough samples
to really get a high quality render from
such a tiny light source coming in
through that window so we need to fake
it and in order to fake it we're going
to go ahead and create a wrecked light
over here and drag that over
here and Loosely shape it to the well
shape and size of our doorway here so by
increasing the sord width and the sord
height like that Loosely matching the
size of it the Skylight does inject a
little bit of indirect lighting but it's
just not enough you're not getting
enough consecutive bounces here so we
need to inject some some direct lighting
with the help of the rec light here to
really get some better results okay so
with our rec light we're also going to
increase the attenuation radius and
maybe set the value to something like
800 and now notice how we are getting a
much more interesting look all because
we've introduced a bit of direct
lighting it's okay to fake things now
I'm going to incre I can change the
color a little bit make it a little bit
cooler and there you have it we're
already having a much Bluer look to our
scene and already we are about 60% of
the way there but you'll notice that the
these areas here are still very black
not very good looking what more can we
do we don't want to increase the
exposure we want to increase the
indirect lighting values sometimes
looming can be a little bit tricky so
this is why I like using the path Tracer
sometimes in order to help me figure out
like hey am I actually doing things
right here so by going to the lit tab
here we're going to go turn on path
tracing and what the path Tracer is
going to do is it's going to give you a
more ground shrew physically accurate
lighting result based on your current
lighting settings this is what your
scene should look like if everything is
set up correctly there should be no
tremendous difference between the two
they should both be pretty similar and
if they're not then there's other issues
we need to fix so you'll see we're
missing out on a ton of indirect
lighting over here it's you'll notice
it's not perfectly black it's not there
not black at all there so we need to go
fix that somehow right we need to try
and rectify this issue and how do we
inject a little bit more indirect
lighting into our scene we don't want to
go ahead and increase the exposure again
that will work but it also brightens up
everything else and we don't want that
all we want is to lift up those Shadows
a little bit more so we're going to go
ahead and click on our wck light
here and we're going to scroll down to
indirect lighting intensity so I'm going
to bump this up to something like five
to exaggerate it a little bit and you'll
see hey we're starting to get a lot more
indirect lighting into our scene it's
all already looking a whole lot better
now keep in mind this is not a
physically accurate setting your changes
here will not be mirrored in the path
Tracer because What's Happening Here is
a surface is reflecting five times more
light than it is receiving which is
physically impossible so use this with
caution use it only more of a subtle art
Direction kind of feature okay now
another issue that I'm noticing is our
shadows here are very harsh right again
if I turn on the path Tracer um you'll
notice that Shadows are very very soft
here right they look really really good
and I don't I'm not seeing that we're
getting these really hard Shadows here
something feels off and the reason for
that is because of virtual Shadow Maps
when it comes to very very soft Shadows
you're just kind of hitting that
limitation there so in order to fix that
we're going to select our rec light
again and we're going to search for R
trace and we want to make sure we cast R
Trace Shadows on and pay attention to
the shear difference here no especially
notice on the wall here this is before
and this is after before and after the
Shadows are so much softer so we're
getting much much better softer Shadows
here now when you need those really
really soft Shadows there's no way
around using Hardware Ray tracing and
that is where RTX gpus come in really
really handy another reason it's
incredibly important to add direct
lighting even your if your scene is
mostly indirectly lit it's because of
specular height light now pay attention
right here on the pillar on the left
hand side here I wanted to give it like
a you know a running water kind of look
like it was very damp if I hide my recck
light right now and I only rely on the
indirect lighting from Lumen and I'm
going to go ahead and increase the
exposure here just for clarity sake
notice how it doesn't look wet and the
reason for that at least this is my
understanding Lumen indirect lighting is
not going to contribute to specular
highlights at least not very much you
can clearly tell right here that there
is just no real specular highlights we
completely lost the that wetness that it
had right and so that is why it's really
important to inject that direct lighting
to make that surface look wet now bonus
tips number one if ever you notice this
kind of like light bleeding in your
Interiors this is actually something
that's pretty common you'll notice like
along the edges you just got this weird
light that seem to be the Skylight
that's coming through the walls you need
to go ahead and add some light blockers
to the exterior of your level and what I
mean by this is these large white cubes
right it's literally just a big white
Cube that I place underneath my level to
make sure that light is being blocked
correctly because as we saw earlier the
Skylight has some very low resolution
sampling which makes it very splotchy
and sometimes at least my understanding
is that you just need more geometry to
block that light coming in so again if I
were to just lower this cube right here
notice how we're getting a whole bunch
of light that bleeding into our scene
here just lifting this big Cube up here
whoa that light's gone that is how you
can fix light that's leaking into the
corners of your wall it's very
frustrating but fortunately with light
blockers it's a very easy fix now let's
say you wanted to have some light Shaft
or some God Rays coming through the
window you can absolutely do that too so
all we need to do is grab our
directional light
here and rotate it so that the sun
shines through the the
doorway and we can angle it the way that
we want to something like this and
you'll see it injects quite a bit of
indirect lighting into our level as well
and we got these light shafts here
thanks to the volumetric fog that we
turned on in our exponential height fog
earlier see if I turn off volumetric fog
here it's going to be a totally
different look and we don't get those
light shafts coming through if I want to
make that light shaft even stronger we
can simply just increase the volumetric
scattering intensity even higher so I I
have already set it to 10 here by
default it'll be one you might not even
see it but if it increase it to like
50 100 you'll see it's a very very
strong God Ray shining in our scene now
and already we're getting quite a bit of
indirect lighting bouncing up and
lighting the rest of our scene this
doesn't match the reference we were
going for but I still just wanted to
show you that it is something that you
can do but for now I'm just going to go
back bring it back up here because
that's not the look I wanted every
single light can had its
own volumetric scattering intensity
you'll see in my re light I already had
it cranked up to six if you want more
fog like that coming coming in which we
do have in our reference here that is
how you can control that bonus tip
number two there's one more trick we
have up Our Sleeve in order to inject a
little bit more indirect lighting into
our scene again this break physicality
but it's a really cool tip to know about
in our postprocess volume we're going to
search for
Lumen and here we've got a neat little
tip called diffuse color boost I already
set it to two but if I set it to one
you'll see our shadows are very dark
right it it's very pitch black we could
always just increase the indirect
lighting of our wck light but by
increasing the color boost here it's
going to increase the Boost of not our
light but of the albo values of our
materials so if I set it to two you'll
see we've already injected quite a bit
more indirect lighting into 2 our level
here again purely n Direction thinging
there's no right or wrong way to do it
it's just important to know which tools
are available to you so I hope that
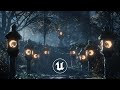
helps so now that we covered this scene
here how do you light an interior that
doesn't have any natural light and that
my friend is artificial lighting so I'm
going to hide this here and turn this on
here you'll see here we've got a
completely differently lit scene I'm not
going to go ahead and show you how to
place each individual light but really
it's about breaking down what our light
lighting is this is a really quick
reference I found from some old Museum
somewhere and notice how there is no
natural light here it's all artificial
you as a lighting artist need to break
down and ask yourself where is my
lighting coming from if I turn on my
light in my bedroom at night the light
source is your light bulb or your lamp
or whatever and that's how we need to
break it down here so I went ahead and
added some light fixtures here we need a
physical prop that is there to suggest
that hey there's lighting here this is
this is actually what is contributing to
the illumination of the scene because if
I were to hide these light fixtures here
and you just Place light something would
feel a little bit odd something feel
like something is missing right so
that's why we need not only add some
practical light props but really think
about where the lights are coming from
and then I just added some point lights
here and adjusted them to the rough
shape of my light source by increasing
the uh Source length here you can kind
of increase The Source length of any
point
light and I've just went ahead and
placed them there and again using the
exact same trick that we learned earlier
either the exposure of your post-process
volume the global exposure of your scene
or the indirect lighting intensity of
your light or the diffused color boost
of your postprocess volume right if I
want to set the two or five you'll see
we've made this scene much much brighter
not really the look and going for but
you get the idea the actual lighting
part here is not very complicated again
just to give you one more example I've
used these torch props that are on the
wall to suggest torch light and also
each point light that I placed again
it's really just a simple Point light
right here that I placed over the torch
each light that I placed also has a
volumetric scattering intensity that I
cranked way up to suggest that maybe
there's a little bit moisture in the
scene or a little bit of haze or smoke
or whatever that's really it the key to
interior lighting is just to break down
where my lighting is coming from and
understanding exposure indirect lighting
and direct lighting all right thanks so
much to Nvidia studio and scan computers
for sponsoring this video scan computers
are one of the leading resellers on
Nvidia Studio laptop and desktops in
Europe if you're looking for an Nvidia
Studio laptop then check out their range
at the link down below so thanks so much
for watching everyone I hope you found
this video helpful and as always folks
happy rendering
Full transcript without timestamps
in today's video we'll be taking a look at interior lighting combining the uses of lumen Hardware R tracing and Patch racing I'm going to show you how you can think of lighting in a way that will help you pick and choose the mood you're going for by simply lighting a couple of different lighting scenarios it will really help you break down how to light any given interior now full disclosure this video is sponsored by Nvidia studio and scan computers everything from the modeling layout lighting rendering and editing of this video had been done with the Asus zbook Pro 16 OLED laptop I don't get to keep the laptop it's being sent back and only being used for reviewing purposes just before we jump into today's tutorial I'm going to take a brief moment to talk about the hardware we're using today the Asus Zenbook Pro 16 ODed laptop runs on a beefy RTX 4070 that allows you to fully utilize Hardware rate tracing and path tracing and tensor AI cords which is going to help massively when you're rendering your shots it's got the Cuda cords you need which are needed if you plan on 3D scanning things with an app like reality capture and since it's the 40 series GPU you can benefit from dss3 which I've talked about in an earlier video right here it's got 32 gigs of RAM a core I9 processor which handles unrealed Shader compilations like an absolute champ the display on this laptop is absolutely top-notch 120 HZ with 100% DCI P3 and 100% srgb color coverage and it's OLED meaning your black that can be nice and Inky some notable quality of life features include this Nifty hinged keyboard which not only feels a lot more natural to me when I'm typing but also seem to help with the cooling and the trackpad has haptic feedback which was a nice surprise Nvidia studio is for creators but Nvidia GeForce is for gamers right down to the drivers even on my personal desktop workstations I'm always using Studio drivers just because I find them a lot more reliable than the game drivers for Creative work specifically if a laptop or desktop is NVIDIA Studio validated it means it spec and design meet the needs of a Creator you can get Nvidia Studio laptops at scan computers you can check out the link down below I thought it would would be fun to make a tutorial using a laptop for a change because a lot of people assume that the work I do in unreal can only be done on a crazy expensive workstation desktop and that's just not the case so let's get started with what you came here for lighting Interiors in Unreal Engine 5 okay so since we're getting started I just want to make sure that you all have the same project settings that I'm using I am currently using Unreal Engine 5.3 so by going to the settings up here we're going to go to Project settings we're going to scroll down to the rendering tab down here and you're going to want to make sure that support Hardware R tracing and turned on and pth tracing and turned on here as well I'm using virtual Shadow maps and make sure that used Hardware R tracing when available is turned on and it should go without saying but if you want this to work you need a GPU that is capable of rate tracing the GPU in this laptop is an RTX 470 so you're not going to have any issues with it and one last thing we're in the search panel up top we're going to search for Direct X and I believe you need to have direct de 12 enabled at least that's what I'm using and it works like a charm so here we have a scene that I made an unreal that is Loosely inspired by a scene in Game of Thrones and before we get started with the lighting let's look at the reference and try to break down where the light is coming from notice how there is no artificial lighting the only thing we're seeing is light pouring in through that doorway at the top of the stairs that is the only light source and the camera is exposing for the interior making the exterior completely Overexposed and and blown out and that is what we're going to try to mimic here now this laptop handles this scene like an absolute champ I'm blazing past 60fps without any issues and if you want to follow along with the environment in this tutorial and reverse engineer how to scene was lit you can download this project for free here on gumroad link down below just to be clear though it's not going to look exactly the same because I'm using a lot of Mega scans textures and models in this level and I'm not legally allowed to redistribute those assets but you will have something to work with and the lighting will look the same so what we're going to do now is we're going to completely kill all of our lighting and we have to create a daylight system using the environment light mixer as always so by going to the window tab up here we're going to go to the environment light mixer create Skylight atmospheric light sky atmosphere and height fog and next we're going to create a postprocess volum drag it into our scene here and make sure we set it to Unbound make sure this is checked right here you'll see this is really important for pretty much everything moving forward in this video so you'll see obviously this is very underwhelming when it comes to interior lighting indirect lighting is everything and that's the main takeaway here the easiest way is to increase the brightness of your Skylight because this is our main source of light notice in our reference we don't have any sunlight coming in there the sun is probably pointing in a totally different direction we only want Skylight coming in so we can select our Skylight and we can increase intensity scale to something ridiculous like 20 or 100 1,000 you'll see we're starting to get a little bit more lighting coming into our scene but you'll see uh you know it's not really great it's very splotchy and I think that's really just because it's a limitation of lumen right now with the Skylight it just doesn't have enough sample to work with and so when that doesn't work what's next we can increase the exposure of the scene so we're going to go to the postprocess volume and we're going to search for e and I'm going to check these three boxes here and uncheck apply physical camera exposure and we can adjust the exposure this way now again this brightens everything up but it's still pretty splotchy not really what we're going for it's not really what we want and we get this really not so great looking Blue Fog and that's because we want to make sure that we select our exponential height fog and turn on volumetric fog you'll see why does it important later now in order to give your Skylight a bit of a boost you can also increase the brightness of your directional light to something like I don't know like 800 or something and that will also help inject a lot more light because as you increase your directional light it increases the brightness of your sky as well so it kind of goes both ways honestly I think a th here is probably a bit too strong I would rather play around with the exposure later so now we are getting a bit of a better result over here but still this is not what we're going for and the reason why because the indirect lighting quality of lummen is great but Lumen just does not have enough samples to really get a high quality render from such a tiny light source coming in through that window so we need to fake it and in order to fake it we're going to go ahead and create a wrecked light over here and drag that over here and Loosely shape it to the well shape and size of our doorway here so by increasing the sord width and the sord height like that Loosely matching the size of it the Skylight does inject a little bit of indirect lighting but it's just not enough you're not getting enough consecutive bounces here so we need to inject some some direct lighting with the help of the rec light here to really get some better results okay so with our rec light we're also going to increase the attenuation radius and maybe set the value to something like 800 and now notice how we are getting a much more interesting look all because we've introduced a bit of direct lighting it's okay to fake things now I'm going to incre I can change the color a little bit make it a little bit cooler and there you have it we're already having a much Bluer look to our scene and already we are about 60% of the way there but you'll notice that the these areas here are still very black not very good looking what more can we do we don't want to increase the exposure we want to increase the indirect lighting values sometimes looming can be a little bit tricky so this is why I like using the path Tracer sometimes in order to help me figure out like hey am I actually doing things right here so by going to the lit tab here we're going to go turn on path tracing and what the path Tracer is going to do is it's going to give you a more ground shrew physically accurate lighting result based on your current lighting settings this is what your scene should look like if everything is set up correctly there should be no tremendous difference between the two they should both be pretty similar and if they're not then there's other issues we need to fix so you'll see we're missing out on a ton of indirect lighting over here it's you'll notice it's not perfectly black it's not there not black at all there so we need to go fix that somehow right we need to try and rectify this issue and how do we inject a little bit more indirect lighting into our scene we don't want to go ahead and increase the exposure again that will work but it also brightens up everything else and we don't want that all we want is to lift up those Shadows a little bit more so we're going to go ahead and click on our wck light here and we're going to scroll down to indirect lighting intensity so I'm going to bump this up to something like five to exaggerate it a little bit and you'll see hey we're starting to get a lot more indirect lighting into our scene it's all already looking a whole lot better now keep in mind this is not a physically accurate setting your changes here will not be mirrored in the path Tracer because What's Happening Here is a surface is reflecting five times more light than it is receiving which is physically impossible so use this with caution use it only more of a subtle art Direction kind of feature okay now another issue that I'm noticing is our shadows here are very harsh right again if I turn on the path Tracer um you'll notice that Shadows are very very soft here right they look really really good and I don't I'm not seeing that we're getting these really hard Shadows here something feels off and the reason for that is because of virtual Shadow Maps when it comes to very very soft Shadows you're just kind of hitting that limitation there so in order to fix that we're going to select our rec light again and we're going to search for R trace and we want to make sure we cast R Trace Shadows on and pay attention to the shear difference here no especially notice on the wall here this is before and this is after before and after the Shadows are so much softer so we're getting much much better softer Shadows here now when you need those really really soft Shadows there's no way around using Hardware Ray tracing and that is where RTX gpus come in really really handy another reason it's incredibly important to add direct lighting even your if your scene is mostly indirectly lit it's because of specular height light now pay attention right here on the pillar on the left hand side here I wanted to give it like a you know a running water kind of look like it was very damp if I hide my recck light right now and I only rely on the indirect lighting from Lumen and I'm going to go ahead and increase the exposure here just for clarity sake notice how it doesn't look wet and the reason for that at least this is my understanding Lumen indirect lighting is not going to contribute to specular highlights at least not very much you can clearly tell right here that there is just no real specular highlights we completely lost the that wetness that it had right and so that is why it's really important to inject that direct lighting to make that surface look wet now bonus tips number one if ever you notice this kind of like light bleeding in your Interiors this is actually something that's pretty common you'll notice like along the edges you just got this weird light that seem to be the Skylight that's coming through the walls you need to go ahead and add some light blockers to the exterior of your level and what I mean by this is these large white cubes right it's literally just a big white Cube that I place underneath my level to make sure that light is being blocked correctly because as we saw earlier the Skylight has some very low resolution sampling which makes it very splotchy and sometimes at least my understanding is that you just need more geometry to block that light coming in so again if I were to just lower this cube right here notice how we're getting a whole bunch of light that bleeding into our scene here just lifting this big Cube up here whoa that light's gone that is how you can fix light that's leaking into the corners of your wall it's very frustrating but fortunately with light blockers it's a very easy fix now let's say you wanted to have some light Shaft or some God Rays coming through the window you can absolutely do that too so all we need to do is grab our directional light here and rotate it so that the sun shines through the the doorway and we can angle it the way that we want to something like this and you'll see it injects quite a bit of indirect lighting into our level as well and we got these light shafts here thanks to the volumetric fog that we turned on in our exponential height fog earlier see if I turn off volumetric fog here it's going to be a totally different look and we don't get those light shafts coming through if I want to make that light shaft even stronger we can simply just increase the volumetric scattering intensity even higher so I I have already set it to 10 here by default it'll be one you might not even see it but if it increase it to like 50 100 you'll see it's a very very strong God Ray shining in our scene now and already we're getting quite a bit of indirect lighting bouncing up and lighting the rest of our scene this doesn't match the reference we were going for but I still just wanted to show you that it is something that you can do but for now I'm just going to go back bring it back up here because that's not the look I wanted every single light can had its own volumetric scattering intensity you'll see in my re light I already had it cranked up to six if you want more fog like that coming coming in which we do have in our reference here that is how you can control that bonus tip number two there's one more trick we have up Our Sleeve in order to inject a little bit more indirect lighting into our scene again this break physicality but it's a really cool tip to know about in our postprocess volume we're going to search for Lumen and here we've got a neat little tip called diffuse color boost I already set it to two but if I set it to one you'll see our shadows are very dark right it it's very pitch black we could always just increase the indirect lighting of our wck light but by increasing the color boost here it's going to increase the Boost of not our light but of the albo values of our materials so if I set it to two you'll see we've already injected quite a bit more indirect lighting into 2 our level here again purely n Direction thinging there's no right or wrong way to do it it's just important to know which tools are available to you so I hope that helps so now that we covered this scene here how do you light an interior that doesn't have any natural light and that my friend is artificial lighting so I'm going to hide this here and turn this on here you'll see here we've got a completely differently lit scene I'm not going to go ahead and show you how to place each individual light but really it's about breaking down what our light lighting is this is a really quick reference I found from some old Museum somewhere and notice how there is no natural light here it's all artificial you as a lighting artist need to break down and ask yourself where is my lighting coming from if I turn on my light in my bedroom at night the light source is your light bulb or your lamp or whatever and that's how we need to break it down here so I went ahead and added some light fixtures here we need a physical prop that is there to suggest that hey there's lighting here this is this is actually what is contributing to the illumination of the scene because if I were to hide these light fixtures here and you just Place light something would feel a little bit odd something feel like something is missing right so that's why we need not only add some practical light props but really think about where the lights are coming from and then I just added some point lights here and adjusted them to the rough shape of my light source by increasing the uh Source length here you can kind of increase The Source length of any point light and I've just went ahead and placed them there and again using the exact same trick that we learned earlier either the exposure of your post-process volume the global exposure of your scene or the indirect lighting intensity of your light or the diffused color boost of your postprocess volume right if I want to set the two or five you'll see we've made this scene much much brighter not really the look and going for but you get the idea the actual lighting part here is not very complicated again just to give you one more example I've used these torch props that are on the wall to suggest torch light and also each point light that I placed again it's really just a simple Point light right here that I placed over the torch each light that I placed also has a volumetric scattering intensity that I cranked way up to suggest that maybe there's a little bit moisture in the scene or a little bit of haze or smoke or whatever that's really it the key to interior lighting is just to break down where my lighting is coming from and understanding exposure indirect lighting and direct lighting all right thanks so much to Nvidia studio and scan computers for sponsoring this video scan computers are one of the leading resellers on Nvidia Studio laptop and desktops in Europe if you're looking for an Nvidia Studio laptop then check out their range at the link down below so thanks so much for watching everyone I hope you found this video helpful and as always folks happy rendering
Download Subtitles
These subtitles were extracted using the Free YouTube Subtitle Downloader by LunaNotes.
Download more subtitlesRelated Videos

Download Subtitles for Lighting in Unreal Engine 5 Tutorial
Enhance your understanding of lighting techniques in Unreal Engine 5 by downloading accurate subtitles for this beginner-friendly tutorial. Captions help you follow along easily and grasp complex concepts effectively.
Download Subtitles for Lighting a NIGHT-TIME Exterior in Unreal
Enhance your understanding of lighting techniques in Unreal Engine by downloading accurate subtitles for this night-time exterior tutorial. Subtitles help you follow detailed instructions and improve learning efficiency, making this video accessible for all skill levels.
Download Subtitles for The 2025 Guide to Rendering in Unreal Engine 5
Enhance your learning experience with downloadable subtitles for The 2025 Guide to Rendering in Unreal Engine 5 video. Accurate captions make it easier to follow complex rendering techniques and ensure accessibility for all viewers. Get your subtitles now to master Unreal Engine 5 effectively.

Download Subtitles for Lumen Explained - UE5 Captions
Enhance your understanding of Unreal Engine 5 with precise subtitles for the 'Lumen Explained' video. Download captions to follow important tips and insights clearly, ensuring you don't miss any detail in this essential UE5 tutorial.
Download Subtitles for How to Add Camera Shake in Unreal Engine
Enhance your learning experience by downloading accurate subtitles for the tutorial on adding camera shake in Unreal Engine. Subtitles help you follow along easily and understand key concepts without missing any details. Perfect for developers seeking clear, accessible guidance.
Most Viewed

Untertitel für 'Nicos Weg' Deutsch lernen A1 Film herunterladen
Laden Sie die Untertitel für den gesamten Film 'Nicos Weg' herunter, um Ihr Deutschlernen auf A1 Niveau zu unterstützen. Untertitel helfen Ihnen, Wortschatz und Aussprache besser zu verstehen und verbessern das Hörverständnis effektiv.
ดาวน์โหลดซับไตเติ้ล DMD LAND 3 The Final Land Day 1
ดาวน์โหลดซับไตเติ้ลสำหรับวิดีโอ DMD LAND 3 The Final Land Day 1 เพื่อช่วยให้เข้าใจเนื้อหาได้ง่ายขึ้น และเพิ่มความสะดวกในการติดตามทุกช่วงเวลา เหมาะสำหรับผู้ชมที่ต้องการความชัดเจนและเข้าถึงข้อมูลอย่างครบถ้วน

Descarga Subtítulos para NARCISISMO | 6 DE COPAS - Episodio 63
Accede fácilmente a los subtítulos del episodio 63 de '6 DE COPAS', centrado en el narcisismo. Descargar estos subtítulos te ayudará a entender mejor el contenido y mejorar la experiencia de visualización.

Subtítulos para TIPOS DE APEGO | 6 DE COPAS Episodio 56
Descarga los subtítulos para el episodio 56 de la tercera temporada de 6 DE COPAS, centrado en los tipos de apego. Mejora tu comprensión y disfruta del contenido en detalle con nuestros subtítulos precisos y accesibles.

Download Subtitles for Your Favorite Videos Easily
Enhance your video watching experience by downloading accurate subtitles and captions. Enjoy better understanding, accessibility, and language support for all your favorite videos.

If you found these subtitles useful, consider buying us a coffee. It would help us a lot!