Download Subtitles for Lighting a NIGHT-TIME Exterior in Unreal
Lighting a NIGHT-TIME exterior in Unreal
William Faucher
SRT - Most compatible format for video players (VLC, media players, video editors)
VTT - Web Video Text Tracks for HTML5 video and browsers
TXT - Plain text with timestamps for easy reading and editing
Scroll to view all subtitles
[Music]
hey everyone welcome back william
felicia here i want to preface this
video by saying that while i'll be using
unreal in this tutorial just about
everything in this video can be applied
to any renderer whether you're using
unreal yourself or blender v-ray
redshift octane
whatever it's all more or less the same
because lighting is lighting and while
there are a few
technical differences from one program
to another the fundamentals are all the
same now i get a lot of questions about
how to do nighttime lighting because
i'll admit it's tricky
but before you skip ahead to the good
stuff wait a second we need to observe
how cinematographers light their night
scenes
in actual movies i promise you this is
going to help you
bear with me
understanding how movies are lit for
night shots is essential to getting a
good result let's take a look at some
classic film shots here and break down
the lighting they used and first off
you'll notice when you look at these
you may realize that something feels a
bit off
that is not real moonlight
you can clearly tell that this is a big
bright artificial light source we can
clearly see that the light is coming
from two different directions at once
which is a telltale sign that it's not
natural light why don't they just use
moonlight the reason being is because
moonlight is way too dark sunlight is
roughly 100 000 lux in brightness
while moonlight is between 0.25 and 1
lux which means the sun is 100 to 400
000 times brighter
than moonlight
even with modern cameras with incredible
low light performance
it's just not enough light to nail a
correct exposure without getting too
much noise in the shot you're going to
need to crank up that gain or the iso to
ridiculous numbers and that's just
that's just no bueno
but secondly notice how all the shots
here are very cold or blue in color
temperature
all of them
which is funny because moonlight is
actually not blue science tells us that
moonlight is actually a bit more red
than sunlight and has a color
temperature of about 4000 kelvin which
is very warm if moonlight actually have
a warm white color to it why
do we light and grade moonlight to
appear like a cold blue tldr is called
the perkinia effect in basic terms our
eyes will shift peak luminosity toward
the blue end of the color spectrum at
low illumination levels so our eyes will
be using rods instead of cones in the
retina depending on the available light
with that knowledge why do films keep
using blue to represent nighttime shots
honestly it's probably because it's a
convention that audiences have come to
recognize
just like how 24fps feels right when you
watch a movie and
fps feel a bit weird this kind of goes
to show that art is very subjective but
to give you a visual example
here's a shot of me with a white balance
card to get a neutral white balance when
outside during a full moon
it was bright enough to see my own
shadow and if i didn't know any better
it almost looks like a lightly cloudy
day now the lighting here looks very
flat because all of that snow is acting
like a huge reflector but under normal
non-snowy conditions you would get a lot
more directionality to the moonlight but
here's another photo example and it
really does look like daylight when
exposed correctly remember moonlight is
just way too dark to shoot well exposed
clean video in so cinematographers
really need to compensate with
artificial lighting to make things feel
like they are moonlit without actually
using moonlight there are lots of ways
to fake this but using huge bright light
sources practical lights or what we call
a day for night grade which is the
process of actually shooting your
footage during the day in broad sunlight
getting the benefits of having more
light to see buy and work with and then
they color grade that footage in post to
make it look like a nighttime shot by
adjusting the highlights the exposure
and the white balance
sometimes they even go so far to add
some sky replacements in post for added
effect it's all a huge hack it's total
fakery making us believe it's a night
shot without actually needing to shoot
at night and that is what we're going to
do right now we're going to light this
shot right here entirely from scratch
right after the sponsored message
so a big thank you to skillshare for
sponsoring this video as you're all well
aware by now skillshare is an online
learning platform you can use to find
thousands of inspiring high quality
classes in order to learn any skills
you've ever dreamt of picking up need to
learn about getting started in unreal
for archbis skillshare had you covered
with yahoo justin's class on unreal
engine for architecture as a freelancer
myself i'm trying to learn more about
seo and ran fishkin's introduction to
seo strategy for entrepreneurs has
taught me just about everything i need
to know on the topic
skillshare's classes are curated they're
ad free new premium classes come out
every week and it's worth mentioning
that the entire catalog of classes now
offers subtitles in spanish french
portuguese and german so the first 1 000
of my subscribers to click the link down
below we'll get a one month free trial
so you can start learning right away on
the go
even on your phone
and now let's get started in unreal
all right so now that we're in unreal
the first thing you're going to notice
is that i'm using ue4 and there's a few
reasons i'm not using ue5 at the moment
first and foremost because foliage just
does not look quite as good in ue5 yet
so i'm sticking with ue4 right now
primarily for stability and slightly
better quality you get with foliage
assets and there's a few other reasons
as well but we'll get into that a little
bit later so you'll see here i'm pretty
much exclusively using mega scans assets
here including the trees the trees are
all the brand new mega scan tree assets
so you can recreate the scene yourself
very easily so what we're going to do
here is we're going to delete every
single light in the scene and start off
with a blank slate and just like that
you'll see we've got nothing left it's
totally dark
let's start from scratch so the first
thing i like to do before doing anything
at all is to establish a sky and in this
environment we don't really see the sky
that much but
you may want to have a starry night sky
so what we're going to do is we're going
to go to the content browser and in the
engine content folder
make sure that you have the show engine
content button turned on here we're
going to search for sky and we're going
to filter by blueprint class
and here we have the bp sky sphere we're
going to drag and drop this into our
scene like that
and you'll see
now we have a sky now this sky blueprint
has been around since the day unreal
engine 4 came out pretty much it is old
but it is pretty useful to get a kind of
a basic sky system in there if you need
it
so what we're going to do now is with
the bp sky sphere selected we're going
to go to the details panel and we're
going to adjust the sun height right
here
turn this down like that
and next let's say something like that
there we go and now we're going to
change the star's brightness right here
and crank that up a little bit and
you'll see that's a very simple and
effective way to get
stars in your sky now the texture is not
that great but you can go ahead and
change that in the material itself if
you so desire so if i go here and open
up this material instance dynamic and
open this master material
if i zoom out you'll see here
in the sky colors there's a texture here
called t underscore sky stars
and you can use any tileable star
texture that you want and replace the
default one just so you know but for now
i'm going to leave this like that
because i don't really need
any starts because i don't really need
anything better
then going back to my sequence going
back to my camera view the next step
involves creating a directional light
and the directional light is going to be
our moonlight so to speak so i'm going
to go to lights and drag and drop a
directional light in my scene like that
i got to move it closer so i can select
it more easily
and two things
make sure we set it to movable and in
the search detailed panel again i'm
going to search for atmosphere and we're
going to turn on atmosphere sunlight the
only reason i have this checked on is
because now i can use the control l
shortcut to move and rotate the
directional light and really fine tune
it the way i want it to it's really just
a handy tip that is good to know about
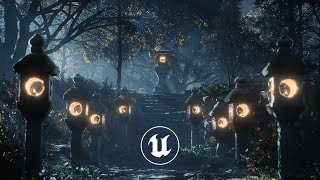
so what i want is for my moonlight so to
speak to really highlight our hero asset
and our hero prop here our main subject
is this lantern in the back over here
right so i want to make sure that my
directional light is really highlighting
the edges here i want i really want it
to give a nice rim light to it
so i'm going to fine tune it kind of
like this until it really
illuminates all of those edges because
when it comes to lighting night time
scenes
silhouette
is probably the most important thing
silhouette is what you're going to see
it's what's going to catch those edges
is what's going to make things pop and
stand out from the rest keep that in
mind because we're going to be working a
lot with silhouette and the fog and
silhouettes with rim lighting
specifically so
keep that in mind
and now i might uh increase my intensity
my sunlight to like 20 or something
just make a little bit brighter make
things pop a little bit more uh it helps
the trees get a little bit more
illuminated as well
but yeah you can play around with that
for now obviously we don't see anything
the lighting here is just it's too dark
we have some interesting silhouettes but
that's about it
the next step involves adding some fog
because the fog here especially in
unreal is really gonna help us get that
depth that we need so let's go ahead and
create that right now
we're going to go to visual effects here
exponential height fog and drag this
into our scene and just like that
we're starting to get somewhere right it
went from looking like total crap to
this in one click but first there are
some critically important things we need
to change before we move on the first of
which is changing one of your project
settings so we're going to go to the
settings tab up top here
go to project settings
and we're going to search for
fog up here
and here is where you want to have
support sky atmosphere affecting height
fog make sure this is turned on
you may have to restart unreal if you do
go ahead and do so before moving on
now once that project setting has been
changed we're going to select our
exponential high fog and go to the
details panel and we need to set the fog
and scattering color to
black and set the directional and
scattering color here to black as well
the reason we're doing that is because
exponential height fog is purely
additive and we're going to be using
volumetric fog
okay so we want to make sure that only
the volumetric fog is affecting the fog
so to speak so
the next step is to scroll down a little
bit further and turn on volumetric fog
here
now you'll see okay this looks
different not great
different
what do we need to do now the next step
is we need to select our directional
light
and go to the search details panel and
search for ray because we're going to
turn off ray tracing here for several
reasons a it's going to make our foliage
look better in our trees b ray trace
shadows don't work with volumetric fog
very well the ray shadows don't cast
shadows on volumetric fog
i did make a tutorial about this last
year but that was in 4.26 and in 4.27
that hack broke
so
unfortunately we're going to have to
turn off ray tracing for the directional
light to get our fog to shadow correctly
if you're using uv5 you don't need to
worry about this it's going to be just
fine
because fog is properly shadowed in ue5
this is purely a ue4
issue so we're going to go here and turn
off cast ray tracing shadows
and you'll see okay
this is starting to look a bit more
interesting
right now we got some fog in there we
got some fog kind of shining through we
got a bit more depth in our scene if i
toggle the fog on and off
before and after
big difference and i'm going to hide the
fog and toggle the
uh raytrace shadows pay attention to the
trees look at the difference it makes on
the leaves themselves this is with ray
tracing on
and off
on
and off so you'll see we get a little
bit more of a lush feeling with
raytracing off so this is very nice if
you don't have an rtx gpu so i'm going
to turn on the fog again
and now i in my directional light i'm
going to go ahead and boost the fog a
little bit i'm going to by increasing
the volumetric scattering intensity i'm
gonna set that to three
and now you'll see wow
boom just like that we've got
way more depth to our scene the whole
thing feels way more alive see we kind
of got these nice god rays shining
through but
if you do this in your scene you're
probably not going to get the same
result now the reason why things look so
good right now is because i carefully
laid out the scene to get this desired
effect i placed all the trees perfectly
to get the fog shining through kind of
like god raid would shine through a
window
let me get out of camera view here and
get closer to show you what i mean
notice how here i've got this nice god
ray shining through here because i
essentially made a window
right here
i placed a whole bunch of trees and a
shadow blocker up top here to fake a
window so to speak to make sure the
volumetric fog shines exactly where i
want it to
same thing over here we have an opening
here
we got the god ray shining through here
because i carefully placed a window
over here because that is where i wanted
the volumetric fog to shine through okay
so if i go back to my camera view and i
select this big shadow caster here
pay attention to what happened when i
move it
see how that look is totally different
now
if i hide this
look at the difference that makes
it is day and night so that's what i did
there is no shame in using this massive
shadow blocker to
carefully craft and shape the volumetric
fog to do whatever it is you want it to
do we are literally faking those nice
god rays to give the desired look and
that is why
using volumetric fog is so important hey
everyone future will here i just wanted
to take a moment to talk about something
about the fog that i
omitted from the original recording so
let's take a look at that right now
when we have our exponential height fog
selected in the details panel you can
control the directionality of your god
rays by using a feature called
scattering distribution which you can
find in the volumetric fog tab okay so
you'll see by default it is set to 0.2
and if i set this to 1
you'll notice that the fog
kind of disappears
but it hasn't really it just changed
functionality now pay attention to when
i moved a camera here
you'll notice
that now we've got the kind of god ray
shining through the trees like that
if i set the scattering distribution
back down to 0.2 again
you'll notice those direct god rays
completely disappear again so like the
hot tip says here the distribution value
of 0 scatters equally in all directions
while 0.9 scattered predominantly in the
light direction
so if you want to have light shaft
visible from the side it needs to be
closer to zero again because it's set to
0.2 which is close to zero you'll see we
see the god rays coming in from the side
but when you increase it closer to 0.9
like so
we get these really cool god rays
shining through the leaves of our tree
right here so there's no right or wrong
setting to use it really depends on the
art direction that you require and so
i just figured it was something really
important
to talk about especially if you're
trying to get this kind of look so with
that said let's go back to past oil so
now we already have this with literally
only the directional light and the
height fog that's it
the next step involves adding a skylight
because we need to kind of go out of
scotland to lift up these shadows a bit
because the shadows here are pitch black
there's there's no bounce light here so
the skylight's going to help us with
that so we're going to click on lights
here
add a skylight
in our scene like this
and we're going to set this light to
movable i'm going to set the sky distant
threshold to
1
and
i'm going to uncheck lower hemisphere
solid color
so now you'll see these shadows if i
hide the skylight
see that difference it makes it really
helps lift up those shadows now this is
a little bit too bright for my taste i
may actually turn that down to like .5
there we go so now we've got a pretty
decent lighting setup done
now we need to art direct it and make it
a bit more bluish because that's the art
direction i want to go for it's what
we're used to seeing in movies night
time scenes do look pretty good when
they're lit blue even though that's not
technically physically accurate so i'm
going to select my directional light
here and in the details panel we're
going to make this color a little bit
bluish
not too much be very careful not to
overdo it
but maybe something like that something
there we go
that looks pretty decent
and just like that
we're already about eighty percent of
the way done
with those reactors that's it so the
next step involves adding practical
light so a practical light is an actual
working light that appears in the scene
so it can be a household lamp a tv
car headlights and in this case it's
going to be the candles that are inside
each one of these lanterns over here so
we're going to go ahead and add a point
light
inside each of these lanterns
like this
now this is way too bright so i'm going
to turn this intensity down to
1 and i'm going to change the color to
something more orangey like that
and i'm going to change it to movable
i'm going to make sure that it is
actually inside correctly
there we go and now i'm going to go
ahead and do the same for each and every
one of these lanterns in the scene so i
will fast forward this
now just like that
adding these practical lights here
really helps these lanterns pop a little
bit it adds that extra warmth in it we
get that nice teal and orange look when
combined with the blue fog so these kind
of help add a little bit more interest
to our scene now
we are about
90 of the way there there is still one
last thing we need to do before we're
done and that's adding fill lights and
extra rim lights so these are not
exactly realistic lights these are not
something that would be physically
accurate but cinematographers add these
extra lights to these fill lights and
rim lights to accentuate the shape and
silhouette of thing because like i said
earlier
silhouette
and shape is the most important thing
when it comes to night lighting you see
here
the silhouette of the lantern the
silhouette of our hero lantern up here
the silhouette of the tree of all the
trees
this is what really stands out so we're
going to go ahead and add some extra
little fill lights and some more rim
lights to make certain things pop a
little bit more because
as you probably noticed it's going to be
really hard to get moonlight to shine
perfectly on all the things you want it
to shine on because you know trees are
in the way and then when you move one
tree
it just cast shadows in another area
that you don't want so we're going to
take a page from the cinematographer's
playbook and make our lives a little bit
easier by adding some individual smaller
local fill lights to give you a perfect
example i'm going to go ahead and add a
wrecked light right here
and move just like that
and what i want to do is i want to
just lift up the shadows on this side
because if i hide this here notice how
this entire lantern is kind of shapeless
same thing here and here
all of these lanterns kind of feel a
little bit shapeless because they're in
the shadow and there's fog we're going
to help our scene out by adding some
local light so this here obviously way
too bright set this to movable
and turn this down to
1 2.5 something like that and make this
blue
a little bit more blue it so it matches
the ambient lighting
right
return
and so now just this extra little light
here really helps make this lantern
stand out a little bit now i'm also
don't want this light to affect
everything within its attenuation radius
so in the details panel i'm going to
turn the attenuation radius down to 500
300 maybe there we go so it doesn't
affect the other lanterns here so now
i'm going to duplicate the direct light
and i'm going to move it back
to do the same thing on this lantern
here
so notice here how this lantern kind of
disappears into mush like it did you you
don't see the shape of it very well the
only way to fix that is by
adding an extra rect light here and this
really suddenly makes it
pop a little bit better
so i'm going to turn the brightness down
to like point two point three just
something just a little hint of light to
make the shape stand out
i'm going to duplicate this again
and bring this back
to light
this lantern over here as well
because like i said unreal engine 4
doesn't have good indirect lighting you
would have it in ue5 with lumen but
we don't have that here so we have to
fake it somehow so again to show you if
i select my three rex lights and hide
them
see that difference it makes see how it
just helps those lanterns pop a little
bit
that is what we're doing here
i also want to add a bit of a rim light
over here on this side of the lantern
because i would like to suggest that the
light is shining down on it from this
side so
i'm going to grab the direct light
duplicate it move it over here
rotate it like that
just down a little bit maybe
like that
and
you'll see before and after before and
after just that subtle rim light helps
make it pop
a little bit more i'm gonna do the same
thing for this lantern over here because
there is sky's light shining down from
this side it won't be a strong rim light
but just something to make this edge pop
a little bit i'm just going to duplicate
this wrecked light
bring it over here
and
move it like so just a tiny tiny rim
light
like that maybe not very bright 10 maybe
so this is no rim light
and it's just a tiny little bit now
this brings me to my next point and a
very important tool that unreal has
and that's lighting channels
you'll see here this wrecked light is
affecting
both the lantern and the tree here i
don't want the red light to affect the
tree so i'm going to use lighting
channels to make that light only affect
this lantern
so we're going to select this light here
i'm going to go to the details panel and
i'm going to search for
channel
and you'll see here i'm going to uncheck
channel 0
suddenly it doesn't affect the tree
anymore but it doesn't affect the
lantern either
i'm going to turn on channel 1
and now i'm going to select this lantern
and make sure that it also has channel
one enabled
and now
you'll see it gets that rib light
but this light is no longer affecting
anything else in the scene
see only this lamp
and that's what we want this is a super
handy tool for adding rim lights to
objects without having those lights
affect anything else in our scene be
aware however that lighting channels
don't work with lumen and ue5 so now i'm
going to go do the same thing over here
on this light here
and one thing i like to do as well is
fake
some indirect lighting over here you'll
see here we got the moonlight strong
moonlight hitting the ground right here
and in real life it would bounce up and
illuminate both of these lanterns here
so
we're going to go ahead and add
erect light to do just that
something like that you'll see just to
kind of lift up those blacks a little
bit
so really we just want to add a whole
bunch of wrecked lights in our scene to
help these lanterns pop a little bit and
i know what you're thinking this is not
performance friendly this is probably
not the best thing to do if you're
making a game but in my case i'm just
trying to make a nice looking shot so i
don't care about how many lights i have
the reason i'm doing this is because a
unreal engine 4 doesn't really have good
indirect lighting solutions so we have
to fake it and wrecked lights are a
fantastic way to do that b
like i said earlier we're taking a page
from the cinematographer's playbook and
we're faking rim lights lighting
nighttime exteriors for a movie is a
huge hack it's all faked anyway so now
we only have one last thing to do and
that's doing the same thing we did here
to our main
hero lantern in the back so i'm going to
go ahead and grab one of these rect
lights
i'm going to duplicate it and i got to
move it all the way back over there
now i need to make sure that it's
rotated upwards like this and the reason
i'm doing this is because you'll see we
do have some strong moonlight shining
here so we would absolutely have some
indirect lighting shining here and
lighting up the underside of this
lantern so i gotta fake it with another
wrecked light
like that maybe and you'll see already
it's kind of an interesting rim light
here now obviously that was way too
bright but i think you're starting to
get the idea or blue there we go
and just like that we kind of
highlighted the side of our lantern here
which kind of helps it make it pop a
little bit more and that's it that's
really all you need to do to get a
decent looking nighttime shot let's
break this down one more time just so
you have a bit of a refresher so so
we're gonna hide these and hide these so
we started off with absolutely nothing
more than just a starry sky added a
directional light to simulate our
moonlights then we added the volumetric
fog which honestly took us 80 of the way
there
like i said earlier shaping that
volumetric fog with other huge
props like this in the scene is key to
getting a very moody atmosphere right
then we went ahead and lifted the
shadows a little bit with our skylight
like that then
we added some local practical lights
like this just to help simulate that
candlelight a bit and lastly we added a
whole bunch of fill lights and rim
lights to our scene to make some of
these lanterns stand out so this is
before
and this is after before and after now
again this is pretty subjective there's
no right or wrong answer here you're
going to have to be the judge and you're
going to have to art direct your scene
so you may actually prefer it the before
version
and that's okay i just wanted to take
the time to show you that it is a
entirely viable approach to just add a
whole bunch a smaller light like this to
fake the directionality of the light
fake the indirect lighting and fake the
rim lighting as well now the last thing
i would do here is render this shot out
using the movie render queue which i
have tutorial for right here
and from there
i would just color grade this a little
bit in davinci resolve now i do have a
tutorial on color grading and davinci
resolve coming soon so be sure you
subscribe so you don't miss it because
at the end of the day the only thing
that matters is the end result if your
shot looks gorgeous the client is happy
you're good to go and that is how you
can go ahead and light a nighttime shot
yourself pretty easily
and guys thank you so much for watching
i hope you found this video helpful if
you did do consider subscribing and
leaving a comment down below and as
always
happy rendering
Full transcript without timestamps
[Music] hey everyone welcome back william felicia here i want to preface this video by saying that while i'll be using unreal in this tutorial just about everything in this video can be applied to any renderer whether you're using unreal yourself or blender v-ray redshift octane whatever it's all more or less the same because lighting is lighting and while there are a few technical differences from one program to another the fundamentals are all the same now i get a lot of questions about how to do nighttime lighting because i'll admit it's tricky but before you skip ahead to the good stuff wait a second we need to observe how cinematographers light their night scenes in actual movies i promise you this is going to help you bear with me understanding how movies are lit for night shots is essential to getting a good result let's take a look at some classic film shots here and break down the lighting they used and first off you'll notice when you look at these you may realize that something feels a bit off that is not real moonlight you can clearly tell that this is a big bright artificial light source we can clearly see that the light is coming from two different directions at once which is a telltale sign that it's not natural light why don't they just use moonlight the reason being is because moonlight is way too dark sunlight is roughly 100 000 lux in brightness while moonlight is between 0.25 and 1 lux which means the sun is 100 to 400 000 times brighter than moonlight even with modern cameras with incredible low light performance it's just not enough light to nail a correct exposure without getting too much noise in the shot you're going to need to crank up that gain or the iso to ridiculous numbers and that's just that's just no bueno but secondly notice how all the shots here are very cold or blue in color temperature all of them which is funny because moonlight is actually not blue science tells us that moonlight is actually a bit more red than sunlight and has a color temperature of about 4000 kelvin which is very warm if moonlight actually have a warm white color to it why do we light and grade moonlight to appear like a cold blue tldr is called the perkinia effect in basic terms our eyes will shift peak luminosity toward the blue end of the color spectrum at low illumination levels so our eyes will be using rods instead of cones in the retina depending on the available light with that knowledge why do films keep using blue to represent nighttime shots honestly it's probably because it's a convention that audiences have come to recognize just like how 24fps feels right when you watch a movie and fps feel a bit weird this kind of goes to show that art is very subjective but to give you a visual example here's a shot of me with a white balance card to get a neutral white balance when outside during a full moon it was bright enough to see my own shadow and if i didn't know any better it almost looks like a lightly cloudy day now the lighting here looks very flat because all of that snow is acting like a huge reflector but under normal non-snowy conditions you would get a lot more directionality to the moonlight but here's another photo example and it really does look like daylight when exposed correctly remember moonlight is just way too dark to shoot well exposed clean video in so cinematographers really need to compensate with artificial lighting to make things feel like they are moonlit without actually using moonlight there are lots of ways to fake this but using huge bright light sources practical lights or what we call a day for night grade which is the process of actually shooting your footage during the day in broad sunlight getting the benefits of having more light to see buy and work with and then they color grade that footage in post to make it look like a nighttime shot by adjusting the highlights the exposure and the white balance sometimes they even go so far to add some sky replacements in post for added effect it's all a huge hack it's total fakery making us believe it's a night shot without actually needing to shoot at night and that is what we're going to do right now we're going to light this shot right here entirely from scratch right after the sponsored message so a big thank you to skillshare for sponsoring this video as you're all well aware by now skillshare is an online learning platform you can use to find thousands of inspiring high quality classes in order to learn any skills you've ever dreamt of picking up need to learn about getting started in unreal for archbis skillshare had you covered with yahoo justin's class on unreal engine for architecture as a freelancer myself i'm trying to learn more about seo and ran fishkin's introduction to seo strategy for entrepreneurs has taught me just about everything i need to know on the topic skillshare's classes are curated they're ad free new premium classes come out every week and it's worth mentioning that the entire catalog of classes now offers subtitles in spanish french portuguese and german so the first 1 000 of my subscribers to click the link down below we'll get a one month free trial so you can start learning right away on the go even on your phone and now let's get started in unreal all right so now that we're in unreal the first thing you're going to notice is that i'm using ue4 and there's a few reasons i'm not using ue5 at the moment first and foremost because foliage just does not look quite as good in ue5 yet so i'm sticking with ue4 right now primarily for stability and slightly better quality you get with foliage assets and there's a few other reasons as well but we'll get into that a little bit later so you'll see here i'm pretty much exclusively using mega scans assets here including the trees the trees are all the brand new mega scan tree assets so you can recreate the scene yourself very easily so what we're going to do here is we're going to delete every single light in the scene and start off with a blank slate and just like that you'll see we've got nothing left it's totally dark let's start from scratch so the first thing i like to do before doing anything at all is to establish a sky and in this environment we don't really see the sky that much but you may want to have a starry night sky so what we're going to do is we're going to go to the content browser and in the engine content folder make sure that you have the show engine content button turned on here we're going to search for sky and we're going to filter by blueprint class and here we have the bp sky sphere we're going to drag and drop this into our scene like that and you'll see now we have a sky now this sky blueprint has been around since the day unreal engine 4 came out pretty much it is old but it is pretty useful to get a kind of a basic sky system in there if you need it so what we're going to do now is with the bp sky sphere selected we're going to go to the details panel and we're going to adjust the sun height right here turn this down like that and next let's say something like that there we go and now we're going to change the star's brightness right here and crank that up a little bit and you'll see that's a very simple and effective way to get stars in your sky now the texture is not that great but you can go ahead and change that in the material itself if you so desire so if i go here and open up this material instance dynamic and open this master material if i zoom out you'll see here in the sky colors there's a texture here called t underscore sky stars and you can use any tileable star texture that you want and replace the default one just so you know but for now i'm going to leave this like that because i don't really need any starts because i don't really need anything better then going back to my sequence going back to my camera view the next step involves creating a directional light and the directional light is going to be our moonlight so to speak so i'm going to go to lights and drag and drop a directional light in my scene like that i got to move it closer so i can select it more easily and two things make sure we set it to movable and in the search detailed panel again i'm going to search for atmosphere and we're going to turn on atmosphere sunlight the only reason i have this checked on is because now i can use the control l shortcut to move and rotate the directional light and really fine tune it the way i want it to it's really just a handy tip that is good to know about so what i want is for my moonlight so to speak to really highlight our hero asset and our hero prop here our main subject is this lantern in the back over here right so i want to make sure that my directional light is really highlighting the edges here i want i really want it to give a nice rim light to it so i'm going to fine tune it kind of like this until it really illuminates all of those edges because when it comes to lighting night time scenes silhouette is probably the most important thing silhouette is what you're going to see it's what's going to catch those edges is what's going to make things pop and stand out from the rest keep that in mind because we're going to be working a lot with silhouette and the fog and silhouettes with rim lighting specifically so keep that in mind and now i might uh increase my intensity my sunlight to like 20 or something just make a little bit brighter make things pop a little bit more uh it helps the trees get a little bit more illuminated as well but yeah you can play around with that for now obviously we don't see anything the lighting here is just it's too dark we have some interesting silhouettes but that's about it the next step involves adding some fog because the fog here especially in unreal is really gonna help us get that depth that we need so let's go ahead and create that right now we're going to go to visual effects here exponential height fog and drag this into our scene and just like that we're starting to get somewhere right it went from looking like total crap to this in one click but first there are some critically important things we need to change before we move on the first of which is changing one of your project settings so we're going to go to the settings tab up top here go to project settings and we're going to search for fog up here and here is where you want to have support sky atmosphere affecting height fog make sure this is turned on you may have to restart unreal if you do go ahead and do so before moving on now once that project setting has been changed we're going to select our exponential high fog and go to the details panel and we need to set the fog and scattering color to black and set the directional and scattering color here to black as well the reason we're doing that is because exponential height fog is purely additive and we're going to be using volumetric fog okay so we want to make sure that only the volumetric fog is affecting the fog so to speak so the next step is to scroll down a little bit further and turn on volumetric fog here now you'll see okay this looks different not great different what do we need to do now the next step is we need to select our directional light and go to the search details panel and search for ray because we're going to turn off ray tracing here for several reasons a it's going to make our foliage look better in our trees b ray trace shadows don't work with volumetric fog very well the ray shadows don't cast shadows on volumetric fog i did make a tutorial about this last year but that was in 4.26 and in 4.27 that hack broke so unfortunately we're going to have to turn off ray tracing for the directional light to get our fog to shadow correctly if you're using uv5 you don't need to worry about this it's going to be just fine because fog is properly shadowed in ue5 this is purely a ue4 issue so we're going to go here and turn off cast ray tracing shadows and you'll see okay this is starting to look a bit more interesting right now we got some fog in there we got some fog kind of shining through we got a bit more depth in our scene if i toggle the fog on and off before and after big difference and i'm going to hide the fog and toggle the uh raytrace shadows pay attention to the trees look at the difference it makes on the leaves themselves this is with ray tracing on and off on and off so you'll see we get a little bit more of a lush feeling with raytracing off so this is very nice if you don't have an rtx gpu so i'm going to turn on the fog again and now i in my directional light i'm going to go ahead and boost the fog a little bit i'm going to by increasing the volumetric scattering intensity i'm gonna set that to three and now you'll see wow boom just like that we've got way more depth to our scene the whole thing feels way more alive see we kind of got these nice god rays shining through but if you do this in your scene you're probably not going to get the same result now the reason why things look so good right now is because i carefully laid out the scene to get this desired effect i placed all the trees perfectly to get the fog shining through kind of like god raid would shine through a window let me get out of camera view here and get closer to show you what i mean notice how here i've got this nice god ray shining through here because i essentially made a window right here i placed a whole bunch of trees and a shadow blocker up top here to fake a window so to speak to make sure the volumetric fog shines exactly where i want it to same thing over here we have an opening here we got the god ray shining through here because i carefully placed a window over here because that is where i wanted the volumetric fog to shine through okay so if i go back to my camera view and i select this big shadow caster here pay attention to what happened when i move it see how that look is totally different now if i hide this look at the difference that makes it is day and night so that's what i did there is no shame in using this massive shadow blocker to carefully craft and shape the volumetric fog to do whatever it is you want it to do we are literally faking those nice god rays to give the desired look and that is why using volumetric fog is so important hey everyone future will here i just wanted to take a moment to talk about something about the fog that i omitted from the original recording so let's take a look at that right now when we have our exponential height fog selected in the details panel you can control the directionality of your god rays by using a feature called scattering distribution which you can find in the volumetric fog tab okay so you'll see by default it is set to 0.2 and if i set this to 1 you'll notice that the fog kind of disappears but it hasn't really it just changed functionality now pay attention to when i moved a camera here you'll notice that now we've got the kind of god ray shining through the trees like that if i set the scattering distribution back down to 0.2 again you'll notice those direct god rays completely disappear again so like the hot tip says here the distribution value of 0 scatters equally in all directions while 0.9 scattered predominantly in the light direction so if you want to have light shaft visible from the side it needs to be closer to zero again because it's set to 0.2 which is close to zero you'll see we see the god rays coming in from the side but when you increase it closer to 0.9 like so we get these really cool god rays shining through the leaves of our tree right here so there's no right or wrong setting to use it really depends on the art direction that you require and so i just figured it was something really important to talk about especially if you're trying to get this kind of look so with that said let's go back to past oil so now we already have this with literally only the directional light and the height fog that's it the next step involves adding a skylight because we need to kind of go out of scotland to lift up these shadows a bit because the shadows here are pitch black there's there's no bounce light here so the skylight's going to help us with that so we're going to click on lights here add a skylight in our scene like this and we're going to set this light to movable i'm going to set the sky distant threshold to 1 and i'm going to uncheck lower hemisphere solid color so now you'll see these shadows if i hide the skylight see that difference it makes it really helps lift up those shadows now this is a little bit too bright for my taste i may actually turn that down to like .5 there we go so now we've got a pretty decent lighting setup done now we need to art direct it and make it a bit more bluish because that's the art direction i want to go for it's what we're used to seeing in movies night time scenes do look pretty good when they're lit blue even though that's not technically physically accurate so i'm going to select my directional light here and in the details panel we're going to make this color a little bit bluish not too much be very careful not to overdo it but maybe something like that something there we go that looks pretty decent and just like that we're already about eighty percent of the way done with those reactors that's it so the next step involves adding practical light so a practical light is an actual working light that appears in the scene so it can be a household lamp a tv car headlights and in this case it's going to be the candles that are inside each one of these lanterns over here so we're going to go ahead and add a point light inside each of these lanterns like this now this is way too bright so i'm going to turn this intensity down to 1 and i'm going to change the color to something more orangey like that and i'm going to change it to movable i'm going to make sure that it is actually inside correctly there we go and now i'm going to go ahead and do the same for each and every one of these lanterns in the scene so i will fast forward this now just like that adding these practical lights here really helps these lanterns pop a little bit it adds that extra warmth in it we get that nice teal and orange look when combined with the blue fog so these kind of help add a little bit more interest to our scene now we are about 90 of the way there there is still one last thing we need to do before we're done and that's adding fill lights and extra rim lights so these are not exactly realistic lights these are not something that would be physically accurate but cinematographers add these extra lights to these fill lights and rim lights to accentuate the shape and silhouette of thing because like i said earlier silhouette and shape is the most important thing when it comes to night lighting you see here the silhouette of the lantern the silhouette of our hero lantern up here the silhouette of the tree of all the trees this is what really stands out so we're going to go ahead and add some extra little fill lights and some more rim lights to make certain things pop a little bit more because as you probably noticed it's going to be really hard to get moonlight to shine perfectly on all the things you want it to shine on because you know trees are in the way and then when you move one tree it just cast shadows in another area that you don't want so we're going to take a page from the cinematographer's playbook and make our lives a little bit easier by adding some individual smaller local fill lights to give you a perfect example i'm going to go ahead and add a wrecked light right here and move just like that and what i want to do is i want to just lift up the shadows on this side because if i hide this here notice how this entire lantern is kind of shapeless same thing here and here all of these lanterns kind of feel a little bit shapeless because they're in the shadow and there's fog we're going to help our scene out by adding some local light so this here obviously way too bright set this to movable and turn this down to 1 2.5 something like that and make this blue a little bit more blue it so it matches the ambient lighting right return and so now just this extra little light here really helps make this lantern stand out a little bit now i'm also don't want this light to affect everything within its attenuation radius so in the details panel i'm going to turn the attenuation radius down to 500 300 maybe there we go so it doesn't affect the other lanterns here so now i'm going to duplicate the direct light and i'm going to move it back to do the same thing on this lantern here so notice here how this lantern kind of disappears into mush like it did you you don't see the shape of it very well the only way to fix that is by adding an extra rect light here and this really suddenly makes it pop a little bit better so i'm going to turn the brightness down to like point two point three just something just a little hint of light to make the shape stand out i'm going to duplicate this again and bring this back to light this lantern over here as well because like i said unreal engine 4 doesn't have good indirect lighting you would have it in ue5 with lumen but we don't have that here so we have to fake it somehow so again to show you if i select my three rex lights and hide them see that difference it makes see how it just helps those lanterns pop a little bit that is what we're doing here i also want to add a bit of a rim light over here on this side of the lantern because i would like to suggest that the light is shining down on it from this side so i'm going to grab the direct light duplicate it move it over here rotate it like that just down a little bit maybe like that and you'll see before and after before and after just that subtle rim light helps make it pop a little bit more i'm gonna do the same thing for this lantern over here because there is sky's light shining down from this side it won't be a strong rim light but just something to make this edge pop a little bit i'm just going to duplicate this wrecked light bring it over here and move it like so just a tiny tiny rim light like that maybe not very bright 10 maybe so this is no rim light and it's just a tiny little bit now this brings me to my next point and a very important tool that unreal has and that's lighting channels you'll see here this wrecked light is affecting both the lantern and the tree here i don't want the red light to affect the tree so i'm going to use lighting channels to make that light only affect this lantern so we're going to select this light here i'm going to go to the details panel and i'm going to search for channel and you'll see here i'm going to uncheck channel 0 suddenly it doesn't affect the tree anymore but it doesn't affect the lantern either i'm going to turn on channel 1 and now i'm going to select this lantern and make sure that it also has channel one enabled and now you'll see it gets that rib light but this light is no longer affecting anything else in the scene see only this lamp and that's what we want this is a super handy tool for adding rim lights to objects without having those lights affect anything else in our scene be aware however that lighting channels don't work with lumen and ue5 so now i'm going to go do the same thing over here on this light here and one thing i like to do as well is fake some indirect lighting over here you'll see here we got the moonlight strong moonlight hitting the ground right here and in real life it would bounce up and illuminate both of these lanterns here so we're going to go ahead and add erect light to do just that something like that you'll see just to kind of lift up those blacks a little bit so really we just want to add a whole bunch of wrecked lights in our scene to help these lanterns pop a little bit and i know what you're thinking this is not performance friendly this is probably not the best thing to do if you're making a game but in my case i'm just trying to make a nice looking shot so i don't care about how many lights i have the reason i'm doing this is because a unreal engine 4 doesn't really have good indirect lighting solutions so we have to fake it and wrecked lights are a fantastic way to do that b like i said earlier we're taking a page from the cinematographer's playbook and we're faking rim lights lighting nighttime exteriors for a movie is a huge hack it's all faked anyway so now we only have one last thing to do and that's doing the same thing we did here to our main hero lantern in the back so i'm going to go ahead and grab one of these rect lights i'm going to duplicate it and i got to move it all the way back over there now i need to make sure that it's rotated upwards like this and the reason i'm doing this is because you'll see we do have some strong moonlight shining here so we would absolutely have some indirect lighting shining here and lighting up the underside of this lantern so i gotta fake it with another wrecked light like that maybe and you'll see already it's kind of an interesting rim light here now obviously that was way too bright but i think you're starting to get the idea or blue there we go and just like that we kind of highlighted the side of our lantern here which kind of helps it make it pop a little bit more and that's it that's really all you need to do to get a decent looking nighttime shot let's break this down one more time just so you have a bit of a refresher so so we're gonna hide these and hide these so we started off with absolutely nothing more than just a starry sky added a directional light to simulate our moonlights then we added the volumetric fog which honestly took us 80 of the way there like i said earlier shaping that volumetric fog with other huge props like this in the scene is key to getting a very moody atmosphere right then we went ahead and lifted the shadows a little bit with our skylight like that then we added some local practical lights like this just to help simulate that candlelight a bit and lastly we added a whole bunch of fill lights and rim lights to our scene to make some of these lanterns stand out so this is before and this is after before and after now again this is pretty subjective there's no right or wrong answer here you're going to have to be the judge and you're going to have to art direct your scene so you may actually prefer it the before version and that's okay i just wanted to take the time to show you that it is a entirely viable approach to just add a whole bunch a smaller light like this to fake the directionality of the light fake the indirect lighting and fake the rim lighting as well now the last thing i would do here is render this shot out using the movie render queue which i have tutorial for right here and from there i would just color grade this a little bit in davinci resolve now i do have a tutorial on color grading and davinci resolve coming soon so be sure you subscribe so you don't miss it because at the end of the day the only thing that matters is the end result if your shot looks gorgeous the client is happy you're good to go and that is how you can go ahead and light a nighttime shot yourself pretty easily and guys thank you so much for watching i hope you found this video helpful if you did do consider subscribing and leaving a comment down below and as always happy rendering
Download Subtitles
These subtitles were extracted using the Free YouTube Subtitle Downloader by LunaNotes.
Download more subtitlesRelated Videos

Download Subtitles for Lighting in Unreal Engine 5 Tutorial
Enhance your understanding of lighting techniques in Unreal Engine 5 by downloading accurate subtitles for this beginner-friendly tutorial. Captions help you follow along easily and grasp complex concepts effectively.

Download Subtitles for Lighting Interiors in Unreal Engine 5
Enhance your learning experience by downloading accurate subtitles for the Lighting Interiors in Unreal Engine 5 tutorial. Captions help you follow along with detailed lighting techniques and improve comprehension, making complex concepts easier to grasp. Get your subtitles now for more effective and accessible video content.

Download Subtitles for Lumen Explained - UE5 Captions
Enhance your understanding of Unreal Engine 5 with precise subtitles for the 'Lumen Explained' video. Download captions to follow important tips and insights clearly, ensuring you don't miss any detail in this essential UE5 tutorial.
Download Subtitles for The 2025 Guide to Rendering in Unreal Engine 5
Enhance your learning experience with downloadable subtitles for The 2025 Guide to Rendering in Unreal Engine 5 video. Accurate captions make it easier to follow complex rendering techniques and ensure accessibility for all viewers. Get your subtitles now to master Unreal Engine 5 effectively.
Download Subtitles for How to Add Camera Shake in Unreal Engine
Enhance your learning experience by downloading accurate subtitles for the tutorial on adding camera shake in Unreal Engine. Subtitles help you follow along easily and understand key concepts without missing any details. Perfect for developers seeking clear, accessible guidance.
Most Viewed

Untertitel für 'Nicos Weg' Deutsch lernen A1 Film herunterladen
Laden Sie die Untertitel für den gesamten Film 'Nicos Weg' herunter, um Ihr Deutschlernen auf A1 Niveau zu unterstützen. Untertitel helfen Ihnen, Wortschatz und Aussprache besser zu verstehen und verbessern das Hörverständnis effektiv.
ดาวน์โหลดซับไตเติ้ล DMD LAND 3 The Final Land Day 1
ดาวน์โหลดซับไตเติ้ลสำหรับวิดีโอ DMD LAND 3 The Final Land Day 1 เพื่อช่วยให้เข้าใจเนื้อหาได้ง่ายขึ้น และเพิ่มความสะดวกในการติดตามทุกช่วงเวลา เหมาะสำหรับผู้ชมที่ต้องการความชัดเจนและเข้าถึงข้อมูลอย่างครบถ้วน

Descarga Subtítulos para NARCISISMO | 6 DE COPAS - Episodio 63
Accede fácilmente a los subtítulos del episodio 63 de '6 DE COPAS', centrado en el narcisismo. Descargar estos subtítulos te ayudará a entender mejor el contenido y mejorar la experiencia de visualización.

Subtítulos para TIPOS DE APEGO | 6 DE COPAS Episodio 56
Descarga los subtítulos para el episodio 56 de la tercera temporada de 6 DE COPAS, centrado en los tipos de apego. Mejora tu comprensión y disfruta del contenido en detalle con nuestros subtítulos precisos y accesibles.

Download Subtitles for Your Favorite Videos Easily
Enhance your video watching experience by downloading accurate subtitles and captions. Enjoy better understanding, accessibility, and language support for all your favorite videos.

If you found these subtitles useful, consider buying us a coffee. It would help us a lot!