Download Subtitles for The Easiest Way to Scatter Plants Video
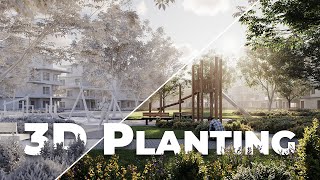
The Easiest Way to Scatter Plants In 3ds Max & Corona or V-Ray
Arch Viz Artist
SRT - Most compatible format for video players (VLC, media players, video editors)
VTT - Web Video Text Tracks for HTML5 video and browsers
TXT - Plain text with timestamps for easy reading and editing
Scroll to view all subtitles
Hi guys, today I will show you the easiest method to scatter plants and grass.
My math teacher used to say it all the time - do not shoot fly with a cannon.
The easiest solutions are often the best.
Let’s start with the grass.
All the models come from the sponsor of this video - Globe Plants - more on them later!
The process is exactly the same in V-Ray and Corona.
We will be using Chaos Scatter, as all of you got this plugin because it comes with
Corona and V-Ray license.
This tutorial comes from our new visualization course for beginner and intermediate artists,
click the link below, if you want to check it out.
I will name it Grass, so the scene is nice and clean.
I just have to pick the surface here.
And here I have to add the models.
Let’s see how it looks on render.
Super excited news!
The results of AVA AWARDS 2023 are published.
Check out the winners, link in the description.
Not enough.
We need to increase density.
Let’s open the scattering and surface scattering tabs.
We have 2 options, we have to pay attention to - max limit and count.
If the count is larger than the max limit, we will end up with the number set in the
max limit box.
Otherwise, the count controls the number of objects.
Let’s increase this number.
Looking good, the grass is too large though.
Let’s open the transformations tab to edit the scale.
Additionally, I will randomize the scale so the models vary.
Let’s try from 20 to 40 percent.
20 is too small, let’s do 30.
Great, we have to increase density again.
I will add a couple of 0 to the max limit in case it’s too small.
Awesome, looking great, I really like these patches of old grass.
Let me show you how to clean up the edges.
Select the grass models and open the material editor.
Right-click on scene material rollout and check the filter selected object option.
This way it will show only the materials of the selected models.
Drag and drop the material to the editor.
Next, we have to add the ChaosScatterEdgeTrimming map.
All we have to do is to plug it into the opacity slot of each material.
The second material has the opacity map slot used, I will show you what to do with this
in a minute.
Let’s plug the map into other materials first.
Let’s go back to the second material, we simply have to plug the scatter map between
the opacity texture and the material.
And that’s it, nice and clean!
This tutorial is a part of our new Visualization Training, link in the description.
Next, let’s move to planting.
I will put the grass on a layer and turn it off.
Next, let’s create another chaos scatter.
First, let’s add the plant models you want to include in the object rollout.
As I mentioned before, all the models come from Globe Plants.
GlobePlants models are not only very detailed and photorealistic but also have really well-done
materials which is even more important.
You can buy individual models or bundles.
It’s very convenient, you can for example choose bundles by the geographical area your
project is located or by the type of plants you need for the project.
They create exact plant species, one of the plants I used in this scene is called Mimulus
gracilis**.**
And Globe Plants were so kind to provide plant models for the students of our Visualization
Training which this scene comes from.
If you cannot find the model you need, don’t worry, just email them and they will custom-make
it for you ;)
The link is in the corner if you are interested.
Le’s go back to the 3ds Max.
Then just pick where you want to have your plants distributed.
I will pick my ground.
Of course, I don’t want to have the whole lawn to be covered with planting.
I will draw the splines in the places where I want my plants.
I will make it larger than a lawn.
If the lines overlap with the lawn, some spaces could be empty because the models don’t
fit.
As a result, parts of the grass could be visible.
Let’s turn off the “Start New Spline” option, this way we will get just one object
at the end.
I will draw other splines.
I made the recording faster.
And that’s it, we have to attach the first 2 splines we draw before the option “Start
New Spline” was on.
I will edit this spline a bit.
That’s fine for now.
I will go back to the Scatter object, and go to the Areas rollout.
Here let’s pick our spline in the include section - this way plants will still be on
the surface we’ve picked earlier but only inside the spline.
In the same way, you can exclude objects if needed.
Let’s see how it looks rendered.
Again, not enough models, let’s increase the count.
Awesome.
Now all the models are in equal proportion, we can change that using the frequency value.
The default is 1.
If we lower it there will be fewer instances of this model inside the scatter.
Next, I will go to transformations, and randomize scale.
Models are too big in my opinion, so I will make the scale lower than 100%.
I will also randomize translation, so the planting seems more randomly distributed.
As we lowered the scale, the planting become less dense, let’s increase the count to
fix this.
Great, now let’s adjust the spline.
We can go back to the spline any time and change the scatter’s area.
I will adjust it to the camera view.
It’s worth spending more time on these small details.
Think about objects that are ahead and behind the planting, what you want to show, and perhaps
what can be a bit hidden creating the layering effect.
It all matters, these small adjustments change the composition and the way how the image
is perceived.
Looking good.
Let’s go back to the scatter object.
I will enable the camera clipping option.
This way the objects which are not visible in the camera won’t be rendered.
Then, let’s go back to the count and adjust the number of plantings again.
I will make the plants slightly smaller.
And finally, I will decrease the count slightly.
Great.
Scatter is done, next, I will set up plants in the foreground.
In this case when I do a small patch of plants in the foreground I often do it manually to
have more control.
Let’s start by converting the models to proxies to keep the scene nice and light.
I will choose Full Mesh as I want to see the plants in the viewport to be able to quickly
place them.
I will start placing the plants.
The main reason I place the plants here is to crop the image which will help a lot with
the composition of this shot.
This technique helps to draw viewers’ attention toward the center of the image.
I want to have the plants slightly protruding at the front, to give more context, and the
feeling that we are in the beautiful park.
When you copy proxies remember to use the instance option, so the objects are loaded
once.
It’s also important to use the rotate and scale tools to avoid repetition when using
the same model more than once, in nature you cannot find two identical plants.
The more variety of plants you will have, the more realistic effect you will get.
I always try to spend a bit more time adjusting manually the foreground objects as they influence
the composition significantly.
And because they are very close to the camera, high-quality models are a must in this case.
For this reason, I highly recommend you check the GlobePlants website and play around with
their models.
And here it is, just as I told you in the beginning that method is super easy.
Now, you will be able to easily create such planting in your projects.
If you want to learn all about visualizations in 3ds Max, Corona & V-Ray join our brand
new, updated visualization course, also you might be interested in these 2 videos.
Bye, bye.
Full transcript without timestamps
Hi guys, today I will show you the easiest method to scatter plants and grass. My math teacher used to say it all the time - do not shoot fly with a cannon. The easiest solutions are often the best. Let’s start with the grass. All the models come from the sponsor of this video - Globe Plants - more on them later! The process is exactly the same in V-Ray and Corona. We will be using Chaos Scatter, as all of you got this plugin because it comes with Corona and V-Ray license. This tutorial comes from our new visualization course for beginner and intermediate artists, click the link below, if you want to check it out. I will name it Grass, so the scene is nice and clean. I just have to pick the surface here. And here I have to add the models. Let’s see how it looks on render. Super excited news! The results of AVA AWARDS 2023 are published. Check out the winners, link in the description. Not enough. We need to increase density. Let’s open the scattering and surface scattering tabs. We have 2 options, we have to pay attention to - max limit and count. If the count is larger than the max limit, we will end up with the number set in the max limit box. Otherwise, the count controls the number of objects. Let’s increase this number. Looking good, the grass is too large though. Let’s open the transformations tab to edit the scale. Additionally, I will randomize the scale so the models vary. Let’s try from 20 to 40 percent. 20 is too small, let’s do 30. Great, we have to increase density again. I will add a couple of 0 to the max limit in case it’s too small. Awesome, looking great, I really like these patches of old grass. Let me show you how to clean up the edges. Select the grass models and open the material editor. Right-click on scene material rollout and check the filter selected object option. This way it will show only the materials of the selected models. Drag and drop the material to the editor. Next, we have to add the ChaosScatterEdgeTrimming map. All we have to do is to plug it into the opacity slot of each material. The second material has the opacity map slot used, I will show you what to do with this in a minute. Let’s plug the map into other materials first. Let’s go back to the second material, we simply have to plug the scatter map between the opacity texture and the material. And that’s it, nice and clean! This tutorial is a part of our new Visualization Training, link in the description. Next, let’s move to planting. I will put the grass on a layer and turn it off. Next, let’s create another chaos scatter. First, let’s add the plant models you want to include in the object rollout. As I mentioned before, all the models come from Globe Plants. GlobePlants models are not only very detailed and photorealistic but also have really well-done materials which is even more important. You can buy individual models or bundles. It’s very convenient, you can for example choose bundles by the geographical area your project is located or by the type of plants you need for the project. They create exact plant species, one of the plants I used in this scene is called Mimulus gracilis**.** And Globe Plants were so kind to provide plant models for the students of our Visualization Training which this scene comes from. If you cannot find the model you need, don’t worry, just email them and they will custom-make it for you ;) The link is in the corner if you are interested. Le’s go back to the 3ds Max. Then just pick where you want to have your plants distributed. I will pick my ground. Of course, I don’t want to have the whole lawn to be covered with planting. I will draw the splines in the places where I want my plants. I will make it larger than a lawn. If the lines overlap with the lawn, some spaces could be empty because the models don’t fit. As a result, parts of the grass could be visible. Let’s turn off the “Start New Spline” option, this way we will get just one object at the end. I will draw other splines. I made the recording faster. And that’s it, we have to attach the first 2 splines we draw before the option “Start New Spline” was on. I will edit this spline a bit. That’s fine for now. I will go back to the Scatter object, and go to the Areas rollout. Here let’s pick our spline in the include section - this way plants will still be on the surface we’ve picked earlier but only inside the spline. In the same way, you can exclude objects if needed. Let’s see how it looks rendered. Again, not enough models, let’s increase the count. Awesome. Now all the models are in equal proportion, we can change that using the frequency value. The default is 1. If we lower it there will be fewer instances of this model inside the scatter. Next, I will go to transformations, and randomize scale. Models are too big in my opinion, so I will make the scale lower than 100%. I will also randomize translation, so the planting seems more randomly distributed. As we lowered the scale, the planting become less dense, let’s increase the count to fix this. Great, now let’s adjust the spline. We can go back to the spline any time and change the scatter’s area. I will adjust it to the camera view. It’s worth spending more time on these small details. Think about objects that are ahead and behind the planting, what you want to show, and perhaps what can be a bit hidden creating the layering effect. It all matters, these small adjustments change the composition and the way how the image is perceived. Looking good. Let’s go back to the scatter object. I will enable the camera clipping option. This way the objects which are not visible in the camera won’t be rendered. Then, let’s go back to the count and adjust the number of plantings again. I will make the plants slightly smaller. And finally, I will decrease the count slightly. Great. Scatter is done, next, I will set up plants in the foreground. In this case when I do a small patch of plants in the foreground I often do it manually to have more control. Let’s start by converting the models to proxies to keep the scene nice and light. I will choose Full Mesh as I want to see the plants in the viewport to be able to quickly place them. I will start placing the plants. The main reason I place the plants here is to crop the image which will help a lot with the composition of this shot. This technique helps to draw viewers’ attention toward the center of the image. I want to have the plants slightly protruding at the front, to give more context, and the feeling that we are in the beautiful park. When you copy proxies remember to use the instance option, so the objects are loaded once. It’s also important to use the rotate and scale tools to avoid repetition when using the same model more than once, in nature you cannot find two identical plants. The more variety of plants you will have, the more realistic effect you will get. I always try to spend a bit more time adjusting manually the foreground objects as they influence the composition significantly. And because they are very close to the camera, high-quality models are a must in this case. For this reason, I highly recommend you check the GlobePlants website and play around with their models. And here it is, just as I told you in the beginning that method is super easy. Now, you will be able to easily create such planting in your projects. If you want to learn all about visualizations in 3ds Max, Corona & V-Ray join our brand new, updated visualization course, also you might be interested in these 2 videos. Bye, bye.
Download Subtitles
These subtitles were extracted using the Free YouTube Subtitle Downloader by LunaNotes.
Download more subtitlesRelated Videos

Download Subtitles for The Easiest Way to Learn English Video
Enhance your English learning by downloading subtitles for 'The Easiest Way to Learn English (Comprehensible Input)'. Accurate subtitles help improve comprehension and vocabulary while watching the video. Access captions anytime to reinforce your language skills effectively.
Download Subtitles for Mastering Matrices in 3D Animation
Enhance your learning experience by downloading accurate subtitles for the video on mastering matrices in 3D animation. Subtitles help you better understand complex concepts and follow along easily, making the animation techniques more accessible.

Download Subtitles for Learn Speaking English the Easy Way
Enhance your English learning experience by downloading accurate subtitles for the video 'Learn Speaking English the Easy Way.' Subtitles help improve comprehension through clear, accessible text to follow along and practice effectively using comprehensible input and immersion techniques.

Download Subtitles for Easy English Conversation Practice Video
Enhance your English speaking and listening skills by downloading accurate subtitles for this 30-minute beginner-friendly video. Subtitles help you follow along, improve comprehension, and reinforce language learning effectively.

Download Subtitles for The 2025 Guide to Rendering in Unreal Engine 5
Enhance your learning experience with downloadable subtitles for The 2025 Guide to Rendering in Unreal Engine 5 video. Accurate captions make it easier to follow complex rendering techniques and ensure accessibility for all viewers. Get your subtitles now to master Unreal Engine 5 effectively.
Most Viewed

Untertitel für 'Nicos Weg' Deutsch lernen A1 Film herunterladen
Laden Sie die Untertitel für den gesamten Film 'Nicos Weg' herunter, um Ihr Deutschlernen auf A1 Niveau zu unterstützen. Untertitel helfen Ihnen, Wortschatz und Aussprache besser zu verstehen und verbessern das Hörverständnis effektiv.

ดาวน์โหลดซับไตเติ้ล DMD LAND 3 The Final Land Day 1
ดาวน์โหลดซับไตเติ้ลสำหรับวิดีโอ DMD LAND 3 The Final Land Day 1 เพื่อช่วยให้เข้าใจเนื้อหาได้ง่ายขึ้น และเพิ่มความสะดวกในการติดตามทุกช่วงเวลา เหมาะสำหรับผู้ชมที่ต้องการความชัดเจนและเข้าถึงข้อมูลอย่างครบถ้วน

Descarga Subtítulos para NARCISISMO | 6 DE COPAS - Episodio 63
Accede fácilmente a los subtítulos del episodio 63 de '6 DE COPAS', centrado en el narcisismo. Descargar estos subtítulos te ayudará a entender mejor el contenido y mejorar la experiencia de visualización.

Subtítulos para TIPOS DE APEGO | 6 DE COPAS Episodio 56
Descarga los subtítulos para el episodio 56 de la tercera temporada de 6 DE COPAS, centrado en los tipos de apego. Mejora tu comprensión y disfruta del contenido en detalle con nuestros subtítulos precisos y accesibles.

Download Subtitles for Your Favorite Videos Easily
Enhance your video watching experience by downloading accurate subtitles and captions. Enjoy better understanding, accessibility, and language support for all your favorite videos.

If you found these subtitles useful, consider buying us a coffee. It would help us a lot!