Download Subtitles for Rigging with Matrices - Part 02 FK Tutorial
rigging with matrices - part02 - fk
Jean-Paul Tossings
SRT - Most compatible format for video players (VLC, media players, video editors)
VTT - Web Video Text Tracks for HTML5 video and browsers
TXT - Plain text with timestamps for easy reading and editing
Scroll to view all subtitles
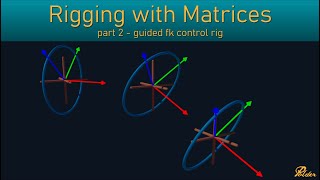
First we will build a guided FK control
rig. We will build the controls from
nersps circles and uh nerp circles like
every other geometry type in Maya is uh
if you look at the outliner and show
shapes you have like the the shape
object which has the actual shape data
of the ner curve and uh it is parented
under a transform node. So when you
select anything in a viewport, you
always select the transform node, not
the shape itself because the shape
cannot be manipulated. So cannot be
translated, rotated or scaled, but the
control can. And the transform node of
this control um has a few inputs and
outputs. So basically everything you can
translate, rotate or scale within the
Maya interface is based on a transform
node. The transform node is basically uh
a user interface for manipulating
matrices. A transform node outputs a
matrix uh and that is used to uh
manipulate the data and build
hierarchies. So there's a few inputs of
course there's the translate, rotate and
scale. Uh it also has a shear which is
tucked away in the uh attribute editor.
You can find it here. Um and as well it
has some pivot uh offset options in the
attribute editor. Uh and all these
translate, rotate, scale, pivot and
shear values are used to compose
matrices like I demonstrated in my
matrix video. And all these matrices
multiplied together will uh create the
matrix output plug for the transform
node as well. Since my 2020 with the
matrix workflow update uh another input
uh attribute has been added to the every
transform node which is the offset
parent matrix node. So if you do show
all attributes and then filter on matrix
you will see the offset parent matrix
which is basically another matrix plug
but an input plug. uh and what this is
used for uh after composing the uh local
matrix it is multiplied with the offset
parent matrix before multiplying with
the parent matrix of the parent object
of this uh transform node. So if this
would be parented under another node um
the matrix is multiplied with the offset
parent matrix and then multiplied with
the word matrix of the parent node. So
that's for the input uh plugs. Then
there's a couple of output plugs. Uh the
matrix uh plugs is like I just said and
then you have uh the local DAG matrix.
This is the the cached matrix that is
the matrix multiplied with the offset
parent matrix. So it has been premputed
uh and uh cached uh by Maya on the node.
And then you have the world matrix which
is also a cacheed uh matrix which is
basically the dag local matrix
multiplied with the parent world matrix
that will result in the world matrix of
this node. And then the parent matrix is
also a convenient plug which is just
basically a copy of the cached world
matrix of the parent node. And then all
these matrices also have their inversion
counterpart available uh as precomputed
uh um plugs on the trans on the
transform node. So that being said,
um if we want to uh construct a FK uh
control chain, before you used a an
extra buffer uh transform node in the
hierarchy to create an offset between
the controls while maintaining their
zeroed out rotation, translation and
scale. So for example the lower arm
control it would group the group it and
then parent it under the upper control.
Um and then we call this something like
buffer and we can set the translation
and rotation on the buffer group. Uh and
then the control will remain zeroed out.
Uh but since the introduction of the
offset parent matrix plug, we don't need
this buffer group anymore because we can
set the buffer matrix values on the
offset parent matrix. So we can directly
parent the control under the upper arm
and then of course zero out the
transformation. And if we go to this
node now the lower arm and if we in the
attribute editor go to the uh offset
parent matrix u area. We can look at it
in the composition uh tab which
basically shows the decomposed matrix in
its translate rotate scale and shear
values. uh or you can look at the matrix
um representation which basically just
shows the basis vector x basis vector y
basis vector z and the translation
vector. So this is the actual matrix
values that are stored in this matrix
and Maya offers the composition tab for
convenience because it is difficult to
enter a rotation in the matrix
form. So we can now for example just set
the translation offset to three and
maybe add a rotation on the
y of - 455. So now we have a direct
hierarchy with zeroed out translation
transformation uh and the buffer is
stored in the offset parent matrix plug
and we can do the same for the uh hand
control.
Um, I'll use the uh parent relative mode
so it's parented and Maya doesn't uh
recomputee the uh transformation to keep
its original uh location. You can also
just parent it and then reset it to zero
but it's the same uh the end result is
the same. And for this as well in the
attribute editor let's say we put the uh
translation buffer to three on the
x-axis. So now we have a control
hierarchy with zeroed out control
transformations
uh which is uh basically a simple FK uh
chain setup. However, this is not very
user friendly because if you want to
change the uh the position of the
controls, you have to go to the offset
parent matrix and then manually enter
the values here to change it. then it
can be very difficult to align to a
specific position in the workspace to
align with the model for example. So
what we can do is we can make a guide
hierarchy as well. Uh let me just
unhide my
guides.
So I have created a a hierarchy of uh
locators. So if we were to well for
example create the
same
orientation as the uh that we set on the
controls like so what we can now do is
because these guides are parented in the
same way that the controls are parented
um their local matrices if we add these
to the
graph. For example, the hand lower
upper. If we now look at the uh
lower guide, the matrix output plug is
its local matrix relative to its parent.
So, relative to this guide. So, its
local matrix is the buffer matrix. So
what we can do we can just take the
matrix output and plug it directly into
the offset parent matrix. You see
nothing changes and the lower control
now has a connection in the offset
parent matrix which is the same as
before but now it is derived from the
locator or the guide. So we can do the
same for the hand. If we take the matrix
output plug and plug it directly into
the offset parent matrix,
um the offset parent matrix plug by the
way is not always visible. Uh if you
create a new note, for example, a new
transform node, uh which is basically
the same as making an empty group, uh
it's all just transform node. If you
press uh four, it is not visible. If you
press three, it's also not visible. uh
which is kind of annoying because it's a
very important plug. But what you can do
is just
uh right click and choose show all
attributes. If Maya lets
me show all attributes and then filter
by matrix then it's available. So that
way you can uh connect to it or you can
just if you don't do this and you have
this view, you can just basically go to
the look through the list and select it
that way. But it's kind of annoying that
it's not visible by
default. Okay. Um we for completeness uh
for this doesn't change because the
upper control is at the world origin.
But still uh we can do the same for the
upper. we can take the matrix plug and
plug it into the offset parent matrix of
the upper
control. So now we have a uh a buffer
hierarchy of guides. And the nice thing
about this is that because the guides
are will never be time dependent because
only the controls will be animated.
These uh transformation matrices of
these guides will only be calculated on
scene open. After that they will never
change. So they will never be updated.
So um they are not contributing to the
uh performance of the rig.
And now we can change control rig
um by adjusting the guides and the
controls will follow. And so we have an
adjustable uh FK uh control
rig. But the downside of this uh control
setup is that still if you select the
parent control um all the child controls
get selection highlighted. So it's never
completely clear uh or readable what
controls are selected. So to this end I
like to flatten the control rig to
prevent this selection highlighting
issue. But if we now just simply
unparent the
controls then Maya of course compensates
by setting the uh transformation values
so they keep their same world space uh
transformations. And if
we reset
them, so we have the upper lower and
hand uh of course then the the rig
doesn't work anymore because there's no
connection anymore uh between the
controls. So how we can fix this is by
adding the world transformation matrix
of the up control to the offset parent
matrix of the lower control. Since we
have broken the parent child hierarchy
in the outliner, we have to reconstruct
a parent child hierarchy. So we have to
reconstruct it in the node editor. And
we can use the mult matrix note for
this. So if you create a mult matrix
node, this basically uh multiplies
matrices together. So if you have a
hierarchy
uh all these transformation nodes are
basically matrices and the matrix of
this uh object will be multiplied with
the matrix of its parent and that will
be multiplied with the matrix of its
parent and the end result is the world
matrix of this object. So we can do the
same in the outliner. Um we can just
plug in matrices into the milk matrix.
And if we plug in the child and then its
parent and then its grandparent then the
output will be the world uh space matrix
of the
child. So the
order is upside down. So if you have the
transformation order of multiplication
order going from top to bottom in a
hierarchy in the outliner the matrix
multiplication order of the mil matrix
is from top to bottom. the first input
matrix is multiplied with the second and
then with the
third. So that's something to keep in
mind.
So if we now want to recreate the
hierarchy in the note editor, we can say
that the matrix output of the lower FK
guide that would be the child of the uh
upper
control because the buffer in in a
hierarchy the lower FK control would be
uh parented under a buffer and the
buffer would be parented under the upper
FK control. So the child would be the uh
buffer which is the guide and then uh
well Maya doesn't display the second
plug uh by default. So you have to press
one and then three for the second plug
to uh show up in the array. So if we
then take the world space matrix of the
parent and plug it into the second plug.
And if we now take the output of the
melt matrix which is the guide or the
buffer matrix multiplied with the world
space of the parent control. If we plug
that into the offset parent matrix of
the lower control, then now the control
still has the the same orientation and
offset and the parent control moves the
uh lower control. So you can basically
see this as follows. The local matrix of
the object is a child of the matrix that
is the offset parent matrix. And the
offset parent matrix is constructed from
the guide or the buffer being a child
because it's the first block of the
upper. So now we can rename the mod
matrix node.
Um so I'll always use this call this
world matrix because this is the world
matrix basis position for the FK
control. So we can do the same for the
uh hand control. We can make another
modem matrix
node and then we can use
the matrix plug from the guide aka
buffer. Then refresh the inputs and then
we take the world matrix plug from the
lower FK
control. I plug it into the second. So
the buffer is multiplied by the uh world
matrix of the lower FK control. And then
we take the result and plug it into the
offset parent matrix. And then the hand
control also has the same orientation as
the guide.
And its parent drives the
control. And now we can adjust the
guides and the rig will
follow however we manipulate it and
still work as intended as a
whole. But the downside of this if we
would have aligned this to our model and
the hand would be nicely oriented and
positioned in the wrist but the shoulder
was off and we need to adjust it. We
cannot change the position of the parent
guide without affecting the child guide.
So then we have to redo the the hand
position which is kind of annoying. Of
course, we can unparent the guide and
then
change the the guide of the upper and
then reparent it and then the rig will
uh realign itself uh and now still
function as intended. But this is kind
of a well stupid way to adjust it and
it's uh uh prone to errors. So let's
look at another way to set this up
correctly. So if we want to have a um a
way to change a parent guide without
affecting its children, we have to ditch
the hierarchy in the outliner for this
uh as well. So let's just unparent the
guides as well and reorder them so that
they're in the correct order. Uh now of
course the rig is broken because the uh
we're using the um matrices of the
guides as buffers but now the these
objects are in world space. So their
world space um transformations will be
used as buffer and they're not relative
to the parent. So if we want to recreate
the local matrices relative to the
parent guide, we can do this by using
the inversia world matrix.
If we create another milk matrix
node
and if we want to create recreate
the lower lower guide matrix or its
local matrix relative to its parent
guide. We can do this by taking the
world matrix of the lower
guide and plug it into the first plug of
the mode matrix
node and then refresh the input list.
And if we now multiply this world matrix
of this guide with the inversion world
matrix of the guide that is its parent
then we get the local matrix or aka the
matrix that gets me from this matrix to
this matrix. So let's do this. Let's
take the world inversion matrix, plug it
into the
second
input. And now the output of this mil
matrix node is the local matrix as if
this guide were a child of this guide,
which they aren't in the outliner, but
we are recreating this parent hierarchy
inside the note editor with this melt
matrix node. So if we now take the
output of this melt matrix node and plug
it into the first input of the uh world
matrix uh melt matrix node, you see that
the control uh is or again aligned with
the
guide
and the control rig functions again like
it's supposed to be. the transformations
are still
zero and the uh hierarchy is now created
in the node editor. So this node
basically is the new offset parent
matrix or buffer matrix if you want. So
usually I call this something like
parent offset matrix or you could use it
uh a buffer matrix which doesn't really
matter but this is my uh acronym that I
that I always use. So we can do the same
for the uh lower uh guide. So if you
take another world matrix
note and we plug the world matrix of the
hand guide into the first plug of the M
matrix node and then because we want
this matrix as a relative matrix to be
lower we take the inversible world
matrix of this
guide. So take the inversible world
matrix of this guide, plug it into the
second plug, and then the output of this
matrix is the matrix that brings me from
this matrix to that
matrix. So we take the output and plug
it into the first input of the mode
matrix note that we have not named
correctly. So let's do that quickly.
It's the world matrix for the
control and this is
the
again I call it parent offset matrix. So
now you can see that the hand control is
also in the correct orientation and the
rig is still correctly functioning. And
the nice thing now is that we can just
reposition this control or this guide
without affecting the other guides and
the rig still functions as intended. So
now we have a nice way to adjust guides
without affecting its children. But now
we have a system that is quite difficult
to align. And if your rig is perfectly
aligned to the grid like this is, it's
relatively easy maybe to rotate the uh
guides so that they point to the next
control which you basically always want
in a rig. But if for example these have
arbitrary uh
positions and you want this control to
correctly aim with the x-axis to the
next control, it is almost impossible to
do by hand without using constraints of
some sorts. So let's automate this uh
alignment of the guides by creating a
new matrix based on the positions of the
guides. That is a matrix that has the
position of the guide but has the
correct
orientation. So first let's remove the
rotations because we're not going to use
the rotations of the guides and uh lock
them. And then we are going to use an
aim matrix to create a matrix that is
oriented in the correct way.
So let's create an a matrix
node and the upper guide oriented matrix
will be based on the upper guide. So
let's take the world matrix plug of this
upper guide and plug it into the input
matrix of the A matrix because this is
the matrix that we're starting with and
this is the matrix that we're going to
align. So now we want to point this
matrix with the x-axis to the next
control. So we take this uh lower guide
world matrix
and we plug it into the primary target
matrix. And if we look in the attribute
editor, you have the primary section
where we can align uh well the primary
axis or a primary axis and in the
secondary uh uh segment we can align the
the secondary uh uh axis. So we want to
align the x-axis. So if we have the 0 1
0 0 and that is multiplied by the uh
input matrix that gives us the x m
x-axis of the matrix. So this represents
the x-axis and then we want to aim it at
the matrix and if we use the aim mode
then uh this vector is multiplied with
this matrix to generate a point in space
in world space uh and that point is
aimed to. So if you would fill in values
here, uh you would create a a position
offset relative to this matrix. But we
don't want that. We wanted to point at
the origin of this matrix. So we'll
leave it at zero. So now uh we can
temporarily make a locator to visualize
this. So if we create a
locator and if we take the output matrix
of the A matrix and plug it into the
offset parent matrix, we can now see
that we have created a matrix that
points with the x-axis nicely to the uh
uh second uh control or second
guide. And now we want to align the
second axis, which I always use the
y-axis for. And I want to point it in
the direction of the elbow so that the
all the three controls will lay in a
plane uh which is a rotation plane of
the arm in this
case. So let's take the uh hand control
for this because the three guides
together uh define a a plane.
So if we take the world matrix of the FK
hand guide, plug it into the secondary
target matrix,
uh we again want to align the y-axis. So
0 1 0 gives us the y-axis and then the
mode is aim and we want to aim at this
um matrix. But now you can see that the
y-axis is pointing in the forward
direction. We want to point it in the uh
backwards direction. So we can just
basically simply flip the uh input axis
to get the negative y-axis to align. And
now we have the negative uh or the
y-axis pointing in the uh backwards
direction.
So now we have created an aligned
matrix. So if you were to create a a
plane and we would parent it under the
temporary
locator, reset its
transformation and have it
generate in the Z
axis and then scale this. You can see
that the plane nicely uh is aligned with
all the uh the guides and if we change
the guide position uh the orientation
plane uh nicely follows all the
positions. So let's remove this again.
So now we have created the new oriented
uh world matrix. So all connections that
previously you were going from the upper
guide, we will now reroute to use this
oriented uh matrix. So let's call this
the guide out world
matrix. We use the matrix plug because
but because this one is in world space,
the matrix is the same as its world
matrix. So the connection of this matrix
we can connect to the output
matrix of the oriented matrix. And now
the rig explodes and that is because we
are also using the inversia world matrix
of this guide to calculate the offset
matrix or the buffer matrix if you want
for the lower control. So we need to
have an inversion matrix of this
oriented matrix as well. And because
this is not a transform node, it is not
available as a plug. So we have to
create an inversion matrix
note. And if we now get the output of
this oriented guide matrix, plug it into
the input matrix of the inversion
matrix. And now if we take the
connection that is was coming from the
inverse world matrix of the upper guide
and connect it to the output of the
inversion matrix. You see that the
control now is uh back to its original
position or correct position. Uh and we
have an
oriented upper control. So this locator
we can remove it was just for a visual
cue. So if we now change the position of
the lower guide, you can see that the
upper control nicely follows and the
guide which we're only using the
position from is not oriented. But it
doesn't matter because we have created
the matrix the oriented matrix in the
node
editor. So let's call this
one the world inverse
matrix and do the same thing for the
lower arm.
So for the uh lower uh guide oriented
guide, we can make another in matrix
node and we plug the world matrix of the
lower FK guide into the input matrix
because that's the matrix that we're
going to
align. And then we want to aim the
x-axis to the hand
guide. So we take the world matrix of
the hand FK
guide, plug it into the primary target
matrix, and again we want the X-axis to
aim at this matrix. So that's set up
correctly. And let's make a temporary
locator
again and plug the output into the
offset parent matrix of the locator. So
now we can see that the x-axis is nicely
aligned to the hand
control. And then we need to align the
secondary axis, the y- axis again to
point in the backwards direction. So for
this we're going to use the guide of the
upper arm again to create this plane. So
we take
the world matrix of the upper
guide, plug it into the secondary target
matrix and then again we want it to
point in the backwards direction. So we
take the negative yaxis for alignment.
So minus one and we want to aim at this
uh guide. So now we have uh this one
oriented as well. You can see that they
nicely line into a
plane. So this is the
lower
guide out world
matrix. Um and then we can do the same
thing. So all the connections from this
guide we're going to substitute with
connections to the oriented matrix. So
we can take the uh world
matrix and plug it into the output
matrix and this one uh not this one
because this connection is used for the
orientation of this
uh um guide matrix and that's only using
the position. So we can leave that
connection and this connection is going
into the orientation itself. So and then
there's still this invers world matrix
connection that we need to
reroute to this matrix. So, we're going
to use another inverter
matrix and we're going to plug the
output into the input
matrix. And
then the connection from the world
inversion matrix, we're going to
reconnect to the output of the invers
matrix node. And we're going
to rename this world inverse matrix
whim.
And now you can see that
the guide or the control is uh nicely uh
uh oriented and also has the zero
transformations and the rig still works.
Uh we can delete the temporary
locator and now we can change the
position of the guide and the rig nicely
updates to follow the orientation of the
controls.
So there's only one thing left and
that's the orientation of the uh hand
guide. So there's two options. We can
just basically uh leave it as is because
a hand can have a different orientation
from the lower arm. Uh but for this
purpose I'm going to uh reorient the uh
guide to have the same orientation as
the uh as the lower uh oriented matrix.
So it points in the same direction uh
and it's basically just coming straight
out of the uh the lower arm. So for this
we can use uh uh reuse the oriented
matrix which is the output uh of the
lower guide uh a matrix and we basically
only have to reposition it to the
position of the uh hand guide. So we can
do this with a blend matrix note. So if
we create a blend matrix
node, we're going to take the output of
the aim matrix of the lower guide and
plug it into the input matrix. So if we
now create another temporary
locator, which is something I often do
to check my
matrices, you can see that it's at the
position of the uh lower arm and it has
the correct orientation, the same
orientation as the control because well
this is feeding the control. So now we
want to uh shift this matrix to the
position of the hand. So we can
basically just say okay take the matrix
of the hand guide plug it into the
target matrix uh slot for target zero
and then in the attribute editor at the
target matrix uh parameters we can just
say okay I want everything except for or
I only want translation so I'll just
remove the share rotate and scale
weights set them to zero so I only blend
the
translation and blend it 100% %. So now
you can see that the guide is uh at this
position or the locator is this position
of the hand but has the same
orientation. So now we can call this
the
guide outworld matrix and we can use
this to substitute the connections from
the uh hand
guide. So the uh world matrix uh plug
that's going into the parent offset
matrix for the uh hand
control. We reroute this to the output
of the oriented
uh guide and uh there is no connection
from the invers matrix because there is
no child to this guide. Um, so we can
remove the locator. And now you can
already see that the uh hand control is
nicely oriented in the same uh
orientation as the uh lower arm. And if
I now change the guide, you can see that
the controls uh nicely realign
themselves.
And we have a working realignable uh FK
control setup this
way which also keeps working uh if you
adjust
it. So to summarize we just basically
have used the positions of the guides
and created a new oriented matrix for
every guide. So you can uh if you ignore
the uh bunching up of control connection
lines basically this is the upper guide,
this is the lower guide and this is the
hand guide and the inversion
matrix which we created from them and
that feeds into the uh control setup. So
if we align them nicely, you can see we
have the the buffer or parent offset
matrix that feeds into the n matrix that
multiplies it with the world matrix of
its parent control and then feeds into
the control. And the same happens for
the lower. You have the buffer or parent
offset matrix. It multiplies with the
world matrix of its parent and then
feeds into the control. And for the uh
upper
uh control
um we only have just the connection
because it doesn't have a uh a parent uh
where it moves with. But if you would uh
have like a main control or it's
attached to the shoulder, you would have
the same uh setup as this but then
connecting to the guide of its parent.
So if this is difficult to imagine, you
can always uh just for debugging
purposes use a a locator in between so
you can see the reoriented
guides. But this is basically the setup.
It's simple and it's fast and it's
adjustable. However, there is still
something that it's not very nice about
this setup. For example, if I set the
guides of the upper and
hand on the X-axis of the world matrix
and just for visual purposes create a a
plane again. So, oriented in the Z
direction and
then remove this.
And let's take the output of the
oriented upper guide and plug it into
the offset parent matrix of the plane
and then scale
it so we can see the orientation plane
of the arm. If we now take this elbow
and for example make a straight
arm then the alignment well the elbow
points upwards uh and maybe we want it
to point backwards. So if we now move
the elbow just a little bit, the
orientation plane plane flips. And if we
translate it up or down, the orientation
plane well goes berserk because it's
aligning the orientation plane based on
these three points. So in this setup
it's very difficult to create uh an
almost straight or straight arm and then
correctly uh orient the rotation plane
of the arm. So to circumvent this we can
use another extra guide to orient the
orientation plane of the arm and then
constrain the lower arm guide to this
plane. So let's do this. Let's create
another guide and let's call this one
the
um ball
vector vector guide and the guides.
Well, they don't need FK in the name.
So, let's remove it. I use that when I
copy them. But we're going we're going
to use the guides for FK and IK as well.
Um
so let's position this
uh here for
now. So now we are not going to use the
three guides uh to orient the uh
rotation plane but we're going to use
the upper the hand and the pole vector
to orient the rotation plane. So, we're
going to swap the input of the uh aim
matrix. So,
let's position
them a little bit more friendly. So,
this now is the pole vector guide. So,
now we need to create an extra aim
matrix to generate the matrix that is
the orientation plane of the arm. So
let's create another A
matrix. Um, and we're going to use the
upper guide uh for this as a starting
position. So we take the world matrix of
the upper guide and plug it into the
input
matrix. And then uh let's just directly
plug the output into the rotation plane
so that we can see what's happening. And
then we want to aim it at the hand
because we're going to use the upper the
hand and the pole vector to define the
orientation plane of the arm rotation
plane. So it should point in the
direction of the hand guide and then use
the secondary axis to align to the pull
vector object.
So let's take the world matrix of the
hand
guide, plug it into the primary target
matrix and say uh x-axis align and then
use the aim and no offset. So this is
correct. And then now we're going to
take the world matrix of the pole
vector and plug it into the secondary
target matrix of the A
matrix and then we want to align the
Yaxis or maybe the negative Y-axis
again and then set it to aim. And now
you can see that the orientation plane
is now correctly aligned with the hand
and the uh P vector. So if we change the
pole vector
um and we change the hand the
orientation plane nicely
follows. But now uh we have defined this
orientation plane but the lower or the
the lower guide can still be moved
anywhere. It can be moved off the
rotation plane and we want to constrain
the movement of this guide to the
orientation plane. So what we can do is
uh make this guide
uh live in the space of the oriented uh
rotation plane of the arm. So what we
can basically do is just plug the
orientation
matrix into the uh guides offset parent
matrix. So let's see what happens. um
move
this out of the way. This is the uh
rotation plane. This is the pole vector.
So the output of the A
matrix, if we take that and we plug it
into
the offset parent
matrix of the lower
guide. Of course, now it's the position
changes because it has a new uh
parent. If we now set this to zero, you
will see that the position matches the
upper because we use the upper guide as
a basis for orienting the uh rotation
plane matrix. You can also see it if we
select this one. The origin of the
matrix is at the position of the upper
guide. So what we can now
do is
move the
elbow only in
the XY plane because as soon as we move
it along the Z axis, it breaks off the
rotation plane. And if we now change the
pole vector, the arm orientation plane
adjusts and the elbow guide still is a
child of this oriented matrix uh moves
in this plane. So we can lock the Z
translation. And now we can freely move
the guide in this space and always have
a nicely oriented arm and even make a
straight arm. Um although we can now
still move it in the wrong direction,
the opposite direction. So we can limit
the translate Y as well. So let's say in
the guide limit
section for translation we should limit
the y-axis to not be positive. So set
the max to zero and then we cannot
change it further than the straight arm
and we can make it uh well only bent in
the correct uh direction.
But
still now if we change the hand for
example, make it longer, maybe it should
be nice that the default position of the
lower guide would always be in the exact
middle of the upper and the hand. So we
can use another blend matrix to blend
the position of the guide so that its
default uh position if the values are
zeroed out is the nicely in between
position.
So, let's call this
one left arm
orient
guide.
And if we now make another blend
matrix and we plug the output of this
orientation plane matrix and plug it
into the input matrix. And then if we
take the hand guide because we want to
get in between these two. So we can use
this matrix for this position offset.
Plug it into the target matrix.
And if we now in the attribute editor uh
again disable the scale rotate and share
because we only want to blend the
position and we blend it 50%. So we get
halfway in between and we now plug the
output of the blend matrix into the
offset parent matrix of the lower guide.
The lower guide always is positioned
nicely in between the
uh upper and the hand.
And uh we can use the guide of the pull
vector to align the
uh orientation plane the rotation plane
of the
arm. Okay. So let's remove the plane
because we don't need it anymore.
And let's rename
this
to local guide world matrix because it's
the basis world matrix
uh
position. So now we have uh a redefined
setup where we can without a problem
create a straight arm and still orient
the uh create the orientation for the
arm correctly. And the lower guide is
now the only guide that is
already aligning to the plane because
we're using its uh uh orientation to
limit it to the rotation plane.
So the only downside to this setup might
be uh but this is a more of a preference
that if you for example move the uh uh
upper arm and you want to reposition it
a little bit more up that the
orientation of the arm changes. the it's
now pointing a little bit downwards and
if you want to keep it straight back you
have to also move
the pole vector guide. So you also also
have to take into account the position
of the pole vector always. So another
approach of this would be to skip this
uh extra pole vector guide and use an
axis of the upper guide to orient the
rotation plane in the aim matrix where
we define the uh rotation plane of the
arm. We are now uh using the pole vector
um as an aim position. We're aiming at
the position of the pole vector, but we
can just as well use the negative uh
z-axis of the upper guide as the vector
to align with. So, uh we can take the
world matrix output of the upper guide
and plug it into the secondary target
matrix. And then we can say okay we want
the still the negative y-axis to be
aligned but we do not want to aim it. We
want to align it with another vector and
that vector is the negative
zaxis of the upper guide. So the vector
that points in the backwards direction.
So now we can discard this pole vector.
And now if we use
this rotation again. So we
unlock the rotation again. If we now
rotate this, we use this vector or this
orientation of this guide to orient the
uh rotation plane of the arm.
So if
you have
this guide here for example in the arm
then now the
rotation is uh based on the orientation
of the upper guide. So rotation in the
side direction doesn't really do very
much. It's just the this part of the uh
vector. So the the negative z-axis that
defines the plane. So it's just two ways
to set it up. It's a preference. Um, the
end result is the same. Uh, it's just
another way of manipulating uh the
orientation of the rotation plane of the
arm. So, let's clean this up a little
bit. Um, for the controls,
um, we well, we can we can use
translation as well for the FK controls.
Maybe we can keep it. Um, I usually lock
the translation, but uh, let's leave
them unlocked for now. And scale. Well,
maybe we'll use it again. So,
just remove the
visibility. And for the uh, hand guide,
we're only ever going to use the
translation. So, we'll lock and hide the
rotation.
And for the uh elbow, we're only going
to use the X and Y translation because
it is constrained to the rotation plane.
So we can lock and hide these as well.
And for the upper arm, we are using the
rotation and the translation. So we'll
just use lock the uh
scales. And we're going to leave the
orientation setup as it is right now. So
we can remove the pole vector guide.
It's not
used. So now let's uh compound this into
a module. Um a rig module is something
that I use uh for limbs or legs or body.
It's it's basically a part of a rig that
is a um self-contained um part which
only has a few connections to other
parts. uh and the rest of the nodes are
only internally connected. So uh for
example, my bipad rig is com uh composed
of a few uh modules, the spine, the
head, neck, and an arm, shoulder, and
leg modules. And they're all connected
uh via matrix
plugs. So let's set up this arm as a
module and then create uh a root module
and connect these together to see how
that would work. So I can create all
groups by hand, but I'll just use
uh one of my tools to quickly um create
it. So let's call this arm
left. And basically uh this just creates
an hierarchy of um groups, the transform
nodes. Um, you have like the the module
uh uh group and it has a a setup um
group where I add some attributes that
are for initial setup of the rig. Um
that can be handy to quickly find some
attributes uh to set or change. So then
I have a group that's called inputs
which are basically the time dependent
uh inputs to a parent module as well as
the guide of that uh connection. So uh
I'll show this later on if I connect the
uh the root to this um module. But
basically this u parent in this case is
u for example the control of the parent
module where this module has to move
with and the parent guide is the guide
the oriented guide of that same control.
So I know the animated position or
change position and I know the the guide
position. Then the guides are basically
the guides for this module. So we can
move these into the guides group. Um and
then there is the controls group. Well,
it speaks for itself. That's where the
controls should go. And then I have a
rig nodes group which has every node
that is well part of the rig. for
example, IK handles or deformer um
diagnoses for for whatever for um
latises or bent deformers or and so on.
Then joints where the joints will be
placed in as soon as we create the
joints geometry. This is uh for support
geometry only. It's not the geometry of
the character itself. It's only for
intermediate geometry that is needed for
deformation. Uh helpers are visual um
yeah controllers or visual cues um
visible to the user but they don't have
any u driving capabilities to the rig
and then outputs it's kind of the
counterpart of the inputs which where I
can uh add uh nodes that have the
animation or the position of some
controller. For example, I could add the
uh hand control uh to the output or a
note that uh represents the position of
the hand control because as soon as we
use uh add not F IK uh controls to the
setup um the end result of the arm will
be a blend between the FK and the IK
position. So there will be a an output
matrix connected to a node to the
outputs and then as well the guide that
represents that uh orientation and
position in this dress
pose.
So let's uh add the uh root for example
maybe position the arm without that one
of course a little bit
higher. So, and now add
another let's call it
root. So I just get basically the same
module structure but now for root uh
let's create
um a
locator and put it in the guides and
call it root
main
guide and then add some quick
controls for this uh
uh like
so and add it to the
controls and call
this main
control.
Um yes. So now in
the graph note editor, let's just clean
this up a little bit.
and add it maybe to a different tab. So
the guide and
the control can be connected directly.
In practice the the the control the root
control of a rig will most of the
times stay on the origin of the of the
world. But I have also encountered uh
many times that for example for bipads
that the character was modeled not
center to the uh origin. So the front
legs were here and the back legs were
here. So then the uh the the root
control logically would be placed uh in
between. So to make that uh possible we
could just basically uh grab the world
matrix of the
guide and plug it into the uh offset
parent matrix of the root control or the
main control. And if we now
uh I'll just
quickly change the color. This is
basically a script that sets the uh draw
color overrides on the uh note. So if
you go to draw overrides, I just
basically set these values, enable
override and set the color index. That's
the what the tool does. Um but it makes
it nice to see which locators are
guides. So I can now uh position the uh
the main control anywhere and the uh
same as with the other controls of the
arm the uh transformations stay uh
notified or at the default values. So
then
maybe look and hide the
visibility. Um, and
then I need to set the control and the
guide as outputs uh for this module. So
I can connect it to the uh ARM module
and drive the ARM module with
this. So how I normally do this, I just
make an empty uh group or a transform
node and I call this the uh root
main
output and
then I duplicate it and I call it
main guide output. So, and in this case,
it's it's fairly simple because the the
main output is basically just the world
matrix of the main control plugged into
the offset parent
matrix and
then the guide output is basically just
the world matrix of the
guide. So, this is fairly simple. And
now I have created an interface uh for
other modules to connect to. Um of
course this creates extra transform
nodes uh which take up calculation time
for not for the guide because that is
calculated only once because it will
never be time dependent. But this uh
transform node is always dependent on
the main control which can be animated.
Um so this introduces extra
calculations. Uh but it makes it easier
for debugging and swapping modules
within a rig. Um and if you want to you
can always create a publish post script
to check the connections to this node
and um take all the output connections
uh of the offset parent matrix and then
plug them into the incoming uh
attributes and then delete these nodes.
So you can uh have an extra script that
optimizes your rig for uh to get to get
rid of these uh output nodes. But for
now we'll just leave them in because it
makes it easier to um to work with the
modules. So now we can for example take
the ARM module uh parent input and
parent guide
input. And then what I always do uh you
could take the world matrix of this node
but I'm just going to take the offset
parent matrix and uh make it a pass
through uh
attribute. So if I go to other and take
the offset parent matrix and plug it
into the offset parent matrix of the
input node. I have now just passed
through this connection into the
input and I can do the
same for the guide input and
output. So now I have connected the
input of the ARM module with the output
of the uh the root
module. And now if I go back to my ARM
module, I can add uh these nodes in
here. And now I can drive the upper
control because now the upper control
does not have any uh parent
dependencies. It is basically now at the
same position as the oriented uh upper
guide control. So we can do the same
that we did for the uh other controls.
We can calculate the uh parent offset
matrix. So the offset matrix relative to
its parent and then we can add that or
multiply that offset with the parent
control uh to create the new offset
parent matrix. So in this case for the
upper FK control the parent guide is the
uh input the parent guide input node and
the parent uh driver the uh controller
is the parent input because that's
connected to the uh parent control of
the the main control of the root. So
let's create a melt matrix
node and
then connect the uh guide world matrix
of the upper FK
control and refresh the input plugs and
then multiply it with the inversion
world matrix of the uh input
guide. So the world inversion matrix
of its parent guides basically. And this
will give us
the control par offset
matrix. And now we can multiply the
offset matrix with the uh parent um
control or the input parent input which
is connected to the um root control. So
we create another mult matrix node.
And then
we set the parent offset matrix as the
first bug and then take the offset
parent matrix because we are using the
uh attribute as a pass through. So the
offset parent matrix from the parent
input was connected to the output uh of
the root module and that was connected
to the main control. So we're just using
these input and output nodes as pass
through nodes. So we connect that to um
the second input and then we connect
this to the offset parent matrix. So
nothing changes except for the fact that
we now have connected the ARM module to
the uh root module. So let's call this
root matrix. And now if we change the uh
root control, the uh arm uh moves along
with it and we can still reposition the
root control to wherever we want because
the offsets are always recalculated from
the guides. So it doesn't matter where
the root control is, the uh rig always
stays functional. So, this can be nice
um if you want to change the root
position
uh of a rig or uh when you're still
working on it, tweak the positions. So,
now we have two modules. We have the
root module uh which is a fairly basic
one and we have the ARM module uh which
is also a basic one. It only has FK but
uh we can add uh more to it. But this is
the basic setup.
um of how I build my rigs with modules.
So we have inputs which connect to
another module and we have outputs uh
that also connect to other modules. So
within a module all nodes are only
dependent on nodes that are part of the
module and only via the inputs and
outputs it uh well communicates with
other modules uh and the scene.
Full transcript without timestamps
First we will build a guided FK control rig. We will build the controls from nersps circles and uh nerp circles like every other geometry type in Maya is uh if you look at the outliner and show shapes you have like the the shape object which has the actual shape data of the ner curve and uh it is parented under a transform node. So when you select anything in a viewport, you always select the transform node, not the shape itself because the shape cannot be manipulated. So cannot be translated, rotated or scaled, but the control can. And the transform node of this control um has a few inputs and outputs. So basically everything you can translate, rotate or scale within the Maya interface is based on a transform node. The transform node is basically uh a user interface for manipulating matrices. A transform node outputs a matrix uh and that is used to uh manipulate the data and build hierarchies. So there's a few inputs of course there's the translate, rotate and scale. Uh it also has a shear which is tucked away in the uh attribute editor. You can find it here. Um and as well it has some pivot uh offset options in the attribute editor. Uh and all these translate, rotate, scale, pivot and shear values are used to compose matrices like I demonstrated in my matrix video. And all these matrices multiplied together will uh create the matrix output plug for the transform node as well. Since my 2020 with the matrix workflow update uh another input uh attribute has been added to the every transform node which is the offset parent matrix node. So if you do show all attributes and then filter on matrix you will see the offset parent matrix which is basically another matrix plug but an input plug. uh and what this is used for uh after composing the uh local matrix it is multiplied with the offset parent matrix before multiplying with the parent matrix of the parent object of this uh transform node. So if this would be parented under another node um the matrix is multiplied with the offset parent matrix and then multiplied with the word matrix of the parent node. So that's for the input uh plugs. Then there's a couple of output plugs. Uh the matrix uh plugs is like I just said and then you have uh the local DAG matrix. This is the the cached matrix that is the matrix multiplied with the offset parent matrix. So it has been premputed uh and uh cached uh by Maya on the node. And then you have the world matrix which is also a cacheed uh matrix which is basically the dag local matrix multiplied with the parent world matrix that will result in the world matrix of this node. And then the parent matrix is also a convenient plug which is just basically a copy of the cached world matrix of the parent node. And then all these matrices also have their inversion counterpart available uh as precomputed uh um plugs on the trans on the transform node. So that being said, um if we want to uh construct a FK uh control chain, before you used a an extra buffer uh transform node in the hierarchy to create an offset between the controls while maintaining their zeroed out rotation, translation and scale. So for example the lower arm control it would group the group it and then parent it under the upper control. Um and then we call this something like buffer and we can set the translation and rotation on the buffer group. Uh and then the control will remain zeroed out. Uh but since the introduction of the offset parent matrix plug, we don't need this buffer group anymore because we can set the buffer matrix values on the offset parent matrix. So we can directly parent the control under the upper arm and then of course zero out the transformation. And if we go to this node now the lower arm and if we in the attribute editor go to the uh offset parent matrix u area. We can look at it in the composition uh tab which basically shows the decomposed matrix in its translate rotate scale and shear values. uh or you can look at the matrix um representation which basically just shows the basis vector x basis vector y basis vector z and the translation vector. So this is the actual matrix values that are stored in this matrix and Maya offers the composition tab for convenience because it is difficult to enter a rotation in the matrix form. So we can now for example just set the translation offset to three and maybe add a rotation on the y of - 455. So now we have a direct hierarchy with zeroed out translation transformation uh and the buffer is stored in the offset parent matrix plug and we can do the same for the uh hand control. Um, I'll use the uh parent relative mode so it's parented and Maya doesn't uh recomputee the uh transformation to keep its original uh location. You can also just parent it and then reset it to zero but it's the same uh the end result is the same. And for this as well in the attribute editor let's say we put the uh translation buffer to three on the x-axis. So now we have a control hierarchy with zeroed out control transformations uh which is uh basically a simple FK uh chain setup. However, this is not very user friendly because if you want to change the uh the position of the controls, you have to go to the offset parent matrix and then manually enter the values here to change it. then it can be very difficult to align to a specific position in the workspace to align with the model for example. So what we can do is we can make a guide hierarchy as well. Uh let me just unhide my guides. So I have created a a hierarchy of uh locators. So if we were to well for example create the same orientation as the uh that we set on the controls like so what we can now do is because these guides are parented in the same way that the controls are parented um their local matrices if we add these to the graph. For example, the hand lower upper. If we now look at the uh lower guide, the matrix output plug is its local matrix relative to its parent. So, relative to this guide. So, its local matrix is the buffer matrix. So what we can do we can just take the matrix output and plug it directly into the offset parent matrix. You see nothing changes and the lower control now has a connection in the offset parent matrix which is the same as before but now it is derived from the locator or the guide. So we can do the same for the hand. If we take the matrix output plug and plug it directly into the offset parent matrix, um the offset parent matrix plug by the way is not always visible. Uh if you create a new note, for example, a new transform node, uh which is basically the same as making an empty group, uh it's all just transform node. If you press uh four, it is not visible. If you press three, it's also not visible. uh which is kind of annoying because it's a very important plug. But what you can do is just uh right click and choose show all attributes. If Maya lets me show all attributes and then filter by matrix then it's available. So that way you can uh connect to it or you can just if you don't do this and you have this view, you can just basically go to the look through the list and select it that way. But it's kind of annoying that it's not visible by default. Okay. Um we for completeness uh for this doesn't change because the upper control is at the world origin. But still uh we can do the same for the upper. we can take the matrix plug and plug it into the offset parent matrix of the upper control. So now we have a uh a buffer hierarchy of guides. And the nice thing about this is that because the guides are will never be time dependent because only the controls will be animated. These uh transformation matrices of these guides will only be calculated on scene open. After that they will never change. So they will never be updated. So um they are not contributing to the uh performance of the rig. And now we can change control rig um by adjusting the guides and the controls will follow. And so we have an adjustable uh FK uh control rig. But the downside of this uh control setup is that still if you select the parent control um all the child controls get selection highlighted. So it's never completely clear uh or readable what controls are selected. So to this end I like to flatten the control rig to prevent this selection highlighting issue. But if we now just simply unparent the controls then Maya of course compensates by setting the uh transformation values so they keep their same world space uh transformations. And if we reset them, so we have the upper lower and hand uh of course then the the rig doesn't work anymore because there's no connection anymore uh between the controls. So how we can fix this is by adding the world transformation matrix of the up control to the offset parent matrix of the lower control. Since we have broken the parent child hierarchy in the outliner, we have to reconstruct a parent child hierarchy. So we have to reconstruct it in the node editor. And we can use the mult matrix note for this. So if you create a mult matrix node, this basically uh multiplies matrices together. So if you have a hierarchy uh all these transformation nodes are basically matrices and the matrix of this uh object will be multiplied with the matrix of its parent and that will be multiplied with the matrix of its parent and the end result is the world matrix of this object. So we can do the same in the outliner. Um we can just plug in matrices into the milk matrix. And if we plug in the child and then its parent and then its grandparent then the output will be the world uh space matrix of the child. So the order is upside down. So if you have the transformation order of multiplication order going from top to bottom in a hierarchy in the outliner the matrix multiplication order of the mil matrix is from top to bottom. the first input matrix is multiplied with the second and then with the third. So that's something to keep in mind. So if we now want to recreate the hierarchy in the note editor, we can say that the matrix output of the lower FK guide that would be the child of the uh upper control because the buffer in in a hierarchy the lower FK control would be uh parented under a buffer and the buffer would be parented under the upper FK control. So the child would be the uh buffer which is the guide and then uh well Maya doesn't display the second plug uh by default. So you have to press one and then three for the second plug to uh show up in the array. So if we then take the world space matrix of the parent and plug it into the second plug. And if we now take the output of the melt matrix which is the guide or the buffer matrix multiplied with the world space of the parent control. If we plug that into the offset parent matrix of the lower control, then now the control still has the the same orientation and offset and the parent control moves the uh lower control. So you can basically see this as follows. The local matrix of the object is a child of the matrix that is the offset parent matrix. And the offset parent matrix is constructed from the guide or the buffer being a child because it's the first block of the upper. So now we can rename the mod matrix node. Um so I'll always use this call this world matrix because this is the world matrix basis position for the FK control. So we can do the same for the uh hand control. We can make another modem matrix node and then we can use the matrix plug from the guide aka buffer. Then refresh the inputs and then we take the world matrix plug from the lower FK control. I plug it into the second. So the buffer is multiplied by the uh world matrix of the lower FK control. And then we take the result and plug it into the offset parent matrix. And then the hand control also has the same orientation as the guide. And its parent drives the control. And now we can adjust the guides and the rig will follow however we manipulate it and still work as intended as a whole. But the downside of this if we would have aligned this to our model and the hand would be nicely oriented and positioned in the wrist but the shoulder was off and we need to adjust it. We cannot change the position of the parent guide without affecting the child guide. So then we have to redo the the hand position which is kind of annoying. Of course, we can unparent the guide and then change the the guide of the upper and then reparent it and then the rig will uh realign itself uh and now still function as intended. But this is kind of a well stupid way to adjust it and it's uh uh prone to errors. So let's look at another way to set this up correctly. So if we want to have a um a way to change a parent guide without affecting its children, we have to ditch the hierarchy in the outliner for this uh as well. So let's just unparent the guides as well and reorder them so that they're in the correct order. Uh now of course the rig is broken because the uh we're using the um matrices of the guides as buffers but now the these objects are in world space. So their world space um transformations will be used as buffer and they're not relative to the parent. So if we want to recreate the local matrices relative to the parent guide, we can do this by using the inversia world matrix. If we create another milk matrix node and if we want to create recreate the lower lower guide matrix or its local matrix relative to its parent guide. We can do this by taking the world matrix of the lower guide and plug it into the first plug of the mode matrix node and then refresh the input list. And if we now multiply this world matrix of this guide with the inversion world matrix of the guide that is its parent then we get the local matrix or aka the matrix that gets me from this matrix to this matrix. So let's do this. Let's take the world inversion matrix, plug it into the second input. And now the output of this mil matrix node is the local matrix as if this guide were a child of this guide, which they aren't in the outliner, but we are recreating this parent hierarchy inside the note editor with this melt matrix node. So if we now take the output of this melt matrix node and plug it into the first input of the uh world matrix uh melt matrix node, you see that the control uh is or again aligned with the guide and the control rig functions again like it's supposed to be. the transformations are still zero and the uh hierarchy is now created in the node editor. So this node basically is the new offset parent matrix or buffer matrix if you want. So usually I call this something like parent offset matrix or you could use it uh a buffer matrix which doesn't really matter but this is my uh acronym that I that I always use. So we can do the same for the uh lower uh guide. So if you take another world matrix note and we plug the world matrix of the hand guide into the first plug of the M matrix node and then because we want this matrix as a relative matrix to be lower we take the inversible world matrix of this guide. So take the inversible world matrix of this guide, plug it into the second plug, and then the output of this matrix is the matrix that brings me from this matrix to that matrix. So we take the output and plug it into the first input of the mode matrix note that we have not named correctly. So let's do that quickly. It's the world matrix for the control and this is the again I call it parent offset matrix. So now you can see that the hand control is also in the correct orientation and the rig is still correctly functioning. And the nice thing now is that we can just reposition this control or this guide without affecting the other guides and the rig still functions as intended. So now we have a nice way to adjust guides without affecting its children. But now we have a system that is quite difficult to align. And if your rig is perfectly aligned to the grid like this is, it's relatively easy maybe to rotate the uh guides so that they point to the next control which you basically always want in a rig. But if for example these have arbitrary uh positions and you want this control to correctly aim with the x-axis to the next control, it is almost impossible to do by hand without using constraints of some sorts. So let's automate this uh alignment of the guides by creating a new matrix based on the positions of the guides. That is a matrix that has the position of the guide but has the correct orientation. So first let's remove the rotations because we're not going to use the rotations of the guides and uh lock them. And then we are going to use an aim matrix to create a matrix that is oriented in the correct way. So let's create an a matrix node and the upper guide oriented matrix will be based on the upper guide. So let's take the world matrix plug of this upper guide and plug it into the input matrix of the A matrix because this is the matrix that we're starting with and this is the matrix that we're going to align. So now we want to point this matrix with the x-axis to the next control. So we take this uh lower guide world matrix and we plug it into the primary target matrix. And if we look in the attribute editor, you have the primary section where we can align uh well the primary axis or a primary axis and in the secondary uh uh segment we can align the the secondary uh uh axis. So we want to align the x-axis. So if we have the 0 1 0 0 and that is multiplied by the uh input matrix that gives us the x m x-axis of the matrix. So this represents the x-axis and then we want to aim it at the matrix and if we use the aim mode then uh this vector is multiplied with this matrix to generate a point in space in world space uh and that point is aimed to. So if you would fill in values here, uh you would create a a position offset relative to this matrix. But we don't want that. We wanted to point at the origin of this matrix. So we'll leave it at zero. So now uh we can temporarily make a locator to visualize this. So if we create a locator and if we take the output matrix of the A matrix and plug it into the offset parent matrix, we can now see that we have created a matrix that points with the x-axis nicely to the uh uh second uh control or second guide. And now we want to align the second axis, which I always use the y-axis for. And I want to point it in the direction of the elbow so that the all the three controls will lay in a plane uh which is a rotation plane of the arm in this case. So let's take the uh hand control for this because the three guides together uh define a a plane. So if we take the world matrix of the FK hand guide, plug it into the secondary target matrix, uh we again want to align the y-axis. So 0 1 0 gives us the y-axis and then the mode is aim and we want to aim at this um matrix. But now you can see that the y-axis is pointing in the forward direction. We want to point it in the uh backwards direction. So we can just basically simply flip the uh input axis to get the negative y-axis to align. And now we have the negative uh or the y-axis pointing in the uh backwards direction. So now we have created an aligned matrix. So if you were to create a a plane and we would parent it under the temporary locator, reset its transformation and have it generate in the Z axis and then scale this. You can see that the plane nicely uh is aligned with all the uh the guides and if we change the guide position uh the orientation plane uh nicely follows all the positions. So let's remove this again. So now we have created the new oriented uh world matrix. So all connections that previously you were going from the upper guide, we will now reroute to use this oriented uh matrix. So let's call this the guide out world matrix. We use the matrix plug because but because this one is in world space, the matrix is the same as its world matrix. So the connection of this matrix we can connect to the output matrix of the oriented matrix. And now the rig explodes and that is because we are also using the inversia world matrix of this guide to calculate the offset matrix or the buffer matrix if you want for the lower control. So we need to have an inversion matrix of this oriented matrix as well. And because this is not a transform node, it is not available as a plug. So we have to create an inversion matrix note. And if we now get the output of this oriented guide matrix, plug it into the input matrix of the inversion matrix. And now if we take the connection that is was coming from the inverse world matrix of the upper guide and connect it to the output of the inversion matrix. You see that the control now is uh back to its original position or correct position. Uh and we have an oriented upper control. So this locator we can remove it was just for a visual cue. So if we now change the position of the lower guide, you can see that the upper control nicely follows and the guide which we're only using the position from is not oriented. But it doesn't matter because we have created the matrix the oriented matrix in the node editor. So let's call this one the world inverse matrix and do the same thing for the lower arm. So for the uh lower uh guide oriented guide, we can make another in matrix node and we plug the world matrix of the lower FK guide into the input matrix because that's the matrix that we're going to align. And then we want to aim the x-axis to the hand guide. So we take the world matrix of the hand FK guide, plug it into the primary target matrix, and again we want the X-axis to aim at this matrix. So that's set up correctly. And let's make a temporary locator again and plug the output into the offset parent matrix of the locator. So now we can see that the x-axis is nicely aligned to the hand control. And then we need to align the secondary axis, the y- axis again to point in the backwards direction. So for this we're going to use the guide of the upper arm again to create this plane. So we take the world matrix of the upper guide, plug it into the secondary target matrix and then again we want it to point in the backwards direction. So we take the negative yaxis for alignment. So minus one and we want to aim at this uh guide. So now we have uh this one oriented as well. You can see that they nicely line into a plane. So this is the lower guide out world matrix. Um and then we can do the same thing. So all the connections from this guide we're going to substitute with connections to the oriented matrix. So we can take the uh world matrix and plug it into the output matrix and this one uh not this one because this connection is used for the orientation of this uh um guide matrix and that's only using the position. So we can leave that connection and this connection is going into the orientation itself. So and then there's still this invers world matrix connection that we need to reroute to this matrix. So, we're going to use another inverter matrix and we're going to plug the output into the input matrix. And then the connection from the world inversion matrix, we're going to reconnect to the output of the invers matrix node. And we're going to rename this world inverse matrix whim. And now you can see that the guide or the control is uh nicely uh uh oriented and also has the zero transformations and the rig still works. Uh we can delete the temporary locator and now we can change the position of the guide and the rig nicely updates to follow the orientation of the controls. So there's only one thing left and that's the orientation of the uh hand guide. So there's two options. We can just basically uh leave it as is because a hand can have a different orientation from the lower arm. Uh but for this purpose I'm going to uh reorient the uh guide to have the same orientation as the uh as the lower uh oriented matrix. So it points in the same direction uh and it's basically just coming straight out of the uh the lower arm. So for this we can use uh uh reuse the oriented matrix which is the output uh of the lower guide uh a matrix and we basically only have to reposition it to the position of the uh hand guide. So we can do this with a blend matrix note. So if we create a blend matrix node, we're going to take the output of the aim matrix of the lower guide and plug it into the input matrix. So if we now create another temporary locator, which is something I often do to check my matrices, you can see that it's at the position of the uh lower arm and it has the correct orientation, the same orientation as the control because well this is feeding the control. So now we want to uh shift this matrix to the position of the hand. So we can basically just say okay take the matrix of the hand guide plug it into the target matrix uh slot for target zero and then in the attribute editor at the target matrix uh parameters we can just say okay I want everything except for or I only want translation so I'll just remove the share rotate and scale weights set them to zero so I only blend the translation and blend it 100% %. So now you can see that the guide is uh at this position or the locator is this position of the hand but has the same orientation. So now we can call this the guide outworld matrix and we can use this to substitute the connections from the uh hand guide. So the uh world matrix uh plug that's going into the parent offset matrix for the uh hand control. We reroute this to the output of the oriented uh guide and uh there is no connection from the invers matrix because there is no child to this guide. Um, so we can remove the locator. And now you can already see that the uh hand control is nicely oriented in the same uh orientation as the uh lower arm. And if I now change the guide, you can see that the controls uh nicely realign themselves. And we have a working realignable uh FK control setup this way which also keeps working uh if you adjust it. So to summarize we just basically have used the positions of the guides and created a new oriented matrix for every guide. So you can uh if you ignore the uh bunching up of control connection lines basically this is the upper guide, this is the lower guide and this is the hand guide and the inversion matrix which we created from them and that feeds into the uh control setup. So if we align them nicely, you can see we have the the buffer or parent offset matrix that feeds into the n matrix that multiplies it with the world matrix of its parent control and then feeds into the control. And the same happens for the lower. You have the buffer or parent offset matrix. It multiplies with the world matrix of its parent and then feeds into the control. And for the uh upper uh control um we only have just the connection because it doesn't have a uh a parent uh where it moves with. But if you would uh have like a main control or it's attached to the shoulder, you would have the same uh setup as this but then connecting to the guide of its parent. So if this is difficult to imagine, you can always uh just for debugging purposes use a a locator in between so you can see the reoriented guides. But this is basically the setup. It's simple and it's fast and it's adjustable. However, there is still something that it's not very nice about this setup. For example, if I set the guides of the upper and hand on the X-axis of the world matrix and just for visual purposes create a a plane again. So, oriented in the Z direction and then remove this. And let's take the output of the oriented upper guide and plug it into the offset parent matrix of the plane and then scale it so we can see the orientation plane of the arm. If we now take this elbow and for example make a straight arm then the alignment well the elbow points upwards uh and maybe we want it to point backwards. So if we now move the elbow just a little bit, the orientation plane plane flips. And if we translate it up or down, the orientation plane well goes berserk because it's aligning the orientation plane based on these three points. So in this setup it's very difficult to create uh an almost straight or straight arm and then correctly uh orient the rotation plane of the arm. So to circumvent this we can use another extra guide to orient the orientation plane of the arm and then constrain the lower arm guide to this plane. So let's do this. Let's create another guide and let's call this one the um ball vector vector guide and the guides. Well, they don't need FK in the name. So, let's remove it. I use that when I copy them. But we're going we're going to use the guides for FK and IK as well. Um so let's position this uh here for now. So now we are not going to use the three guides uh to orient the uh rotation plane but we're going to use the upper the hand and the pole vector to orient the rotation plane. So, we're going to swap the input of the uh aim matrix. So, let's position them a little bit more friendly. So, this now is the pole vector guide. So, now we need to create an extra aim matrix to generate the matrix that is the orientation plane of the arm. So let's create another A matrix. Um, and we're going to use the upper guide uh for this as a starting position. So we take the world matrix of the upper guide and plug it into the input matrix. And then uh let's just directly plug the output into the rotation plane so that we can see what's happening. And then we want to aim it at the hand because we're going to use the upper the hand and the pole vector to define the orientation plane of the arm rotation plane. So it should point in the direction of the hand guide and then use the secondary axis to align to the pull vector object. So let's take the world matrix of the hand guide, plug it into the primary target matrix and say uh x-axis align and then use the aim and no offset. So this is correct. And then now we're going to take the world matrix of the pole vector and plug it into the secondary target matrix of the A matrix and then we want to align the Yaxis or maybe the negative Y-axis again and then set it to aim. And now you can see that the orientation plane is now correctly aligned with the hand and the uh P vector. So if we change the pole vector um and we change the hand the orientation plane nicely follows. But now uh we have defined this orientation plane but the lower or the the lower guide can still be moved anywhere. It can be moved off the rotation plane and we want to constrain the movement of this guide to the orientation plane. So what we can do is uh make this guide uh live in the space of the oriented uh rotation plane of the arm. So what we can basically do is just plug the orientation matrix into the uh guides offset parent matrix. So let's see what happens. um move this out of the way. This is the uh rotation plane. This is the pole vector. So the output of the A matrix, if we take that and we plug it into the offset parent matrix of the lower guide. Of course, now it's the position changes because it has a new uh parent. If we now set this to zero, you will see that the position matches the upper because we use the upper guide as a basis for orienting the uh rotation plane matrix. You can also see it if we select this one. The origin of the matrix is at the position of the upper guide. So what we can now do is move the elbow only in the XY plane because as soon as we move it along the Z axis, it breaks off the rotation plane. And if we now change the pole vector, the arm orientation plane adjusts and the elbow guide still is a child of this oriented matrix uh moves in this plane. So we can lock the Z translation. And now we can freely move the guide in this space and always have a nicely oriented arm and even make a straight arm. Um although we can now still move it in the wrong direction, the opposite direction. So we can limit the translate Y as well. So let's say in the guide limit section for translation we should limit the y-axis to not be positive. So set the max to zero and then we cannot change it further than the straight arm and we can make it uh well only bent in the correct uh direction. But still now if we change the hand for example, make it longer, maybe it should be nice that the default position of the lower guide would always be in the exact middle of the upper and the hand. So we can use another blend matrix to blend the position of the guide so that its default uh position if the values are zeroed out is the nicely in between position. So, let's call this one left arm orient guide. And if we now make another blend matrix and we plug the output of this orientation plane matrix and plug it into the input matrix. And then if we take the hand guide because we want to get in between these two. So we can use this matrix for this position offset. Plug it into the target matrix. And if we now in the attribute editor uh again disable the scale rotate and share because we only want to blend the position and we blend it 50%. So we get halfway in between and we now plug the output of the blend matrix into the offset parent matrix of the lower guide. The lower guide always is positioned nicely in between the uh upper and the hand. And uh we can use the guide of the pull vector to align the uh orientation plane the rotation plane of the arm. Okay. So let's remove the plane because we don't need it anymore. And let's rename this to local guide world matrix because it's the basis world matrix uh position. So now we have uh a redefined setup where we can without a problem create a straight arm and still orient the uh create the orientation for the arm correctly. And the lower guide is now the only guide that is already aligning to the plane because we're using its uh uh orientation to limit it to the rotation plane. So the only downside to this setup might be uh but this is a more of a preference that if you for example move the uh uh upper arm and you want to reposition it a little bit more up that the orientation of the arm changes. the it's now pointing a little bit downwards and if you want to keep it straight back you have to also move the pole vector guide. So you also also have to take into account the position of the pole vector always. So another approach of this would be to skip this uh extra pole vector guide and use an axis of the upper guide to orient the rotation plane in the aim matrix where we define the uh rotation plane of the arm. We are now uh using the pole vector um as an aim position. We're aiming at the position of the pole vector, but we can just as well use the negative uh z-axis of the upper guide as the vector to align with. So, uh we can take the world matrix output of the upper guide and plug it into the secondary target matrix. And then we can say okay we want the still the negative y-axis to be aligned but we do not want to aim it. We want to align it with another vector and that vector is the negative zaxis of the upper guide. So the vector that points in the backwards direction. So now we can discard this pole vector. And now if we use this rotation again. So we unlock the rotation again. If we now rotate this, we use this vector or this orientation of this guide to orient the uh rotation plane of the arm. So if you have this guide here for example in the arm then now the rotation is uh based on the orientation of the upper guide. So rotation in the side direction doesn't really do very much. It's just the this part of the uh vector. So the the negative z-axis that defines the plane. So it's just two ways to set it up. It's a preference. Um, the end result is the same. Uh, it's just another way of manipulating uh the orientation of the rotation plane of the arm. So, let's clean this up a little bit. Um, for the controls, um, we well, we can we can use translation as well for the FK controls. Maybe we can keep it. Um, I usually lock the translation, but uh, let's leave them unlocked for now. And scale. Well, maybe we'll use it again. So, just remove the visibility. And for the uh, hand guide, we're only ever going to use the translation. So, we'll lock and hide the rotation. And for the uh elbow, we're only going to use the X and Y translation because it is constrained to the rotation plane. So we can lock and hide these as well. And for the upper arm, we are using the rotation and the translation. So we'll just use lock the uh scales. And we're going to leave the orientation setup as it is right now. So we can remove the pole vector guide. It's not used. So now let's uh compound this into a module. Um a rig module is something that I use uh for limbs or legs or body. It's it's basically a part of a rig that is a um self-contained um part which only has a few connections to other parts. uh and the rest of the nodes are only internally connected. So uh for example, my bipad rig is com uh composed of a few uh modules, the spine, the head, neck, and an arm, shoulder, and leg modules. And they're all connected uh via matrix plugs. So let's set up this arm as a module and then create uh a root module and connect these together to see how that would work. So I can create all groups by hand, but I'll just use uh one of my tools to quickly um create it. So let's call this arm left. And basically uh this just creates an hierarchy of um groups, the transform nodes. Um, you have like the the module uh uh group and it has a a setup um group where I add some attributes that are for initial setup of the rig. Um that can be handy to quickly find some attributes uh to set or change. So then I have a group that's called inputs which are basically the time dependent uh inputs to a parent module as well as the guide of that uh connection. So uh I'll show this later on if I connect the uh the root to this um module. But basically this u parent in this case is u for example the control of the parent module where this module has to move with and the parent guide is the guide the oriented guide of that same control. So I know the animated position or change position and I know the the guide position. Then the guides are basically the guides for this module. So we can move these into the guides group. Um and then there is the controls group. Well, it speaks for itself. That's where the controls should go. And then I have a rig nodes group which has every node that is well part of the rig. for example, IK handles or deformer um diagnoses for for whatever for um latises or bent deformers or and so on. Then joints where the joints will be placed in as soon as we create the joints geometry. This is uh for support geometry only. It's not the geometry of the character itself. It's only for intermediate geometry that is needed for deformation. Uh helpers are visual um yeah controllers or visual cues um visible to the user but they don't have any u driving capabilities to the rig and then outputs it's kind of the counterpart of the inputs which where I can uh add uh nodes that have the animation or the position of some controller. For example, I could add the uh hand control uh to the output or a note that uh represents the position of the hand control because as soon as we use uh add not F IK uh controls to the setup um the end result of the arm will be a blend between the FK and the IK position. So there will be a an output matrix connected to a node to the outputs and then as well the guide that represents that uh orientation and position in this dress pose. So let's uh add the uh root for example maybe position the arm without that one of course a little bit higher. So, and now add another let's call it root. So I just get basically the same module structure but now for root uh let's create um a locator and put it in the guides and call it root main guide and then add some quick controls for this uh uh like so and add it to the controls and call this main control. Um yes. So now in the graph note editor, let's just clean this up a little bit. and add it maybe to a different tab. So the guide and the control can be connected directly. In practice the the the control the root control of a rig will most of the times stay on the origin of the of the world. But I have also encountered uh many times that for example for bipads that the character was modeled not center to the uh origin. So the front legs were here and the back legs were here. So then the uh the the root control logically would be placed uh in between. So to make that uh possible we could just basically uh grab the world matrix of the guide and plug it into the uh offset parent matrix of the root control or the main control. And if we now uh I'll just quickly change the color. This is basically a script that sets the uh draw color overrides on the uh note. So if you go to draw overrides, I just basically set these values, enable override and set the color index. That's the what the tool does. Um but it makes it nice to see which locators are guides. So I can now uh position the uh the main control anywhere and the uh same as with the other controls of the arm the uh transformations stay uh notified or at the default values. So then maybe look and hide the visibility. Um, and then I need to set the control and the guide as outputs uh for this module. So I can connect it to the uh ARM module and drive the ARM module with this. So how I normally do this, I just make an empty uh group or a transform node and I call this the uh root main output and then I duplicate it and I call it main guide output. So, and in this case, it's it's fairly simple because the the main output is basically just the world matrix of the main control plugged into the offset parent matrix and then the guide output is basically just the world matrix of the guide. So, this is fairly simple. And now I have created an interface uh for other modules to connect to. Um of course this creates extra transform nodes uh which take up calculation time for not for the guide because that is calculated only once because it will never be time dependent. But this uh transform node is always dependent on the main control which can be animated. Um so this introduces extra calculations. Uh but it makes it easier for debugging and swapping modules within a rig. Um and if you want to you can always create a publish post script to check the connections to this node and um take all the output connections uh of the offset parent matrix and then plug them into the incoming uh attributes and then delete these nodes. So you can uh have an extra script that optimizes your rig for uh to get to get rid of these uh output nodes. But for now we'll just leave them in because it makes it easier to um to work with the modules. So now we can for example take the ARM module uh parent input and parent guide input. And then what I always do uh you could take the world matrix of this node but I'm just going to take the offset parent matrix and uh make it a pass through uh attribute. So if I go to other and take the offset parent matrix and plug it into the offset parent matrix of the input node. I have now just passed through this connection into the input and I can do the same for the guide input and output. So now I have connected the input of the ARM module with the output of the uh the root module. And now if I go back to my ARM module, I can add uh these nodes in here. And now I can drive the upper control because now the upper control does not have any uh parent dependencies. It is basically now at the same position as the oriented uh upper guide control. So we can do the same that we did for the uh other controls. We can calculate the uh parent offset matrix. So the offset matrix relative to its parent and then we can add that or multiply that offset with the parent control uh to create the new offset parent matrix. So in this case for the upper FK control the parent guide is the uh input the parent guide input node and the parent uh driver the uh controller is the parent input because that's connected to the uh parent control of the the main control of the root. So let's create a melt matrix node and then connect the uh guide world matrix of the upper FK control and refresh the input plugs and then multiply it with the inversion world matrix of the uh input guide. So the world inversion matrix of its parent guides basically. And this will give us the control par offset matrix. And now we can multiply the offset matrix with the uh parent um control or the input parent input which is connected to the um root control. So we create another mult matrix node. And then we set the parent offset matrix as the first bug and then take the offset parent matrix because we are using the uh attribute as a pass through. So the offset parent matrix from the parent input was connected to the output uh of the root module and that was connected to the main control. So we're just using these input and output nodes as pass through nodes. So we connect that to um the second input and then we connect this to the offset parent matrix. So nothing changes except for the fact that we now have connected the ARM module to the uh root module. So let's call this root matrix. And now if we change the uh root control, the uh arm uh moves along with it and we can still reposition the root control to wherever we want because the offsets are always recalculated from the guides. So it doesn't matter where the root control is, the uh rig always stays functional. So, this can be nice um if you want to change the root position uh of a rig or uh when you're still working on it, tweak the positions. So, now we have two modules. We have the root module uh which is a fairly basic one and we have the ARM module uh which is also a basic one. It only has FK but uh we can add uh more to it. But this is the basic setup. um of how I build my rigs with modules. So we have inputs which connect to another module and we have outputs uh that also connect to other modules. So within a module all nodes are only dependent on nodes that are part of the module and only via the inputs and outputs it uh well communicates with other modules uh and the scene.
Download Subtitles
These subtitles were extracted using the Free YouTube Subtitle Downloader by LunaNotes.
Download more subtitlesRelated Videos
Download Subtitles for Mastering Matrices in 3D Animation
Enhance your learning experience by downloading accurate subtitles for the video on mastering matrices in 3D animation. Subtitles help you better understand complex concepts and follow along easily, making the animation techniques more accessible.

Download Subtitles for Geometry Class 2 Video Lessons
Enhance your learning experience by downloading accurate subtitles for Geometry Class 2 videos. Subtitles help you follow along easily, improve understanding, and make revising key concepts more effective.

Download Subtitles for 10 Fitting the Map to a Texture Video
Enhance your understanding of the '10 Fitting the Map to a Texture' tutorial by downloading accurate subtitles. Perfect for learners who prefer reading along or need captions for clarity and better comprehension.

Download Subtitles for 140 Soft Acrobatics Moves Tutorial
Enhance your learning experience by downloading accurate subtitles for the '140 Soft Acrobatics Moves Adult Beginners Can Actually Master' video. Subtitles help you follow instructions clearly, improve understanding, and practice safely at your own pace.

Download Subtitles for Mod-01 Lec-2 Symmetry in Perfect Solids
Enhance your learning experience with accurate subtitles for Mod-01 Lec-2 Symmetry in Perfect Solids. Download captions to better understand complex concepts and follow along with ease. Ideal for students and educators aiming for clarity and accessibility.
Most Viewed

Untertitel für 'Nicos Weg' Deutsch lernen A1 Film herunterladen
Laden Sie die Untertitel für den gesamten Film 'Nicos Weg' herunter, um Ihr Deutschlernen auf A1 Niveau zu unterstützen. Untertitel helfen Ihnen, Wortschatz und Aussprache besser zu verstehen und verbessern das Hörverständnis effektiv.

ดาวน์โหลดซับไตเติ้ล DMD LAND 3 The Final Land Day 1
ดาวน์โหลดซับไตเติ้ลสำหรับวิดีโอ DMD LAND 3 The Final Land Day 1 เพื่อช่วยให้เข้าใจเนื้อหาได้ง่ายขึ้น และเพิ่มความสะดวกในการติดตามทุกช่วงเวลา เหมาะสำหรับผู้ชมที่ต้องการความชัดเจนและเข้าถึงข้อมูลอย่างครบถ้วน

Descarga Subtítulos para NARCISISMO | 6 DE COPAS - Episodio 63
Accede fácilmente a los subtítulos del episodio 63 de '6 DE COPAS', centrado en el narcisismo. Descargar estos subtítulos te ayudará a entender mejor el contenido y mejorar la experiencia de visualización.

Subtítulos para TIPOS DE APEGO | 6 DE COPAS Episodio 56
Descarga los subtítulos para el episodio 56 de la tercera temporada de 6 DE COPAS, centrado en los tipos de apego. Mejora tu comprensión y disfruta del contenido en detalle con nuestros subtítulos precisos y accesibles.

Download Subtitles for Your Favorite Videos Easily
Enhance your video watching experience by downloading accurate subtitles and captions. Enjoy better understanding, accessibility, and language support for all your favorite videos.

If you found these subtitles useful, consider buying us a coffee. It would help us a lot!