Download Subtitles for 2026 Unreal Engine to DaVinci Resolve Guide

The 2026 Unreal Engine to Davinci Resolve Guide - ACES & sRGB
William Faucher
SRT - Most compatible format for video players (VLC, media players, video editors)
VTT - Web Video Text Tracks for HTML5 video and browsers
TXT - Plain text with timestamps for easy reading and editing
Scroll to view all subtitles
Have you ever rendered a shot in Unreal
only to find it looks nothing like your
viewport? Things are dark. The colors
are all weird between aces and OCIO
configs. It is confusing and
frustrating. And that is what we're
looking at today. I made a tutorial for
Da Vinci Resolve a few years ago, but
I'm an eternal student. I'm always
learning and this revised workflow is so
much easier. Not only will your renders
match your viewport, will improve upon
them from there. But William, you might
ask, why bother with yet another app?
Why not just color grade in Unreal?
What's the point? Great question.
Resolve is specifically designed for
color grading, and its tools are far
more robust than what Unreal offers. It
is built for giving you complete control
over your final image in a
nondestructive way. Color science is
complicated. I don't claim to be an
expert, so please take all of this with
a grain of salt with respect to your own
production needs. Full disclosure, this
video is not sponsored. I do have
affiliate links for Dehancer, which is a
plugin for Da Vinci Resolve that we'll
be looking at later. That said, I've
just released a free update for Easy Fog
with performance optimizations and flow
map driven animation to add realistic
movement. Plus, my entire easy
collection of tools are all currently on
sale on Fab for the next week. So, grab
them while you can. With that out of the
way and into Unreal, let me show you
what my render settings are. If you
don't know how to render in Unreal, this
video I made recently has you covered
with everything you need to know about
the latest information. But for now,
here are the important render settings.
The file format I'm rendering in is EXR,
which is industry standard and offers
the best rendering quality and bit
depth. We won't be rendering in JPEG or
PNG because they really fall apart
quickly when you're editing, color
grading, or compositing. Next is color
output. And this is probably the most
important part of this video. Color
output revolves around the dreaded tone
curve. You might have heard about it
before, and it's not a bad thing. Just
don't get tone curved mixed up with tone
mapper. These are two different things.
If you watch my previous ASUS color
grading workflow, you might remember
setting up an OCIO config, finding and
downloading a config file online just to
handle the color space conversion. But
this time, it's unnecessary. Why?
because we can do the color space
conversion directly in Da Vinci Resolve.
No need for any extra conversions at
render time because we're rendering in
linear sRGB. Keeping things simple to
prove it. Here are two identical shots.
One rendered with an OCIO config
rendering in ASUS CG and the other in
linear sRGB. When properly converted in
Resolve, the results are identical. But
if you need your EXR file to be rendered
directly in ACCG or you want your
viewport to have a viewport transform,
which may be handy in a bit, here is
how. One, ensure you have the open color
IO plug-in enabled. Two, right click in
your content browser and create an open
color IO configuration file. Three, open
this config file and type OCIO
colon/default at the configuration file
path. The OCIO config is now built
directly into the engine with no need to
download anything. This is so nice.
Thank you, Epic. Next, you need linear
sRGB and ASUS CG as the desired color
spaces and sRGB ASUS 1.0 SDR video as
the display view. I'm going to refer to
the display view and how it can help you
later in this video. Remember this.
Next, in the color output node of movie
render Q, tick is enabled in the OCIO
configuration. Load the configuration
file we just created. In the transform
source, put in linear sRGB and ACCG as
the destination. Again, I don't even
recommend you do this unless you have a
reason for needing your EXR to be in
ASES from the get-go. I just want to
show you how it is easy to do. Okay, so
moving on. The setting to use in the
color output node, you need to ask
yourself if you want to render with a
tone curve on or off. What does this
mean for you, the artist? With the tone
curve on, which is default, you get a
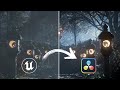
one:1 match with the viewport. Here's an
example. On the right, a render properly
transformed into Vinc Resolve, and on
the left, the Unreal viewport. They are
identical. The downside is this render
is not linear nor aces, limiting your
flexibility in post. The baked in tone
curve makes color grading harder, even
in 16- bit EXR. Avoid this for
compositing or doing serious color work
in post. With the tone curve disabled,
it outputs linear sRGB, which I
recommend. With minimal tweaking and
resolve, you'll get within 99% viewport
accuracy with the added benefit of full
flexibility for compositing, matching
shots with other renderers, or
converting to a log profile if you want.
That is how I matched an ASUS render
earlier because it is a linear image.
That would not work if I left the tone
curve on. So, there's no right or wrong
choice here. It just depends on what you
need. Personally, I recommend disabling
the tone curve, but I'll show you how to
correctly convert every option we talked
about tone curve enabled, disabled, or
even if you rendered to ACCG directly. A
few additional things you can set up in
your level post-process volume are the
following. One, make sure your post
profit volume is set to unbound, but you
can set the blue correction and expand
gamut to zero. Blue correction can fix
some weirdness that occurs in bright
blues, and expand gamut does some fakery
to give the impression of wider gamut,
but I really struggle to see any
difference. And if anything, it is
making your colors wrong. These are not
mandatory, so don't fret if you forgot
to change it. You probably won't even
notice. It's just good to know about.
Okay, that was a lot of info, but now we
can render out our frames and move on to
Da Vinci Resolve, which is free to use.
It also has a paid studio version that
has a few extra bells and whistles that
is not absolutely essential. You can do
most of what I'm going to show you here
with the free version. I want to preface
that color grading is a very personal
thing. What one person likes, another
person might hate. There are entire
channels on YouTube dedicated to just
color grading. So, the point I want to
drill into you here is that there's no
right or wrong way to color grade a
shot. It's all about what you or your
client likes in the end. I just want to
show you the tools at your disposal to
get you started, both free tools and
paid ones. So, with Da Vinci Resolve
open, the first thing we want to do is
establish our timeline settings by going
to file and then project management. We
want to assign our resolution and
desired frame rate. My resolution here
is
2560x440 and this video is in 30 fps,
but there's no correct setting here.
Just choose what you want for your
project. You're going to find a bunch of
buttons at the bottom here. You got
media, cut, edit, fusion, color, fair
light, deliver. To import our renders
from Unreal, make sure you're on the
edit page. And here on the left in your
media pool, rightclick, import media,
and select all the renders and import.
Resolve is smart enough to figure out
that your image sequences are going to
be one clip. Once imported, drag and
drop the clip onto your timeline like
this. Now, if you've rendered in EXR
before, you know the colors are all
kinds of weird. Everything looks wrong
and dark. We just need to tell Da Vinci
Resolve how to interpret this render.
This doesn't happen with JPEG or PNG
because they are already in 8bit sRGB
with the tone curve baked in. For
demonstration purposes, I rendered out
the exact same shot in JPEG with the
tone curve left on as is the default,
which I will be using as our ground
truth reference here. If we take a
side-by-side comparison here, you'll see
we have a match. So, with our shots
imported, let's move on to the color
page, which is where we will convert and
display our renders correctly and begin
color grading them. So, once we are in
the color page here, you'll notice I
have four renders right here. If you
don't see that when you import your
clips, you can click on the little clip
button up here. I have one with the tone
curve enabled left by default, one with
the tone curve disabled in linear sRGB,
the third one in ASUS CG, and the JPEG
is my ground truth reference. We know
the JPEG matches my viewport in Unreal.
So, the way to convert our file
correctly is we need to add the ASES
transform node in the effects tab right
over here. If you don't see this, click
on FX up here and it will show up. Drag
and drop this into your node graph and
connect it like this. The settings we
need to put in here for a tone curved
image, we're going to set this to sRGB
linear. Bear with me. I know it sounds
wrong. And output transform is going to
be sRGB texture. And now you'll see
compared to my JPEG, it is identical.
Now, what I recommend you do is to
render with the tone curve disabled. And
again, we're going to add the ASA
transform node connect as such. Input
transform is going to be linear sRGB.
And the output transform just regular
sRGB. Now, for the third shot, this one
is an ASUS CG. Again, ASUS transform.
Input transform is going to be ASUS
CG and output will be sRGB.
You'll see the render with the tone
curve disabled is identical to the ACCG
one, but both of these that are linear
do not match the JPEG. You'll see it is
a little bit darker than our JPEG. You
will never get a perfect match between
Unreal's default viewport and your
render. When you disable the tone curve,
I found the render will always be about
one stoper. And that is because Unreal's
tone curve is not aces exactly. The math
is based on it, but it uses a different
target brightness and shadow rolloff.
So, it is acid flavored, but not a true
aces. But there is a way you can get a
one one perfect match with the viewport
and your render even with a linear
workflow by using an OCIO viewport
transform. You remember that display
view I talked about earlier in the OCIO
config we made? Remember this? Let's use
it in Unreal. Click on the lit button
here, then OCIO display, then tick
enable display, and load the config file
we made. There's now two dropown menus.
In the top one, use linear sRGB. And in
the bottom one, use the ASUS 1.0 SDR
video display view, and your viewport
will now match your linear renders
perfectly. Remember how I said that
Unreal's tone curve is not exactly aces?
This way, our viewport is now displayed
in a known profile that matches what
you're converting to in Da Vinci
Resolve. So, one could argue that a good
workflow is to set up the viewport
transform at the beginning of your
project. Author your artistic content
with the look done in the viewport and
render from there with the tone curve
disabled like I showed you. That way,
you will never have any surprises. But
remember, it's okay if you don't have a
perfect match, too. The whole reason
we're grading in Resolve is specifically
because I don't want it to match my
viewport. I want to change it and make
it better. So, don't overthink it. But
also, if I wanted to take this and
convert it to a log profile, let's say
you've got some LUTs that you want to
use, instead of converting it to sRGB, I
can convert it to something like Canon
Log 3. If you want a log profile, you've
got it. Once we converted it to log, I
can just create a new node and adjust
the curves like this and really, you
know, fine-tune the look that I want. I
don't actually hate this way of working,
but one thing at a time. Now that we've
gotten our renders correctly converted,
we can get started with actually color
grading our shots. And the beauty of
working in Resolve is this
non-destructive node-based editing. So
clicking on the ASUS transform node
here, I'm going to press the Alt S key
and that creates a new node. So with
this new node here, you'll see at the
bottom here, we got lift, gamma, gain,
and offset. As I adjust these, I want
you to pay attention to the waveform on
the right hand side here. The waveform
tells us where the highlights and the
shadows of our shot are. So as I adjust
the lift here, lift means shadows. And
notice how when I adjust the lift, it
mostly affects the lower part of the
waveform. It adjusts my
shadows. Gamma is the
midtones. Again, the waveform mostly the
middle range moves here. It doesn't
really affect the shadows or the
highlights as much. Gain is the
highlights. So again, if I move this,
notice how the only the upper part of
the waveform is being
affected. And offset moves everything
evenly. So, if I adjust this like that,
you'll see the whole waveform does not
kind of stretch. It all moves up or down
evenly. On the right hand side here, you
have the effects library, which has a
whole bunch of stuff you can explore and
dive into, but I'm only going to show
you a couple of them in this video. The
first thing I like to do is to rename my
nodes. And I got to call this one
contrast. I like to have one node per
thing I'm doing. So, one for contrast,
one for color correction, one for color
temperature, maybe that kind of thing.
You get the idea. So, let's pay
attention to the waveform here. If I
zoom in, you'll see we really have quite
a few almost clipping areas. So, what I
like to do in that case is I like to go
to the node before the as transform. And
in the curves, I'm just going to lift it
just a tiny little bit. You don't need
to go very far. You don't need to go
like that, but just a teeny tiny little
bit to lift it up. Like that is perfect.
just to make sure that we're not
clipping any blacks. I'll be able to
reduce those shadows later. And now by
going back to my contrast node, you'll
see at the bottom here, we have more
space to kind of crunch those blacks
down a little bit. So in the contrast
node, I'm going to click on my curves
here and just really fine-tune, bump
those highlights a little bit, bring
those blacks down a tiny bit to really
give a give us a punchier look. So by
hitting Ctrl D on a node, you can
disable it and reenable
it. So that is my first contrast
adjustment. I'm going to create a new
node with by again hitting Alt S. And
I'm going to do a little bit of color
correction here. So I let's say I want
the shot to be a tiny bit warmer. So I'm
going to go to temp right here and maybe
crank it up a tiny little bit. You don't
don't go overkill, of course, but just a
little bit to warm up the shot ever so
slightly. I'm going to right click and
name this color correction. Something I
like to do sometimes to get a better
visual idea of what I'm looking at is to
grab the saturation and just crank it up
like crazy and see exactly which colors
are in the scene. So I can see here that
there is a lot of blue in the scene. And
I want to
homogenize my scene a little bit by
reducing the amount of blues here. So
there's a really cool feature
uh right here called hue versus
saturation. And by clicking on that, I
can now click right here. And you'll see
it creates three points. We have a spike
in the blues here, and that is over here
where there's a bit more blue in the
sky. I can either increase that
saturation or decrease it. It's very
subtle, but I just want to bring the
blues down a little bit to make the
clouds feel a bit just less bluish.
Another very cool thing I can do is
clicking on hue versus hue right here.
And let's say I want the green here to
be a little bit less green. I want again
I want to homogenize the shot and make
the greens a little bit more warm in
tone. I can by clicking on the greens
here. You'll see now we have three more
points. I can change the color of those
greens by moving this point down right
here. So, I'm just going to nudge it a
teeny tiny bit to make it a little bit
warmer in tone to make the whole shot
feel a bit more cohesive. These color
corrections can be really, really
minimal. You don't need to go super
crazy, but it's just nice to have that
kind of granular control over the look
of your shot. If there's a part of your
frame you don't like a specific color,
you can kind of nudge those pixels in a
direction you want. Next, I like to add
a little bit of vignetting to my shot.
And so, we're going to hit Alt S, create
a new node. And we're going to click on
the little round circle here, here, and
click on this here. And you'll see we
got a circle in our frame. I'm going to
move this like
such. And go back to our curves
adjustment. And I'm gonna bring this
down like that. Vignetting is something
that occurs in real life with real
lenses. I love how a vignetting can help
direct the eye towards the center of the
frame. It's just a little something that
I love to add to my shots. Next, I want
to show you how you can paint a little
bit with light. So, again, alt s to
create a new node. And I'm going to go
back to my little circle here, and I'm
going to again create another circle
mask. But this time, I'm going to paint
a god ray in my scene like
this. And now, going back to my curves
adjustment, we can bump it up like that.
And you'll see now I can move. We're
really just painting with light here.
I'm adding a little bit of a mask just
to kind of fake a little bit of a god
ray coming in. And we can maybe like
lift up those blacks a little bit as
such. So if I disable it and enable it,
you'll see we added just a teeny tiny
little something. You need to be really
careful not to overcook your color
grading. It's very easy to go over the
top. A good rule of thumb is to apply
your edit and then divide everything by
half because like I said, we tend to go
a little bit too far sometimes. So, just
remember that. Next, I can add a little
bit of glow. Glow is basically bloom in
Unreal. So, I'm going to add a glow node
by searching for glow and adding it to
our shot like this. You'll see glow can
be a little bit strong sometimes. I like
to set it to screen to make it a little
bit less pronounced.
We can adjust the shine threshold here
and the
opacity along with the spread. It's very
easy to make things look a little bit
too bloomy and too magical. So, be very
careful with this setting with this
node, but you get the idea. And now with
just a few nodes, we went from this to
this in just a few minutes. So, I just
wanted to hammer home how easy it is to
just push your renders a little bit
further. All of this can be done with
the free version of Da Vinci Resolve.
Now, I'm going to show you one little
thing that comes with the studio version
of Resolve. Again, our library here. I'm
going to search for the film look
creator and add it to my graph here. The
film look creator essentially
consolidates everything we just did here
in one node. See, we got the exposure,
we got the contrast, highlight
adjustment, we've got the vignetting
that we added earlier, we got bloom
adjustments here. The way I showed you
before does give you way more control,
but it is nice to have everything kind
of built into one handy node. Film grain
is one of those things where you either
love it or you hate it. Personally, I'm
a sucker for it, so I'm going to use it
in these shots. So, again, this is
before and this is after. I want to
showcase one last tool I have under my
belt, and that is Dehancer. I've used
Dehancer on many renders in the past,
and this is how I add some magic sauce
to my renders. It is a paid plugin for
Resolve. Again, this video is not
sponsored, but I do have an affiliate
link down below where you can get 10%
off all Dehancer products using the
promo code William 10. The film look
creator I showed you just came out with
Da Vinci Resolve 19. It is largely based
off of DeHancer. You'll find many of the
exact same settings here. Where Dehancer
really shines, however, is with its film
profiles. These are based on real film
stocks. And I love this because as
someone who dabbles in film photography,
I can get my renders to look like they
were shot on these rolls of film. I even
have a roll of Kodak Portra 800 here on
my desk. And here in Dehancer, I can
find the portrait profile. You have a
ton of them to choose from. And they
immediately give you a very good
starting point. It looks really good.
Analog film develops very differently
depending on whether you over or
underexpose it. So there's a slider here
that shifts the colors around a bit. the
same way. It is a lot of fun to use.
Dehancer also has some of the best film
grain I have ever seen because unlike
the film look creator we just looked at
or even the film grain node in Resolve,
Dehancer doesn't just slap on a grain
texture overlay, dehancer actually
reconstructs your image and softens your
footage based on grain intensity. Just
like film grain behaves with real
cameras. Here's a comparison between the
film grain overlays we see in Resolve
and Dehancer film grain. I hope you're
able to see the difference given how
aggressive YouTube's compression can be.
But I love the way Dehancer softens my
image and gives my shots a much more
realistic, tangible look to them. The
industry veterans among you know that we
have often intentionally blurred our
renders a bit to break up that fake CG
look. This is the best possible way to
do that. Now, Decaster has a few options
available. There's the pro version that
I have here, but there's also a much
cheaper light version and other options
if you only want the film grain, for
example. There's a free trial you can
try out, too. That said, there are no
cheap colorist plugins out there. They
are all pretty expensive, and Dehancer
is the cheaper budget friendly one. If
you're just a hobbyist and simply want
some pretty renders for social media, I
don't actually recommend paying for
this. The free tools in Resolve will be
more than good enough. But if you are a
working professional or someone who
takes their renders very seriously, give
Dehancer a try with the trial. I
absolutely love it. Again, there is no
sponsorship here. They are not paying me
to say this. It's just a tool I can
wholeheartedly recommend. So, use the
link down below with the promo code
William10 to get 10% off. Once we're
done with our grade here, there's two
ways to export your shot. If you just
want to export a still image, right
click here, grab still, and it will show
up in your gallery here. You could then
export it to JPEG or whatever you want
by right-clicking on it. From there, for
video, we move on to the deliver page at
the bottom here. Add the settings you
want, such as file name and location on
disk. Personally, I like to render in
MP4, in H.264, or H.265. And my general
rule of thumb for the quality of the bit
rate is frame rate times 2. So, if I'm
rendering a 24 fps shot, I will set it
to
48,000. If it is 30 fps, I will set it
to 60,000. When you're ready, click on
add to render queue and render your
video from there. And that's it. I know
this was a bit of a wordy and super
technical video, but I hope you found it
helpful. Again, all of my easy tools are
on sale on Fab for the next week, so get
them while you can. Thank you so much
for watching, and as always, folks,
happy rendering.
Full transcript without timestamps
Have you ever rendered a shot in Unreal only to find it looks nothing like your viewport? Things are dark. The colors are all weird between aces and OCIO configs. It is confusing and frustrating. And that is what we're looking at today. I made a tutorial for Da Vinci Resolve a few years ago, but I'm an eternal student. I'm always learning and this revised workflow is so much easier. Not only will your renders match your viewport, will improve upon them from there. But William, you might ask, why bother with yet another app? Why not just color grade in Unreal? What's the point? Great question. Resolve is specifically designed for color grading, and its tools are far more robust than what Unreal offers. It is built for giving you complete control over your final image in a nondestructive way. Color science is complicated. I don't claim to be an expert, so please take all of this with a grain of salt with respect to your own production needs. Full disclosure, this video is not sponsored. I do have affiliate links for Dehancer, which is a plugin for Da Vinci Resolve that we'll be looking at later. That said, I've just released a free update for Easy Fog with performance optimizations and flow map driven animation to add realistic movement. Plus, my entire easy collection of tools are all currently on sale on Fab for the next week. So, grab them while you can. With that out of the way and into Unreal, let me show you what my render settings are. If you don't know how to render in Unreal, this video I made recently has you covered with everything you need to know about the latest information. But for now, here are the important render settings. The file format I'm rendering in is EXR, which is industry standard and offers the best rendering quality and bit depth. We won't be rendering in JPEG or PNG because they really fall apart quickly when you're editing, color grading, or compositing. Next is color output. And this is probably the most important part of this video. Color output revolves around the dreaded tone curve. You might have heard about it before, and it's not a bad thing. Just don't get tone curved mixed up with tone mapper. These are two different things. If you watch my previous ASUS color grading workflow, you might remember setting up an OCIO config, finding and downloading a config file online just to handle the color space conversion. But this time, it's unnecessary. Why? because we can do the color space conversion directly in Da Vinci Resolve. No need for any extra conversions at render time because we're rendering in linear sRGB. Keeping things simple to prove it. Here are two identical shots. One rendered with an OCIO config rendering in ASUS CG and the other in linear sRGB. When properly converted in Resolve, the results are identical. But if you need your EXR file to be rendered directly in ACCG or you want your viewport to have a viewport transform, which may be handy in a bit, here is how. One, ensure you have the open color IO plug-in enabled. Two, right click in your content browser and create an open color IO configuration file. Three, open this config file and type OCIO colon/default at the configuration file path. The OCIO config is now built directly into the engine with no need to download anything. This is so nice. Thank you, Epic. Next, you need linear sRGB and ASUS CG as the desired color spaces and sRGB ASUS 1.0 SDR video as the display view. I'm going to refer to the display view and how it can help you later in this video. Remember this. Next, in the color output node of movie render Q, tick is enabled in the OCIO configuration. Load the configuration file we just created. In the transform source, put in linear sRGB and ACCG as the destination. Again, I don't even recommend you do this unless you have a reason for needing your EXR to be in ASES from the get-go. I just want to show you how it is easy to do. Okay, so moving on. The setting to use in the color output node, you need to ask yourself if you want to render with a tone curve on or off. What does this mean for you, the artist? With the tone curve on, which is default, you get a one:1 match with the viewport. Here's an example. On the right, a render properly transformed into Vinc Resolve, and on the left, the Unreal viewport. They are identical. The downside is this render is not linear nor aces, limiting your flexibility in post. The baked in tone curve makes color grading harder, even in 16- bit EXR. Avoid this for compositing or doing serious color work in post. With the tone curve disabled, it outputs linear sRGB, which I recommend. With minimal tweaking and resolve, you'll get within 99% viewport accuracy with the added benefit of full flexibility for compositing, matching shots with other renderers, or converting to a log profile if you want. That is how I matched an ASUS render earlier because it is a linear image. That would not work if I left the tone curve on. So, there's no right or wrong choice here. It just depends on what you need. Personally, I recommend disabling the tone curve, but I'll show you how to correctly convert every option we talked about tone curve enabled, disabled, or even if you rendered to ACCG directly. A few additional things you can set up in your level post-process volume are the following. One, make sure your post profit volume is set to unbound, but you can set the blue correction and expand gamut to zero. Blue correction can fix some weirdness that occurs in bright blues, and expand gamut does some fakery to give the impression of wider gamut, but I really struggle to see any difference. And if anything, it is making your colors wrong. These are not mandatory, so don't fret if you forgot to change it. You probably won't even notice. It's just good to know about. Okay, that was a lot of info, but now we can render out our frames and move on to Da Vinci Resolve, which is free to use. It also has a paid studio version that has a few extra bells and whistles that is not absolutely essential. You can do most of what I'm going to show you here with the free version. I want to preface that color grading is a very personal thing. What one person likes, another person might hate. There are entire channels on YouTube dedicated to just color grading. So, the point I want to drill into you here is that there's no right or wrong way to color grade a shot. It's all about what you or your client likes in the end. I just want to show you the tools at your disposal to get you started, both free tools and paid ones. So, with Da Vinci Resolve open, the first thing we want to do is establish our timeline settings by going to file and then project management. We want to assign our resolution and desired frame rate. My resolution here is 2560x440 and this video is in 30 fps, but there's no correct setting here. Just choose what you want for your project. You're going to find a bunch of buttons at the bottom here. You got media, cut, edit, fusion, color, fair light, deliver. To import our renders from Unreal, make sure you're on the edit page. And here on the left in your media pool, rightclick, import media, and select all the renders and import. Resolve is smart enough to figure out that your image sequences are going to be one clip. Once imported, drag and drop the clip onto your timeline like this. Now, if you've rendered in EXR before, you know the colors are all kinds of weird. Everything looks wrong and dark. We just need to tell Da Vinci Resolve how to interpret this render. This doesn't happen with JPEG or PNG because they are already in 8bit sRGB with the tone curve baked in. For demonstration purposes, I rendered out the exact same shot in JPEG with the tone curve left on as is the default, which I will be using as our ground truth reference here. If we take a side-by-side comparison here, you'll see we have a match. So, with our shots imported, let's move on to the color page, which is where we will convert and display our renders correctly and begin color grading them. So, once we are in the color page here, you'll notice I have four renders right here. If you don't see that when you import your clips, you can click on the little clip button up here. I have one with the tone curve enabled left by default, one with the tone curve disabled in linear sRGB, the third one in ASUS CG, and the JPEG is my ground truth reference. We know the JPEG matches my viewport in Unreal. So, the way to convert our file correctly is we need to add the ASES transform node in the effects tab right over here. If you don't see this, click on FX up here and it will show up. Drag and drop this into your node graph and connect it like this. The settings we need to put in here for a tone curved image, we're going to set this to sRGB linear. Bear with me. I know it sounds wrong. And output transform is going to be sRGB texture. And now you'll see compared to my JPEG, it is identical. Now, what I recommend you do is to render with the tone curve disabled. And again, we're going to add the ASA transform node connect as such. Input transform is going to be linear sRGB. And the output transform just regular sRGB. Now, for the third shot, this one is an ASUS CG. Again, ASUS transform. Input transform is going to be ASUS CG and output will be sRGB. You'll see the render with the tone curve disabled is identical to the ACCG one, but both of these that are linear do not match the JPEG. You'll see it is a little bit darker than our JPEG. You will never get a perfect match between Unreal's default viewport and your render. When you disable the tone curve, I found the render will always be about one stoper. And that is because Unreal's tone curve is not aces exactly. The math is based on it, but it uses a different target brightness and shadow rolloff. So, it is acid flavored, but not a true aces. But there is a way you can get a one one perfect match with the viewport and your render even with a linear workflow by using an OCIO viewport transform. You remember that display view I talked about earlier in the OCIO config we made? Remember this? Let's use it in Unreal. Click on the lit button here, then OCIO display, then tick enable display, and load the config file we made. There's now two dropown menus. In the top one, use linear sRGB. And in the bottom one, use the ASUS 1.0 SDR video display view, and your viewport will now match your linear renders perfectly. Remember how I said that Unreal's tone curve is not exactly aces? This way, our viewport is now displayed in a known profile that matches what you're converting to in Da Vinci Resolve. So, one could argue that a good workflow is to set up the viewport transform at the beginning of your project. Author your artistic content with the look done in the viewport and render from there with the tone curve disabled like I showed you. That way, you will never have any surprises. But remember, it's okay if you don't have a perfect match, too. The whole reason we're grading in Resolve is specifically because I don't want it to match my viewport. I want to change it and make it better. So, don't overthink it. But also, if I wanted to take this and convert it to a log profile, let's say you've got some LUTs that you want to use, instead of converting it to sRGB, I can convert it to something like Canon Log 3. If you want a log profile, you've got it. Once we converted it to log, I can just create a new node and adjust the curves like this and really, you know, fine-tune the look that I want. I don't actually hate this way of working, but one thing at a time. Now that we've gotten our renders correctly converted, we can get started with actually color grading our shots. And the beauty of working in Resolve is this non-destructive node-based editing. So clicking on the ASUS transform node here, I'm going to press the Alt S key and that creates a new node. So with this new node here, you'll see at the bottom here, we got lift, gamma, gain, and offset. As I adjust these, I want you to pay attention to the waveform on the right hand side here. The waveform tells us where the highlights and the shadows of our shot are. So as I adjust the lift here, lift means shadows. And notice how when I adjust the lift, it mostly affects the lower part of the waveform. It adjusts my shadows. Gamma is the midtones. Again, the waveform mostly the middle range moves here. It doesn't really affect the shadows or the highlights as much. Gain is the highlights. So again, if I move this, notice how the only the upper part of the waveform is being affected. And offset moves everything evenly. So, if I adjust this like that, you'll see the whole waveform does not kind of stretch. It all moves up or down evenly. On the right hand side here, you have the effects library, which has a whole bunch of stuff you can explore and dive into, but I'm only going to show you a couple of them in this video. The first thing I like to do is to rename my nodes. And I got to call this one contrast. I like to have one node per thing I'm doing. So, one for contrast, one for color correction, one for color temperature, maybe that kind of thing. You get the idea. So, let's pay attention to the waveform here. If I zoom in, you'll see we really have quite a few almost clipping areas. So, what I like to do in that case is I like to go to the node before the as transform. And in the curves, I'm just going to lift it just a tiny little bit. You don't need to go very far. You don't need to go like that, but just a teeny tiny little bit to lift it up. Like that is perfect. just to make sure that we're not clipping any blacks. I'll be able to reduce those shadows later. And now by going back to my contrast node, you'll see at the bottom here, we have more space to kind of crunch those blacks down a little bit. So in the contrast node, I'm going to click on my curves here and just really fine-tune, bump those highlights a little bit, bring those blacks down a tiny bit to really give a give us a punchier look. So by hitting Ctrl D on a node, you can disable it and reenable it. So that is my first contrast adjustment. I'm going to create a new node with by again hitting Alt S. And I'm going to do a little bit of color correction here. So I let's say I want the shot to be a tiny bit warmer. So I'm going to go to temp right here and maybe crank it up a tiny little bit. You don't don't go overkill, of course, but just a little bit to warm up the shot ever so slightly. I'm going to right click and name this color correction. Something I like to do sometimes to get a better visual idea of what I'm looking at is to grab the saturation and just crank it up like crazy and see exactly which colors are in the scene. So I can see here that there is a lot of blue in the scene. And I want to homogenize my scene a little bit by reducing the amount of blues here. So there's a really cool feature uh right here called hue versus saturation. And by clicking on that, I can now click right here. And you'll see it creates three points. We have a spike in the blues here, and that is over here where there's a bit more blue in the sky. I can either increase that saturation or decrease it. It's very subtle, but I just want to bring the blues down a little bit to make the clouds feel a bit just less bluish. Another very cool thing I can do is clicking on hue versus hue right here. And let's say I want the green here to be a little bit less green. I want again I want to homogenize the shot and make the greens a little bit more warm in tone. I can by clicking on the greens here. You'll see now we have three more points. I can change the color of those greens by moving this point down right here. So, I'm just going to nudge it a teeny tiny bit to make it a little bit warmer in tone to make the whole shot feel a bit more cohesive. These color corrections can be really, really minimal. You don't need to go super crazy, but it's just nice to have that kind of granular control over the look of your shot. If there's a part of your frame you don't like a specific color, you can kind of nudge those pixels in a direction you want. Next, I like to add a little bit of vignetting to my shot. And so, we're going to hit Alt S, create a new node. And we're going to click on the little round circle here, here, and click on this here. And you'll see we got a circle in our frame. I'm going to move this like such. And go back to our curves adjustment. And I'm gonna bring this down like that. Vignetting is something that occurs in real life with real lenses. I love how a vignetting can help direct the eye towards the center of the frame. It's just a little something that I love to add to my shots. Next, I want to show you how you can paint a little bit with light. So, again, alt s to create a new node. And I'm going to go back to my little circle here, and I'm going to again create another circle mask. But this time, I'm going to paint a god ray in my scene like this. And now, going back to my curves adjustment, we can bump it up like that. And you'll see now I can move. We're really just painting with light here. I'm adding a little bit of a mask just to kind of fake a little bit of a god ray coming in. And we can maybe like lift up those blacks a little bit as such. So if I disable it and enable it, you'll see we added just a teeny tiny little something. You need to be really careful not to overcook your color grading. It's very easy to go over the top. A good rule of thumb is to apply your edit and then divide everything by half because like I said, we tend to go a little bit too far sometimes. So, just remember that. Next, I can add a little bit of glow. Glow is basically bloom in Unreal. So, I'm going to add a glow node by searching for glow and adding it to our shot like this. You'll see glow can be a little bit strong sometimes. I like to set it to screen to make it a little bit less pronounced. We can adjust the shine threshold here and the opacity along with the spread. It's very easy to make things look a little bit too bloomy and too magical. So, be very careful with this setting with this node, but you get the idea. And now with just a few nodes, we went from this to this in just a few minutes. So, I just wanted to hammer home how easy it is to just push your renders a little bit further. All of this can be done with the free version of Da Vinci Resolve. Now, I'm going to show you one little thing that comes with the studio version of Resolve. Again, our library here. I'm going to search for the film look creator and add it to my graph here. The film look creator essentially consolidates everything we just did here in one node. See, we got the exposure, we got the contrast, highlight adjustment, we've got the vignetting that we added earlier, we got bloom adjustments here. The way I showed you before does give you way more control, but it is nice to have everything kind of built into one handy node. Film grain is one of those things where you either love it or you hate it. Personally, I'm a sucker for it, so I'm going to use it in these shots. So, again, this is before and this is after. I want to showcase one last tool I have under my belt, and that is Dehancer. I've used Dehancer on many renders in the past, and this is how I add some magic sauce to my renders. It is a paid plugin for Resolve. Again, this video is not sponsored, but I do have an affiliate link down below where you can get 10% off all Dehancer products using the promo code William 10. The film look creator I showed you just came out with Da Vinci Resolve 19. It is largely based off of DeHancer. You'll find many of the exact same settings here. Where Dehancer really shines, however, is with its film profiles. These are based on real film stocks. And I love this because as someone who dabbles in film photography, I can get my renders to look like they were shot on these rolls of film. I even have a roll of Kodak Portra 800 here on my desk. And here in Dehancer, I can find the portrait profile. You have a ton of them to choose from. And they immediately give you a very good starting point. It looks really good. Analog film develops very differently depending on whether you over or underexpose it. So there's a slider here that shifts the colors around a bit. the same way. It is a lot of fun to use. Dehancer also has some of the best film grain I have ever seen because unlike the film look creator we just looked at or even the film grain node in Resolve, Dehancer doesn't just slap on a grain texture overlay, dehancer actually reconstructs your image and softens your footage based on grain intensity. Just like film grain behaves with real cameras. Here's a comparison between the film grain overlays we see in Resolve and Dehancer film grain. I hope you're able to see the difference given how aggressive YouTube's compression can be. But I love the way Dehancer softens my image and gives my shots a much more realistic, tangible look to them. The industry veterans among you know that we have often intentionally blurred our renders a bit to break up that fake CG look. This is the best possible way to do that. Now, Decaster has a few options available. There's the pro version that I have here, but there's also a much cheaper light version and other options if you only want the film grain, for example. There's a free trial you can try out, too. That said, there are no cheap colorist plugins out there. They are all pretty expensive, and Dehancer is the cheaper budget friendly one. If you're just a hobbyist and simply want some pretty renders for social media, I don't actually recommend paying for this. The free tools in Resolve will be more than good enough. But if you are a working professional or someone who takes their renders very seriously, give Dehancer a try with the trial. I absolutely love it. Again, there is no sponsorship here. They are not paying me to say this. It's just a tool I can wholeheartedly recommend. So, use the link down below with the promo code William10 to get 10% off. Once we're done with our grade here, there's two ways to export your shot. If you just want to export a still image, right click here, grab still, and it will show up in your gallery here. You could then export it to JPEG or whatever you want by right-clicking on it. From there, for video, we move on to the deliver page at the bottom here. Add the settings you want, such as file name and location on disk. Personally, I like to render in MP4, in H.264, or H.265. And my general rule of thumb for the quality of the bit rate is frame rate times 2. So, if I'm rendering a 24 fps shot, I will set it to 48,000. If it is 30 fps, I will set it to 60,000. When you're ready, click on add to render queue and render your video from there. And that's it. I know this was a bit of a wordy and super technical video, but I hope you found it helpful. Again, all of my easy tools are on sale on Fab for the next week, so get them while you can. Thank you so much for watching, and as always, folks, happy rendering.
Download Subtitles
These subtitles were extracted using the Free YouTube Subtitle Downloader by LunaNotes.
Download more subtitlesRelated Videos
Download Subtitles for Unreal to DaVinci Resolve Workflow Video
Enhance your understanding of the Unreal to DaVinci Resolve workflow with downloadable subtitles. Follow along easily as you learn about ACES and sRGB color management techniques to improve your video projects.

Download Subtitles for The 2025 Guide to Rendering in Unreal Engine 5
Enhance your learning experience with downloadable subtitles for The 2025 Guide to Rendering in Unreal Engine 5 video. Accurate captions make it easier to follow complex rendering techniques and ensure accessibility for all viewers. Get your subtitles now to master Unreal Engine 5 effectively.

Download Subtitles for Introduction to DaVinci Resolve Full Course
Enhance your learning experience by downloading accurate subtitles for the Introduction to DaVinci Resolve full course. Captions help you follow along effortlessly, improve comprehension, and make the tutorial accessible anytime, anywhere.

Download Subtitles for Lighting Interiors in Unreal Engine 5
Enhance your learning experience by downloading accurate subtitles for the Lighting Interiors in Unreal Engine 5 tutorial. Captions help you follow along with detailed lighting techniques and improve comprehension, making complex concepts easier to grasp. Get your subtitles now for more effective and accessible video content.

Download Subtitles for Lighting in Unreal Engine 5 Tutorial
Enhance your understanding of lighting techniques in Unreal Engine 5 by downloading accurate subtitles for this beginner-friendly tutorial. Captions help you follow along easily and grasp complex concepts effectively.
Most Viewed

Untertitel für 'Nicos Weg' Deutsch lernen A1 Film herunterladen
Laden Sie die Untertitel für den gesamten Film 'Nicos Weg' herunter, um Ihr Deutschlernen auf A1 Niveau zu unterstützen. Untertitel helfen Ihnen, Wortschatz und Aussprache besser zu verstehen und verbessern das Hörverständnis effektiv.

ดาวน์โหลดซับไตเติ้ล DMD LAND 3 The Final Land Day 1
ดาวน์โหลดซับไตเติ้ลสำหรับวิดีโอ DMD LAND 3 The Final Land Day 1 เพื่อช่วยให้เข้าใจเนื้อหาได้ง่ายขึ้น และเพิ่มความสะดวกในการติดตามทุกช่วงเวลา เหมาะสำหรับผู้ชมที่ต้องการความชัดเจนและเข้าถึงข้อมูลอย่างครบถ้วน

Descarga Subtítulos para NARCISISMO | 6 DE COPAS - Episodio 63
Accede fácilmente a los subtítulos del episodio 63 de '6 DE COPAS', centrado en el narcisismo. Descargar estos subtítulos te ayudará a entender mejor el contenido y mejorar la experiencia de visualización.

Subtítulos para TIPOS DE APEGO | 6 DE COPAS Episodio 56
Descarga los subtítulos para el episodio 56 de la tercera temporada de 6 DE COPAS, centrado en los tipos de apego. Mejora tu comprensión y disfruta del contenido en detalle con nuestros subtítulos precisos y accesibles.

Download Subtitles for Your Favorite Videos Easily
Enhance your video watching experience by downloading accurate subtitles and captions. Enjoy better understanding, accessibility, and language support for all your favorite videos.

If you found these subtitles useful, consider buying us a coffee. It would help us a lot!