Introduction
Taking blood is a fundamental procedure in healthcare, often required for various diagnostics and monitoring treatments. In this detailed guide, we will explore each step of the blood collection process using the Vacutainer system. Whether you’re a medical student preparing for your OSCE or a healthcare professional looking to refine your skills, understanding the nuances of this procedure is essential.
Key areas we will cover include:
- Timing and purpose of blood collection
- Patient interaction and consent
- Equipment preparation and positioning
- Venipuncture technique
- Post-procedure care
When and Why Do We Take Blood?
Blood collection may be performed for numerous reasons in a clinical setting. Understanding these can help guide your approach:
Routine Blood Tests
- Monitoring treatment: Regular blood tests can help track a patient’s response to medications.
- Guiding diagnosis: Blood tests can reveal underlying health conditions.
Pre-operative Blood Tests
- Group and save: Essential for surgeries requiring blood transfusions.
- Cross-matching: Ensures compatibility between donor and patient blood.
Toxicology Testing
- Monitoring medication levels: Ensures therapeutic drug levels are within safe parameters.
- Assessing toxic exposure: Such as analyzing parasal levels in cases of poisoning.
Assessment of Acutely Unwell Patients
- Septic screen: To investigate potential infections through blood cultures and inflammatory markers.
Preparing for Blood Collection
A well-prepared approach can ease both the procedure and any related anxiety for the patient. Here’s how to get ready:
Introduction to the Patient
- Greet with a friendly demeanor.
- Explain your role and the procedure clearly.
- Prepare the patient by informing them it may feel like a sharp scratch.
- Consent: Always obtain consent before proceeding.
Equipment Preparation
Before approaching the patient, ensure the following equipment is ready:
- Vacutainer and blood collection tubes
- Needles (21G or 23G)
- Tourniquet
- Alcohol wipes or chlorhexidine wipes
- Cotton balls or gauze
- Sharps disposal container
Positioning the Patient
The way you position both the patient and yourself is crucial for a successful blood draw:
- Arm position: Ensure the patient’s arm is extended and straight, using a pillow to elevate it if necessary.
- Comfort: Position yourself comfortably to avoid strain while collecting blood.
- Ink pad: Place an ink pad or similar item under the patient’s arm to prevent stains from any blood that may leak.
The Venipuncture Process
Now that you are prepared, follow these critical steps:
Applying the Tourniquet
- Technique: Use a one-handed technique that allows easy release when you need to.
- Duration: Limit tourniquet application time to reduce discomfort and prevent hemoconcentration.
Locating the Vein
Finding a suitable vein can sometimes be challenging. Here are some tips:
- Palpation: Feel along the vein’s course rather than solely relying on visual cues.
- Choose wisely: Select a vein that feels firm and is palpable, commonly the antecubital fossa (inside of the elbow).
Cleansing the Area
- Antiseptic wipe: Clean the chosen site effectively with a chlorhexidine wipe to minimize infection risk.
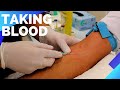
Inserting the Needle
- Needle orientation: Ensure the bevel is facing up to facilitate smooth entry.
- Angle of entry: Insert the needle at a 20° angle to the skin for optimal access to the vein.
- Anchoring the vein: Use your non-dominant hand to anchor the skin and keep the vein stable while advancing the needle.
Collecting the Blood
- Blood draw: Once you feel a ‘pop’ confirming entry into the vein, engage the blood collection tubes. Ensure proper alignment to avoid mishaps.
- Stability: Keep the needle steady, ensuring it doesn’t move once inserted.
Completing the Procedure
- Release the tourniquet.
- Withdraw the needle.
- Apply pressure: Ask the patient to apply pressure with a gauze or cotton ball to minimize bleeding.
- Dispose of sharp objects properly to maintain safety.
- Thank the patient for their cooperation.
Post-Procedure Care
It’s important to provide care and assurance post-draw:
- Monitor for bleeding or hematoma formation.
- Cleanup: Ensure the site is clean and dispose of all used materials in appropriate containers.
Conclusion
Successfully taking blood using the Vacutainer system requires preparation, attention to technique, and effective patient communication. Following these outlined steps will not only enhance your confidence in performing this procedure but also ensure the comfort and safety of your patients. Practice makes perfect, so don't hesitate to repeat these steps to master your skills.
For more tips and instructional content on medical procedures, subscribe to our channel for updated video resources that can help you excel in your clinical practice and education.
Happy learning!
[Music] hi I'm CARiD from osip pass and welcome to this video uh this is your
step-by-step guide to taking Blood using the vacuous system let's get started so when do we do Bloods and why it could be
as part of your routine Bloods to monitor treatment and to help guide your diagnosis preoperative Bloods such as
group and save and cross matching toxicology Bloods for example parasal levels or monitoring medication
levels your vamy Genty levels or the acutely unwell patient you could be doing it as part of your uh
septic screen workup which would be your sort of normal Bloods your inflammatory markers and then microbiology Bloods as
well uh blood cultures okay so on to the introduction it's important to have a nice slick
introduction where you explain who you are what you have come to do the fact that it can be painful you can say it
can feel like a sharp scratch and then to gain consent and to check the patient's
details a good tip is that you could ask the patient where people have taken blood from before and have been
successful this saves you a bit of time looking around so getting your equipment ready it's a good idea to just get it
ready before you go to the patient uh saves on faffing around near the patient which can create a bit of anxiety um
you've already got your things ready it going to look slick because you arrive and you can crack on with the
job the positioning of the arm is really important and it's important that if you want are going for the anticubital fucer
the arm is nice and straight so often um popping a pillow below it is really useful you have to be comfortable
yourself in your positioning and the positioning of the patient's arm a good tip would be to put an inkor pad below
the arm so that if there is a bit of blood that comes off the arm it's not going to stain the pillow once you're
happy with the position applying the tourniquet um this is a better technique to tying it because you can actually
release it with one hand really important when you're anchoring the needle and you need to release the Tet
okay so the next part is trying to find the right vein to take blood from this can be more of an art than something
simple to teach but uh the important techniques essentially are that you have to feel along the course of the vein um
trying to find the direction of the vein it's more about what you can feel rather than what you can see um so those are
really important things to bear in mind once you've chosen the vein you want to go for give the area clean with a claw
hexidine wipe get your needle ready with the bevel side facing up go in at about a 20° angle making sure that with your
non-dominant hand you're holding the skin tort this helps anchor the vein that you're going into as you go into
into the vein you will feel it kind of give and that is your cue to get the blood bottles ready uh start taking your
blood now we've accidentally put on the other side if you're right-handed put it on your right side make it easier for
yourself make life easy and take your blood um anchor the needle with your non-dominant hand and don't move try to
keep it as stable as possible um once you've taken your blood before retracting the needle important
important important to take the tornet off so if you don't do that it could lead to quite messy
situations um so tornet off and then needle out and once you've done that ask the patient to apply
pressure for a few minutes there if there's bleeding or a hematoma to let somebody know dispose your Sharps thank
the patient and then you're done that's it guys and if you want to see more videos to help you pass your osis
subscribe like and we'll see you on another [Music]
day
Heads up!
This summary and transcript were automatically generated using AI with the Free YouTube Transcript Summary Tool by LunaNotes.
Generate a summary for freeRelated Summaries
Step-by-Step Guide to Blood Collection Using the Vacutainer System
Learn how to effectively collect blood using the Vacutainer system with this comprehensive guide.

Mastering Vital Signs: A Comprehensive Guide for Nurses
Learn how to accurately assess vital signs in patients with our comprehensive guide for nurses.
Essential Cardiovascular Examination Skills in Emergency Settings
Learn critical cardiovascular examination skills for emergency settings, including pulse points and blood pressure measurement techniques.

Comprehensive Guide to Patient Identification and Normal ECG Interpretation
This session by Dr. Vino covers essential steps in patient identification, ECG preparation, electrode placement, and interpretation of a normal ECG. Learn how to avoid common artifacts and understand special lead placements for accurate cardiac assessment.

Step-by-Step Guide to Recording a Standard ECG Accurately
Learn the essential steps and best practices for recording a standard ECG, including patient preparation, electrode placement, machine calibration, and artifact prevention. This guide ensures accurate ECG recordings critical for correct cardiac diagnosis and management.
Most Viewed Summaries

A Comprehensive Guide to Using Stable Diffusion Forge UI
Explore the Stable Diffusion Forge UI, customizable settings, models, and more to enhance your image generation experience.

Kolonyalismo at Imperyalismo: Ang Kasaysayan ng Pagsakop sa Pilipinas
Tuklasin ang kasaysayan ng kolonyalismo at imperyalismo sa Pilipinas sa pamamagitan ni Ferdinand Magellan.

Mastering Inpainting with Stable Diffusion: Fix Mistakes and Enhance Your Images
Learn to fix mistakes and enhance images with Stable Diffusion's inpainting features effectively.

Pamamaraan at Patakarang Kolonyal ng mga Espanyol sa Pilipinas
Tuklasin ang mga pamamaraan at patakaran ng mga Espanyol sa Pilipinas, at ang epekto nito sa mga Pilipino.

How to Install and Configure Forge: A New Stable Diffusion Web UI
Learn to install and configure the new Forge web UI for Stable Diffusion, with tips on models and settings.

If you found this summary useful, consider buying us a coffee. It would help us a lot!