Introduction
In the medical profession, taking vital signs is one of the fundamental skills every healthcare provider must master. Whether you are a seasoned nurse or just starting, understanding how to accurately assess vital signs is crucial. In this guide, we will break down the process of measuring vital signs, including blood pressure, heart rate, respiration, temperature, and oxygen saturation. By the end of this article, you will have a complete understanding of how to properly assess and document vital signs, ensuring quality patient care.
Gathering Supplies
Before beginning the assessment, it's essential to gather all necessary supplies, which typically include:
- Stethoscope
- Blood pressure cuff
- Thermometer
- Pulse oximeter
- Watch
- Gloves
- Disinfectant wipes
Having everything ready will allow for a smooth and efficient assessment process.
Hand Hygiene and PPE
Once your supplies are ready, perform hand hygiene thoroughly. If your patient is under contact precautions, don the appropriate personal protective equipment (PPE) to ensure safety for both you and the patient.
Components of Vital Sign Measurement
When measuring vital signs, you'll be collecting several key components:
- Blood Pressure
- Heart Rate
- Respiration Rate
- Temperature
- Pain Level (often referred to as the fifth vital sign)
- Oxygen Saturation
Interacting with the Patient
Upon entering the patient's room, introduce yourself and explain what you will be doing. This not only provides clarity but also helps build trust and comfort.
For instance, you might say, "Hello, my name is Sarah, and I am a nurse. I will be taking your vital signs today. Is that okay?" After obtaining consent, verify the patient's identity by checking their armband and asking them to state their name and date of birth.
Pain Assessment
Importance of Pain Measurement
The first assessment typically involves evaluating the patient's pain level. Pain can significantly affect vital signs—high pain levels may increase heart rate, blood pressure, and respiratory rate. Thus, it’s vital to ask about pain, particularly post-surgery or after trauma.
Pain Rating Scale
Utilizing a numerical scale from 0 to 10, ask the patient about their pain rating:
- 0: No pain
- 10: Worst pain experienced
Document their response along with a description of the pain's characteristics, including location and quality.
Measuring Oxygen Saturation
Oxygenation Status Assessment
Next, measure the patient's oxygen saturation using a pulse oximeter. Place the probe on a nail bed where blood flow is good.
- Normal oxygen saturation: 95–100%
- If oxygen saturation is below this range, further evaluation is necessary.
Heart Rate Measurement
Checking Heart Rate
While holding the pulse oximeter, you can also check the heart rate displayed on the device. Typically measured at the radial artery, here's how to do so:
- Locate the radial artery below the thumb on the wrist.
- Use your first three fingers to feel the pulse gently.
- Count for 30 seconds and multiply by two if the rhythm is regular; if irregular, count for one full minute.
Respiratory Rate Assessment
While still feeling the pulse, count the patient's respirations without mentioning it to avoid altering their breathing pattern. Normal adult respiratory rate is 12–20 breaths per minute. Observe:
- Rate: Count breaths per minute
- Depth: Is it labored or unlabored?
- Rhythm: Regular or irregular?
Measuring Temperature
Temperature Measurement Techniques
After assessing heart rate and respiration, it’s time to measure the body temperature. Adult normal body temperature ranges from 97°F to 99°F, with an average of about 98.6°F.
- Routes for Temperature Measurement:
- Oral (most common)
- Rectal (1°F higher than oral)
- Axillary (1°F lower than oral)
- Tympanic (ear)
- Temporal (forehead)
Using a Temporal Artery Thermometer
For this demonstration, let’s use a temporal artery thermometer:
- Use a probe cover if available.
- Place the probe on the center of the forehead and scan to the hairline.
- Clean the device post-use.
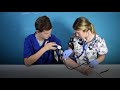
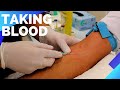
Blood Pressure Measurement
Proper Technique for Blood Pressure Measurement
Finally, it's essential to measure the patient's blood pressure accurately:
- Ensure the patient is seated or lying down with their arm at heart level.
- Use the correct size blood pressure cuff—too big or too small can lead to inaccurate readings.
- Palpate the brachial artery to determine the systolic pressure.
- Inflate the cuff 30 mmHg above the estimated systolic pressure.
- Using a stethoscope, listen for the first sound (systolic) and the last sound (diastolic) as the cuff deflates.
Interpreting Blood Pressure Readings
Refer to the following classifications for blood pressure readings:
- Normal: Systolic < 120 and Diastolic < 80
- Elevated: Systolic 120-129 and Diastolic < 80
- Hypertension Stage 1: Systolic 130-139 or Diastolic 80-89
- Hypertension Stage 2: Systolic ≥ 140 or Diastolic ≥ 90
Conclusion
Upon completing the vital signs assessment, document all findings meticulously, including the methods used for temperature measurement and any changes in the patient’s condition.
Understanding how to properly assess vital signs is essential in providing quality care and maintaining patient safety. By mastering this skill, you enhance your ability to detect potential health issues early and ensure that your patients receive optimal care. Be sure to subscribe to our channel for more helpful nursing videos!
hey everyone it's sarah thread sterner sorry and calm and today I want to demonstrate how to take bottle signs
first what you want to do is you want to gather your supplies typically what you're going to need is a stethoscope
with a blood-pressure cuff along with a thermometer of some type a pulse ox a watch and some gloves along
with a disinfectant wipe to clean the items that are not disposable then what you want to do is you want to perform
hand hygiene and Don the appropriate PPE if necessary like if your patience and contact precautions you'll want to put
on the correct PPE now what is collected during the bottle sign measurement well you'll be checking the patient's blood
pressure heart rate respirations and temperature in addition you'll be asking the patient their pain rating which is
sometimes referred to as the fifth bottle son along with the collecting their oxygen saturation so I've arrived
to the patient's exam room and I've performed hand hygiene now what I want to do is I want to introduce myself to
the patient and tell them what we're going to be doing so hello my name is Sarah I'm a nurse here and I want to be
taking your vital signs is that okay with you yes okay then you want to do your patient identifiers by looking at
their armband having them tell you their name and their date of birth then I like to start with the easiest thing which is
pain and so I'm going to ask him his pain level now this is a very easy and important assessment tool because high
pain ratings if the patient is in pain it can alter their vital signs it can increase their heart rate their blood
pressure and respirations and it's really important especially to ask a patient their pain level if they've just
had surgery or some type of trauma so to assess pain levels you can do that with various skills most commonly we use the
0 to 10 numerical scale so can you tell me your pain with zero being no pain at all to 10 being the worst pain you've
ever had what what's your pain rating zero okay he says he's having no pain that's easy but let's say that they he
said that his pain rating was an 8 well you would want to ask some more questions you and I say where's your
pain located at and please can you describe it for me like burning as a radiating things like that
and then you want to document that the numerical rating along with the words that the patient used to describe the
pain in its location next we're going to measure the patient's oxygenation status and to do that you can use a portable
probe like this one or one that connects to a bedside monitor and to do that you're going to place the device on the
nail bed because that's where it's going to obtain the reading so make sure that you pick some fingers that have good
circulation they're nice and warm in pink so we'll turn on our device and we will place it on the finger and let it
get a reading and here the patient's oxygen saturation is 97% a normal oxygen saturation is anywhere between 95 to a
hundred percent and below you can also see the heart rate as well but here in a moment we will actually check the heart
rate and then you'll just want to remove the device and if it's like a portable one like this you'll want to clean it
with a disinfectant wipe and then document your findings now we're going to collect the patient's body
temperature and some things you want to remember about body temperature is that in an adult it can vary it can be
anywhere between 97 to 99 degrees Fahrenheit with the average being about 98.6 degrees Fahrenheit
orally and an adult it's considered a temperature if the temperature is greater than a hundred point four
degrees Fahrenheit now the temperature reading will depend on the route that you use and you can take a patient's
temperature various ways like orally the forehead via the temporal artery tympanic lis which is via the ear
rectally or axillary via the armpits and a rule of thumb to remember is that rectal and tympanic temperatures will be
one degree higher than the oral route and temperatures that are collected via the axillary or the temporal route will
be one degree lower than oral temperatures so we're going to take the patient's temperature using the temporal
artery and we're going to use this device so what you want to do first is you want to use a probe cover
if your device has one that just protects it from becoming contaminated and what we're gonna do is we're going
to hold the probe flush up against the skin at the center of the forehead we're going to take it and scan it across the
forehead to the hairline and look at her reading and before we do that you want to make sure that the forehead is clear
of any type of hair or anything because this probe needs to be making contact with the skin if anything comes into
contact with it can throw off the reading so we're going to put it flush against the skin
and hold the button in on the device and you'll hear it beeping and scan it to the hairline and look at our temperature
now if your patient was sweating on the forehead because a lot of times whenever patients have fevers they can sweat you
would want to do it the same way probe up against the forehead in the middle hold the button down scan across the
forehead to the hairline but you're also gonna go behind the ear because sweating will decrease the temperature and it's
very vascular back here behind the ear and that will just help us obtain a proper reading then what you're gonna do
is you're going to clean your device and document your finding and if you didn't take it orally you want to make sure you
document the route that you actually took the temperature next we're gonna check the patient's pulse and as we feel
the pulse we're going to be looking at several things of course we're going to be counting the rate but we're also
going to be feeling the strength of the pulse and we will be grading it on a zero to three plus skill with zero being
the pulses absent one plus week 2 plus normal and three plus bounding and the rhythm is the pulse regular or is it
irregular now in adults the most common site to use to check the pulse is the radial
artery because it's really easy to access so it's found what you want to do is find the thumb and it's found below
it in this wrist area along the radial bone hence why we call it the radial artery and whenever you're checking the
pulse have the patient they can set and bad they can lie down and you'll want to support their arm extended out in some
horde it and you're going to use your first three fingers to feel the pulse don't use your thumb your thumb actually
has a pulse in it so use your first three fingers and find it within that area I just told you and lightly just
touch it don't press too hard and feel the bounding of the pulse and what you want to do is you want to count it for
thirty seconds if the pulse is regular and multiply that number by two if it's irregular count it for one full minute
so his heart rate is 82 its regular and it's two plus and a normal heart rate an adult is 60 to 100 beats per minute now
what we're going to do is we're going to keep our fingers here because what we want to do next is check the patient's
respirations and if you tell a patient that you're checking the respirations they're going to alter the way that
they're breathing so we're gonna stay in this same position and assess respirations and when we're assessing
respirations we're looking at a couple things first of all the rate a normal breathing rate in an adult is 12 to 20
breaths per minute we're also looking at the depth is it labored or unlaid and the rhythm are the breaths regular or
irregular and I have found the easiest way to do this is really look at the patient from the side and watch their
game their clothes are they rising and falling because one rise and one fall equals one respiration you could also
sometimes just gently take your hand put it on their back and fill the rise and the fall of the chest and so you will
count that for 30 seconds if their breathing rate is regular and then multiply that by two but if it was
irregular you would need to count for one full minute and then document your findings and lastly what we're going to
do is we're going to measure the blood pressure and to do that we want to make sure a patient is sitting down with
their arm at heart level and their legs are uncross now they're lying in bed you would want to make sure that this arm is
at heart level then what we're going to do is we are going to get our stethoscope
our blood pressure cuff and you want to make sure you get the right size cuff for your patients arm because if you use
too big of a cuff or too small of a cup it can throw off the reading and what we're going to do is we're going to
palpate the brachial artery because this is the artery we're going to be listening to to get our blood pressure
because we're going to be getting our systolic number which is that top number and this is the first sound we hear and
then our diastolic number which is the bottom number and this is the point where we no longer hear the sound so
whenever we're looking at the gauge of our blood pressure cuff we want to make sure we're really noting those points
because it's going to tell us our systolic and diastolic number so what we're going to do is we're going to put
our cuff on our patient and we want to make sure we find the brachial artery this is the artery we palpate that we'll
be using to determine our blood pressure and it's found in the bend of the arm so we're going to find it and it is located
here and we're going to look on our Kufner cuff has these arrows and because this is the left arm we're going to make
sure that this arrow is pointing in that direction of where that artery is so you're gonna put the cuff up about two
inches above the bend of the arm first what we want to do is we want to estimate the systolic pressure so we
want to find that number to do that we're going to palpate the brachial artery and we're going to inflate the
cuff until I no longer feel the brachial artery and at that point when I no longer feel it I need to make sure I'm
looking at this gauge to know that number because that number is our estimated systolic pressure number then
when I go to take the blood pressure I'm going to inflate the cuff 30 millimeters of mercury more than that estimated
number now the whole reason for doing that is because we want to avoid missing the oscillatory gap that can occur in
some patients all patients have it but some and it's usually patients with hypertension because the oscar tory gap
is like this abnormal silence that occur and it will throw off whenever you actually hear that first sound which is
your systolic number so I'm inflating the cuff by filling on the artery and I'm going to note the point where I no
longer feel the artery which is about at the hundred then I'm going to deflate it completely and wait about thirty to
sixty seconds and then we'll take the blood pressure so we're estimated systolic number is a
hundred now I'm going to inflate the cuff to a hundred and thirty and that will avoid missing the oscillatory gap
if one was present so I'm going to take my stethoscope put it in my ears you can use the bell or the diaphragm of your
stethoscope I like to use the Bell because it's best at picking up low-pitched noises so we're going to
place that over the brachial artery do it lightly don't fully compress it because you can include the artery then
we're going to inflate our cuff to a hundred and thirty millimeters of mercury and we're going to let it fall
about two millimeters of mercury per second and we're listening for that first sandwiches our systolic number
okay is 104 and we're listening for that last sound and it was 78 so the blood pressure is 104 over 78 then once you
have your reading make sure you fully deflate the cuff full of air and you're going to take the cuff off of your
patient of course and clean it if it's not disposable and you will document the blood pressure and what arm you took it
in now water normal blood pressure readings according to the American College of Cardiology 2017 updated
guidelines a normal blood pressure is a systolic less than 120 and a diastolic less than 80
elevated blood pressure would be considered a systolic of 120 to 129 and a diastolic less than 80 hypertension
stage 1 would be a systolic of thirty to 139 or a diastolic eighty to eighty nine and hypertension Stage two
would be a systolic greater than 140 and a diastolic greater than ninety okay so that wraps up this demonstration on how
to check vital signs thank you so much for watching and don't forget to subscribe to our channel for more videos
Heads up!
This summary and transcript were automatically generated using AI with the Free YouTube Transcript Summary Tool by LunaNotes.
Generate a summary for freeRelated Summaries
Essential Cardiovascular Examination Skills in Emergency Settings
Learn critical cardiovascular examination skills for emergency settings, including pulse points and blood pressure measurement techniques.
Step-by-Step Guide to Taking Blood with the Vacutainer System
Learn the essential techniques for taking blood using the Vacutainer system in this comprehensive guide.
Step-by-Step Guide to Blood Collection Using the Vacutainer System
Learn how to effectively collect blood using the Vacutainer system with this comprehensive guide.

Comprehensive Guide to Patient Identification and Normal ECG Interpretation
This session by Dr. Vino covers essential steps in patient identification, ECG preparation, electrode placement, and interpretation of a normal ECG. Learn how to avoid common artifacts and understand special lead placements for accurate cardiac assessment.

Comprehensive Guide to ECG Waveforms, Intervals, and Heart Rate Calculation
Dr. Meena explains the fundamentals of ECG waveforms, intervals, and segments, detailing their durations, amplitudes, and clinical significance. Learn how to interpret P waves, QRS complexes, T waves, and calculate heart rate accurately using ECG readings.
Most Viewed Summaries

A Comprehensive Guide to Using Stable Diffusion Forge UI
Explore the Stable Diffusion Forge UI, customizable settings, models, and more to enhance your image generation experience.

Kolonyalismo at Imperyalismo: Ang Kasaysayan ng Pagsakop sa Pilipinas
Tuklasin ang kasaysayan ng kolonyalismo at imperyalismo sa Pilipinas sa pamamagitan ni Ferdinand Magellan.

Mastering Inpainting with Stable Diffusion: Fix Mistakes and Enhance Your Images
Learn to fix mistakes and enhance images with Stable Diffusion's inpainting features effectively.

Pamamaraan at Patakarang Kolonyal ng mga Espanyol sa Pilipinas
Tuklasin ang mga pamamaraan at patakaran ng mga Espanyol sa Pilipinas, at ang epekto nito sa mga Pilipino.

How to Install and Configure Forge: A New Stable Diffusion Web UI
Learn to install and configure the new Forge web UI for Stable Diffusion, with tips on models and settings.

If you found this summary useful, consider buying us a coffee. It would help us a lot!