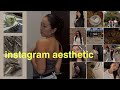
Introduction
Chi Chi shares her step-by-step process for taking perfect Instagram photos, covering everything from preparation to posing and editing.
Preparation Phase
- Inspiration: Use Instagram and Pinterest boards to gather ideas for outfits, locations, and poses. Combine different aesthetics to create your unique style.
- Photo Type: Decide if you want an outfit shot, selfie, mirror selfie, mid shot, or background shot.
- Location: Choose places with good lighting and minimal crowds, such as parking garages or city streets. Match your outfit colors to the location for a cohesive look.
- Outfit Selection: Pick outfits that make you feel confident and complement the location's aesthetic.
- Weather & Timing: Aim to shoot 1.5 hours before sunset for the best natural light. Sunny or partly cloudy days work best. Adjust your shooting style based on your phone camera's capabilities (e.g., iPhone 6 vs. iPhone 11).
Equipment and Makeup
- Use an iPhone (Chi Chi uses iPhone 11 Pro Max) and a Bluetooth tripod with a remote clicker for hands-free shooting.
- Bring makeup essentials like powder to reduce shine, lip gloss, and a hairbrush for touch-ups.
- Apply matte makeup with extra powder to avoid oily appearance in photos.
Taking the Photos
- Set up the tripod at hip height for full-body shots.
- Use the back camera for better quality; place the remote clicker on the floor to frame the shot, then pick it up to take the photo.
- Hide the clicker behind your back or in your hand to keep it out of the frame.
- Adjust camera exposure by locking focus and sliding to increase or decrease brightness.
- Use TikTok and other social media for pose inspiration.
Location Scouting
- After shooting, explore nearby areas to find new photo spots.
- Take reference photos with timestamps and location data to revisit ideal spots later.
Editing Tips
- Increase contrast and saturation slightly, reduce exposure if needed, add warmth and tint, and sharpen the image.
- Use the free Snapseed app's "Expand" tool to enlarge backgrounds and avoid cropping out important parts.
- Use the vertical straightening feature in the camera app to adjust proportions.
Consistency and Growth
- Post consistently and use Instagram Reels alongside high-quality photos to grow your account. For more insights on social media growth, check out Unlocking Instagram Growth: Mastering Content Creation with Brock Johnson.
Conclusion
By following Chi Chi's detailed approach to Instagram photography, you can create visually appealing content that attracts engagement and followers. Preparation, confidence, and smart editing are key to success. For additional tips on mastering photography, see Mastering Photography: The 80/20 Rule Explained.
hi i'm chi chi and i love instagram and judging by the way that you just click
on this video you love instagram too i'm actually gonna teach you guys how i take
my instagram pictures from all the prep that i do so the poses how i get the perfect
angle and how i edit so let's get started [Music]
okay for part one you're going to need to prep in order to prep properly you're gonna need some
inspiration a location an outfit and nice weather for inspiration i just go straight to
instagram and pinterest and i just go on my boards and see what i've been pinning recently i actually recently just made a
pinterest my pictures at the guccinello so if you want to follow me on pinterest you
definitely can but i definitely use pinterest and instagram as inspiration
i use that inspiration for outfits inspiration for location inspiration for poses i try to take the
ideas of a lot of other people and kind of combine it and make it my own in order to find inspiration it's
really easy to put yourself in like an aesthetic but just know that you don't have to fit
into just one aesthetic you can be multiple i also did a video about aesthetics where i
tried out different aesthetics for a week and it was really fun so i'll link that down below as well
and also in this whole inspiration phase you're supposed to figure out what type of picture do you want to take
do you want to take an outfit shot do you want to take a selfie do you want to take a mirror selfie do
you want to go mid shot or do you want to take a background shot being prepared when it comes to taking
pictures is super duper important because it will help the process just go by a lot
smoother also in terms of preparation you're gonna need to get a location down
you can literally take pictures anywhere some of my favorite places to take pictures is probably parking garage
because there's always really good lighting in garages and usually no one's there
so you don't have to face that awkwardness of people looking at you taking pictures of
yourself also something that's like a fave of mine are city pictures i love me some city pictures next you want to
pick your outfit the reason why you pick your location before you pick your outfit is because
you want your location and your outfit to match it's really important to match
your outfit with your location because it makes the picture a lot more aesthetically pleasing like for
this picture you can see that my outfit is very like brown tones and in the background
there's like a brownish tan wall so that's very aesthetically pleasing to eye and obviously it worked
because that picture got a lot of likes a lot of engagement and i gained like 500 followers just
from that post so matching your location with your outfit is extremely extremely important and you're probably wondering
where do i find these places for me after i take a picture in one location i'll go
i'll get all my stuff then i'll walk around the entire city and try to find the location of my next
picture and once i find a good location i'll take a picture of it your iphone will
tell you exactly where that is and exactly what time you took the picture so that
you know what time you need to be there in order to get the light the same way so that's how i find my locations but
honestly like anywhere with good lighting and aesthetically pleasing it's where i'll
go and as for what to actually wear when you're taking pictures
it's honestly entirely up to you whatever you feel comfortable with is what you want to wear there's this
one time where i was filming the trying different aesthetics video and i was trying to take pictures in the drip
aesthetic but i was extremely awkward the entire time because i knew that that aesthetic
just wasn't me so i couldn't take any good pictures and
it was really really hard but later in this video where i literally take you on like a photo shoot with me
you'll see that the way i pose is super duper nice and it's really really easy because i feel confident in what i'm
wearing as for the weather the weather is extremely
extremely extremely important because the sun controls the lighting and lighting makes
or breaks your picture for me i like to take my pictures
in the afternoon evening time the best time to take pictures is an hour and 30 minutes before sundown
what's really good about this time of year like spring summer is that the sun sets later the sun sets
at like eight o'clock so you have ample amount of time you get so many nice pictures but in the winter
the sun sets at like four so it's a lot harder to get good pictures in the winter time it's really nice about this
time of year which is the reason why you should really start building your instagram because it's like so nice and
easy now but for me i make sure the weather is at least sunny or partly cloudy and before for my
pictures i used to only take pictures in the sun to get that nice golden hour feel
but nowadays i take pictures in the shade i mainly take pictures in the shade now because of the iphone that i
have i have the iphone 11 and when i take pictures in the sun
i just look over exposed and everything looks really really weird but if you have like an iphone 6 iphone
7 or iphone 8 those iphones are the best for golden hour pictures like right now
i'm gonna put how golden hour looks on an iphone 6 compared to how golden hour looks on
iphone 11. on the iphone 6 it looks so much better then other than golden hour being
superior on the iphone 6 iphone 11 quality is just better so on the day that i'm taking my
pictures i usually like to wake up nice and bright and early and do my makeup routine in terms of my makeup i
try to gravitate towards more matte makeup i want to put lots and lots of powder on my face
because when you take pictures your face tends to look really really oily so you want to put
extra powder to make sure that's not the case also i kind of just amplify everything
like if my lips are glossy i want them glossier my brows are dark i want them a little
bit darker because on camera everything just kind of washes out you know
as for my equipment i like to take this tote bag that i got from zara i got it right before i moved to
philadelphia then i also take my iphone because that's usually where i take all my pictures on this is the iphone 11
pro max i used to have the iphone 10s max but i dropped that in the toilet and
then i had to get a new phone i usually take this bluetooth tripod i love this tripod
because it's not too tall i tend to take lots of outfit shots so i would want the angle to be pretty low so
it gets my entire body so what i like about this one is that it's pretty short it's not expensive it's like 25 i'll
have it linked down below and also there's a bluetooth clicker attached to it so you can kind of
click and then take the picture and i also bring makeup touch-ups if i'm getting a little bit
oily i bring some powder i also need to bring my lip gloss and i also bring a hairbrush to fix my
hair before i take the pictures this is location that i'm going to be shooting at today
this location may look really familiar because i've actually shot here before okay guys so actually when i came here
yesterday my camera died right when i got up here and it was terrible so it's actually the
next day and i'm here and i actually already posted a picture that i was going to
take here and show you guys how i did but i'm back again with a fully charged camera and i'm
going to show you guys exactly how i did that even though i look completely different from the photo that i just
posted this is the location i shot that picture in it was basically a full body picture so
that's what i'm going to try and do today so when actually taking my pictures
first thing i do is set up the tripod and get it to the angle that i like
this probably takes a chill 20 minutes if i want to get a full body shot then i position the camera to be
about hip length i also like to optimize the grids on there because i make sure that i'm
centered when i take pictures by myself i use the back camera i know what you're wondering
how are you going to be able to see yourself if you're using the back camera so basically i take a little item
usually i use my clicker and i put it on the floor then i reposition
my camera to be centered and be exactly where i want it to be and then after i position it the way i
want i go to the clicker that i put on the floor i pick it up i click and that's usually the angle
that works best for me and also i try to hide the clicker as best as i can
my go-to is just putting the clicker behind my back that's why a lot of my recent pictures on post like this
because i'm actually hiding the clicker but obviously you can hide it in your hand
you can hide it in a bag there are a lot of different ways to hide the clicker and also
i adjust the lighting on the camera app so basically how i do this is i go to the camera i go
to where i am i hold on where i want to focus and then it will show this
ae lock on the top and then you want to go to where you focus and you want to drag up for
higher exposure than drag down for lower exposure and in terms of my go-to poses i go
straight tick-tock trip talk has so many videos of good pose ideas to do
so i usually just always keep that in mind whenever i'm posting and i do that over and over again and i
hope i get really really good pictures okay so i just finished taking pictures fake pictures
pictures i probably will post well i probably will put these pictures on like my spam account or something but after
i'm done taking pictures i put them in my plan only and see if it fits
um i just put the pictures in my finale for reference to see if they fit and they definitely do fit
so that means i'm done and i can leave but the work is not over yet because right
after i take pictures is actually the time where i go and scout for another location
so you guys will come along with me to scout locations [Music]
being here is actually kind of funny because i've actually already took in a picture here
like i took a picture right here right here before that's the one great thing about the city
literally everywhere is aesthetically pleasing okay guys so i found a location that i
think is gonna work really really well this these are just some stairs that i found
they're blue stairs this is kind of like a brownish door next to it i think i can
take some really good pictures here so here's what i'm gonna do i'm gonna go on my camera app
take a picture of it well it's not focusing but it says today at 2 33 p.m because that's the time it
is shows you where exactly you took it that you have the exact address
and you have the exact time in which you should be there so if you see these stairs in my next instagram post
pretend you didn't as for the editing of the photo um it's really different depending on
the photo because every photo has different lighting but my general rule of thumb
when it comes to editing is to go up on the contrast down the exposure up a teensy weensy bit
on the saturation adding more warmth to it i add more tint to it and then i also
sharpen the photo to make it look better quality one editing aspect that has really really helped me
is the expand tool and snapseed snapseed is a free app i can use to edit your instagram photo i
really only use that app for one tool and that's the expand tool basically the expand tool expands your
background let's say you have this great picture but when you put on your plain ollie
your face is cut off to fix that you would go to the expansion and expand your background so it's a bit bigger so
that when you put on your plain ollie your face isn't cut out so that's one aspect that i use
a lot and one aspect that i also use a lot is actually is this like vertical straightening
feature that's on the camera app if you have a picture and your head looks a bit big and your body looks a
bit short you can use this picture on the camera app all you do is go to the
picture then press edit then you would go to the um crop feature then you would go to the second one and
then you would drag it that would make this longer on the bottom and then this would make it
longer on the top then after the picture i posted and i try to stay as consistent as possible on
instagram and ever since i've been doing this i've been growing a lot
also reels and even though the rules made your account grow so much but i've definitely
been using lots of reals i've definitely been growing my account with reals and just with
high quality photos and yeah that's basically how i do it that's basically the end of the video if you guys enjoyed
it give it a thumbs up subscribe to my channel for more content from me i post every sunday and i will see you
guys in my next photo my next photo my next video jesus christ okay
bye guys
To prepare for Instagram photos, start by gathering inspiration from platforms like Instagram and Pinterest. Decide on the type of photo you want (outfit shot, selfie, etc.), choose a location with good lighting, and select outfits that boost your confidence and match the setting. Aim to shoot about 1.5 hours before sunset for optimal lighting.
For great Instagram photos, use a smartphone with a good camera, like an iPhone 11 Pro Max, and a Bluetooth tripod with a remote clicker for hands-free shooting. Additionally, bring makeup essentials to touch up your look and ensure you have good lighting.
For posing, set your tripod at hip height for full-body shots and use the back camera for better quality. Look for pose inspiration on TikTok and other social media platforms, and practice hiding the remote clicker to keep it out of the frame. Confidence in your poses will enhance the overall quality of your photos.
To edit your Instagram photos effectively, increase contrast and saturation slightly, adjust exposure as needed, and add warmth and tint. Use the Snapseed app's "Expand" tool to enlarge backgrounds and avoid cropping important elements, and utilize the vertical straightening feature in your camera app for better proportions.
Consistency is crucial for growing your Instagram account because it keeps your audience engaged and encourages them to return for more content. Posting regularly, along with utilizing Instagram Reels, can significantly enhance your visibility and attract new followers.
When choosing a location for your photos, look for places with good lighting and minimal crowds, such as parking garages or city streets. Ensure that the colors of your outfit complement the location to create a cohesive and visually appealing image.
To find new photo spots, explore nearby areas after your initial shoot and take reference photos with timestamps and location data. This way, you can revisit ideal spots later and keep your content fresh and engaging.
Heads up!
This summary and transcript were automatically generated using AI with the Free YouTube Transcript Summary Tool by LunaNotes.
Generate a summary for freeRelated Summaries
How to Shoot and Plan Aesthetic Content for Social Media
Learn how to create and maintain an aesthetic social media brand with practical steps on choosing your style, creating mood boards, shooting content, editing, and using the right apps and equipment. This beginner-friendly guide helps you build a cohesive and engaging feed that reflects your personal brand.

Step-by-Step Instagram Growth Plan to Reach 10,000 Followers Fast
Discover a detailed, day-by-day strategy to grow your Instagram from zero to 10,000 followers quickly. Learn how to optimize your profile, create engaging content, monetize your account, and master Instagram's algorithm for sustained growth.
30-Day Instagram Growth Challenge: Strategy & Algorithm Tips 2025
Discover a comprehensive 30-day Instagram growth plan designed for 2025, including content pillars, posting strategies, and deep insights into the Instagram algorithm. Learn how to create engaging, sharable content that attracts new followers while maintaining your mental well-being.
Unlocking Instagram Growth: Mastering Content Creation with Brock Johnson
Discover expert strategies from Brock Johnson on Instagram growth, content creation, and turning followers into customers.

How I Grew Instagram from 150K to 800K Followers in 5 Months
Discover the proven content and branding strategies that skyrocketed my Instagram following from 150,000 to 800,000 in just five months. Learn how to craft powerful hooks, create relatable content, and position yourself as a leader to grow your social media presence authentically and effectively.
Most Viewed Summaries

A Comprehensive Guide to Using Stable Diffusion Forge UI
Explore the Stable Diffusion Forge UI, customizable settings, models, and more to enhance your image generation experience.

Kolonyalismo at Imperyalismo: Ang Kasaysayan ng Pagsakop sa Pilipinas
Tuklasin ang kasaysayan ng kolonyalismo at imperyalismo sa Pilipinas sa pamamagitan ni Ferdinand Magellan.

Mastering Inpainting with Stable Diffusion: Fix Mistakes and Enhance Your Images
Learn to fix mistakes and enhance images with Stable Diffusion's inpainting features effectively.

Pamamaraan at Patakarang Kolonyal ng mga Espanyol sa Pilipinas
Tuklasin ang mga pamamaraan at patakaran ng mga Espanyol sa Pilipinas, at ang epekto nito sa mga Pilipino.

How to Install and Configure Forge: A New Stable Diffusion Web UI
Learn to install and configure the new Forge web UI for Stable Diffusion, with tips on models and settings.

If you found this summary useful, consider buying us a coffee. It would help us a lot!