Introducción a la Visión AI en Dispositivos Locales
La curiosidad por las capacidades de visión de los dispositivos AI está en aumento. Hoy, nos adentraremos en un tutorial práctico que comparará las capacidades de visión del Jetson Nano Super y el Raspberry Pi 5. Si bien ambos dispositivos están diseñados para ejecutar tareas de AI, su enfoque en la detección y clasificación de objetos en tiempo real es fascinante.
¿Qué Veremos en Este Video?
- Tutorial paso a paso de cómo configurar ambos dispositivos para la detección de objetos.
- Comparativa de rendimiento entre el Jetson Nano Super y el Raspberry Pi 5.
- Aplicaciones prácticas de la visión AI en proyectos del mundo real.
Preparativos Iniciales
Para comenzar, hemos reunido:
- Jetson Nano Super
- Raspberry Pi 5 (8 GB)
- Cables de cámara y un webcam de 5 megapíxeles
- Un sistema de refrigeración activo para el Raspberry Pi 5
Antes de sumergirnos en la programación, es esencial configurar correctamente el hardware.
Configuración del Raspberry Pi 5
- Instalación del AI Kit: Comenzamos conectando el AI Kit en el Raspberry Pi 5. Lo instalamos siguiendo una serie de comandos.
- Clonar el repositorio: Usamos un comando para clonar el repositorio necesario para la detección de objetos.
- Instalación de dependencias: Con el comando
pip install -r requirements.txt, nos aseguramos de que todas las bibliotecas necesarias estén listas. - Ejemplo de detección: Una vez configurado, ejecutamos un script de detección y observamos como el sistema identifica objetos en tiempo real.
Resultados con Raspberry Pi 5
La detección de objetos en el Raspberry Pi 5 fue asombrosa. A medida que movíamos diferentes elementos frente a la cámara, el sistema reconocía humanos y objetos, mostrando un rendimiento sorprendente.
Configuración del Jetson Nano Super
La configuración del Jetson es un poco más compleja:
- Descargar el contenedor: A través de un comando específico, descargamos el contenedor necesario para ejecutar ejemplos de detección.
- Uso de la cámara USB: A diferencia del Raspberry Pi, para el Jetson es crucial utilizar una cámara USB para el reconocimiento efectivo de objetos.
- Ejemplo en vivo: Al ejecutar el ejemplo en vivo, se nos presenta un URL que podemos abrir en un navegador para ver la detección en acción.
Resultados con Jetson Nano Super
El Jetson también mostró resultados impresionantes, aunque el proceso de configuración requirió más atención. La capacidad de reconocer objetos era comparable, pero con un enfoque diferente en la interfaz y el flujo de trabajo.
Reflexiones Finales
Ambos dispositivos tienen sus ventajas y desventajas. Raspberry Pi 5 es ideal para quienes buscan una solución más económica y fácil de usar, mientras que Jetson Nano Super ofrece un rendimiento robusto para aplicaciones más complejas. Para una comprensión más profunda sobre cómo funcionan estos dispositivos, puedes consultar nuestra Introducción a los Modelos de Lenguaje Grande: ¿Qué son y cómo funcionan?.
Conclusión
Este video fue una excelente oportunidad para explorar las capacidades de visión AI en dispositivos locales. Si tienes ideas sobre casos de uso interesantes para la visión AI con estos dispositivos, ¡compártelo en los comentarios!
FAQs
- ¿Qué es el Jetson Nano Super?
Es un dispositivo de AI diseñado para ejecutar modelos de aprendizaje profundo y aplicaciones de visión por computadora. - ¿Cómo se configura el Raspberry Pi 5 para visión AI?
Necesitas instalar el AI Kit, clonar un repositorio y ejecutar unos scripts específicos. - ¿Qué tipo de cámara es mejor para usar con el Jetson Nano?
Se recomienda utilizar una cámara USB para obtener los mejores resultados. - ¿Puedo utilizar el Raspberry Pi 5 para tareas de AI complejas?
Sí, pero el rendimiento puede ser limitado en comparación con dispositivos más potentes como el Jetson. - ¿Hay aplicaciones prácticas para la visión AI?
Sí, desde la automatización del hogar hasta la seguridad y el monitoreo en tiempo real. Para más información sobre aplicaciones tecnológicas innovadoras, revisa nuestra entrada sobre Deep Seek R1: The Game Changer in AI Technology.
when it comes to locally hosted AI my interests tend to lie more around running llms or perhaps stable diffusion
or even video generation and things of that sort however I really can't help but notice that there is a lot of
interest in the actual Vision capabilities of AI capable devices now when I say Vision capable I don't mean
running a multimodal llm which can see a picture and answer questions about it but I'm actually referring to the
ability of little devices like these to actually take a video stream as input and be able to detect and classify
specific objects from within that stream now that essentially leads us into the whole point of today's video which is
going to be a sort of fusion of a few different things one being a kind of tutorial a kind of comparison test and
just a kind of benchmarking test between the vision capabilities of the Jetson or a nano super
and the Raspberry Pi 5 with AI kit to actually go ahead and run some of the software that will allow us to
experiment with these image capabilities is not as simple as just downloading olama on one of these devices and then
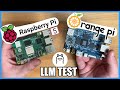
running inference on an llm you do need a few extra things and that is really kind of why I have this little orange
layout or spread if you will in front of me so of course from right to left we have the oron Nano super which if you've
been watching my channel you're likely rather familiar with at this point as am I the pi 5 8 GB we have a camera cable
which will actually allow me to plug in a small little webcam to either of these devices we have an opened but unused
Raspberry Pi 5 AI kit now it does seem that they came out with a more powerful one of these however mine is the up to
13 tops version so just to make note of that I have an opened but unused extremely cheap 5 megapixel webcam from
micros Center or Inland which is the Micro Center store brand and finally I have a Raspberry Pi 5 unopened unused
active cooler now I do need to go ahead and actually install the AI kit and cooler onto the pi5 so I'll probably
just timlapse that as I don't really want to spend a lot of time showing you me like screwing things into a circuit
board and then following that we're essentially just going to start with either of these devices and go through
the steps to install the necessary components and start to R run and see how they
[Music] do we're going to begin with the pi five because I put the camera on that so I
figure let's start with that we're now going to go ahead and just follow the steps to get a basic pipeline running
which essentially as it states here will demonstrate object detection human pose estimation and instance segmentation to
begin we're simply just going to um not do that okay to begin we are going to just
clone this repository once that is completed we will navigate to the directory
and once in there we will run this installation script once that has completed we're
just going to keep going down the line here and we are going to configure the environment by just copy pasting The
Source setup env. SH now that that has been complete we can go ahead and do the PIP install d r
requirements.txt which we'll go ahead and installed the required requirements in this
environment and it says the rapid json. deev package is typically installed by default on Raspberry Pi OS I have not
seen any indication here that that package is missing however I am wondering if maybe I'll
just try this anyway because if it's already installed it will just say the requirements already satisfied okay so
that's fine maybe perhaps just a good thing to check I suppose we are going to download the required Resources by
running this script and basically from what I am seeing there it looks like it errored
but it just seems to show that these required resources are already downloaded so it's not going to retrieve
them so I would assume that this is actually okay and following that we are going to run the postprocess compilation
script well that kind of sums up the initial seems like preps to actually go ahead
and start playing with some of these examples so we are now just going to run this example now considering we are in
the same terminal session and have already done this we don't need to do this again and we are simply going to
just go ahead and run the detection example now I've have not done this before I do have the little webcam kind
of plugged in and hanging off the table so I would assume that hopefully what we see from here
is oh okay so my mistake but this is actually this is actually really quite
cool because it is working so it is running it on the demo video which is what we see here but the bounding boxes
along with the actual labels and percentages on each are actually being generated from the Raspberry Pi's AI
accelerator so this is actually really quite cool and we can see that it is just kind of doing its thing I I don't
know why but like for some reason I want to like touch the AI accelerator to see if it's hot I'm not going to do that but
this is actually kind of cool so now obviously we want to do this
with our own video now if you are using the attached Raspberry Pi camera as I am essentially we're just going to click
the running with different input sources Tab and that will bring us down here and there is actually a rather simple
command that just adds on a flag of input RPI which should essentially just be the default Raspberry Pi camera
plugged into one of the camera ports so we will so what I'm seeing here does not
look good are just going to try this again once more with the Raspberry Pi camera input and we will find out if the
error was on me or if it isn't yeah okay so all right so here's a top tip for you folks if you want to get this working
and not look like a the gold contacts on the camera cable need to be facing towards the ethernet port or all
of so the gold contacts here need to be facing towards the ports on the pie and not away from the ports I'll show a
picture of what I mean so oh wow this is actually working right now even though it's upside down all right I probably
will end up using this cuz this thing awesome and I bought it cuz I was enamored by its miniature yet Mighty
look but basically we're just G to go ahead and oh wow this camera is not that bad person 90% so hey we're running
right now ai object detection on the little pie chair uh not quite all right what are you looking at up there CU
that's a laptop oh I got it look at that look at the the sorry I got excited the iBook G3 is being identified and on top
of it okay so I'm sorry this is probably terrible right now because I'm not really umbrella I could see that I would
I accept that this is really quite interesting and this is honestly the first time I've actually played with any
of this truth to be told I won't say that I I didn't find it interesting but I just couldn't really think of many use
cases that would pertain to my own personal workflow with this if you will but this is actually really cool so it
thinks this red Keys a boook all right here's what I'm going to do I'm going to go ahead and get the camera situations
sorted so that I actually have a stable frame of reference for this and then we'll just try having it detect some
things but this is really cool so if you're running a script like this and you want to get out of it in the
terminal like this you just press contrl and c and that will gracefully end the process very cool after learning that I
have absolutely no idea what the correct use case for a telephoto lens is we are now just going to revert to using the
simple little camera that I had origin originally set this up with now to get back into the examples if you don't want
to have to go back to the GitHub in the terminal you can actually use the arrow keys to cycle through previously entered
commands so essentially all we have to do is just go back into the directory we need to Source the virtual environment
and upon completion of that we basically just run the python script again with the flag for the Raspberry Pi's camera
now you can see I do have a few things in here we have a mannequin over there and it is actually detecting that as a
person which is pretty cool so now um don't mind me CU I have actually just taped the camera to the monitor so if I
uh kind of like use the monitor as as tilt so it's showing me with pretty high detection again I'm not very versed in
this so I figure we'll just kind of put some things into the screen and kind of see what's going on so um like a an
automatone okay it thinks this is a remote but all right um person what about let's
try an Oculus headset apologies if this is very difficult to watch right now as well as here because I have to kind of
keep the mic with me but let's uh remote okay so and again you have to remember that this is only using the
training of the models that okay sorry what am I trying to say the model is only trained to detect specific item so
it is likely if you were to train it to actually understand what a quest headset is or something like that then it would
absolutely be able to identify this as well but it seems this is more for like testing a person or something like that
you can see that it does show the laptop behind me well it did before we saw that originally when I had first actually
tested this so this is interesting and I suppose I'll try it with one more like interesting thing so I'll be right back
I need to go and acquire a dog all right so I brought a dog this is Betty she doesn't like it up
here but it is getting dog with 90% accuracy so really kind of cool and
yeah okay good job as a quick side note I've been making a gaming computer well a micro gaming computer case for the
Orin Nano so I just I won't make a video on this but I just wanted to show so if people are interested in a case I'll
have this finished at some point um and it's totally not inspired by anything at all we now have the Jetson or a nano
super setup the camera is plugged in and just like we did with the Raspberry Pi we're essentially just going to follow
along with the tutorial on how to get the object detection library and model running now the Jetson is a bit more
complicated for the initial setup and actually getting all of this to be able to work as simply as you will likely see
it work right now I did put out a rather in-depth tutorial that if you are interested in doing this on the Jetson
would likely be a good place to start before you just try to jump in and kind of follow along with what we're doing
here now with that kind of disclaimer out of the way I am basically just going to go ahead and run this command which
will essentially download the container that will allow all of this to run on the Jetson pretty simply fingers crossed
hopefully and this will take a little bit of time so we'll fast forward and once this is done we will hopefully be
able to easily play with some object detection once the container has finished downloading it will essentially
drop you into the shell for that specific container now I have just gone and exited out of that because there was
a few other steps that I wanted to go over before actually trying this mainly just kind of running through this one
myself first as sometimes there can be a few more intricacies with getting some of these examples working as opposed to
the one we looked at on the P now being that I have done that there are a couple of considerations I want to quickly
mention and that is here it just says for the live live camera example ensure you have a camera device connected
however if we go into the Jetson containers GitHub the instructions are slightly different and they specify you
need a USB webcam device connected for this example now I was trying this with the Raspberry p cameras and was not
having any luck so I eventually went to the GitHub because sometimes the instructions can have some different
verbiage and things like that which may be able to help you more on the GitHub and I tried to USB web Cam and it worked
for shot so basically all we're going to do now is just go ahead and run this live
example and basically we'll get a bunch of terminal output and things like that some things
that may look somewhat concerning however ultimately we will be met with a URL which we can go to and we will see
the example running locally on our Jetson now we see our URL and you can simply hit control and then click on it
which will open it in your web browser however that would open it in chromium for me which I don't want to do I want
to stick within Firefox so we just going to do it here and sorry it's hard to like keep the
this all oriented but we can see so we see the actual image there but we don't actually see any bounding boxes or
object classifications which can be a little confusing on First Site So eventually um essentially for this we
actually want to specify what we have this this looking for so I'm just going to start with person and we put brackets
around that and that actually will go ahead and then draw a bounding box around it with the classification when
it does see a person so I actually saw for a second there's a Napoleon Dynamite I understand now why like weather people
have a difficult job because they can't see the Napoleon Dynamite right there was quickly showing person for a second
and you can see right now when I point to it that seems to somewhat help it so we can basically just I think we can
stack these but I don't know so I'm going to try to oh wow all the laptops showed up when
I hide so this is very cool as you can see definitely this is a different sort of
implementation than what we saw with this working on the Raspberry Pi but it is this kind of the same thing at the
same time so I'm going to basically just uh try like I'm want to try
to let's see I don't know what this is trained on so depending on how these models are trained
really allow me to rephrase that with an llm or something it has knowledge based upon what it was trained on so say an
llm was not trained to know what a VR headset was then it would have no understanding of what that was so this
is essentially the same thing so I want want to type VR headset but I understand it very likely will not know what a VR
headset is because I don't know that this would have been in it's okay I'm I'm not ready to give it
credit yet because I want to do one more thing I want to see if I can trick it to see if it was just kind of guessing
there and it was a lucky guess um okay so if it says these are sunglasses then I'm not
impressed okay even if I I mean I can't see when I okay so that tricked it but if I put
them without my face it doesn't so this is quite interesting really and as this is one of my first real experiences with
these sorts of Technologies I am impressed with this and now that I actually am using it
Hands-On I can kind of think of some more use cases and things like that for something of this sort I do want to show
you one final thing and that is essentially that you can browse to this from other computers on your network so
I'm going to hop over to this one real quick and basically we'll be able to see the same interface on a different
computer which could be of use for a lot of folks have talked about home automation and things like that so
basically you could have an edge device like this set up somewhere in your local network around your house or something
like that and then you could just kind of hop onto your computer and monitor it or have it send you alerts if it detects
a specific object that you want alerts for or something of that sort so it is rather cool I guess to say the
least oops and it's so it's hard to see and hear but we can see on that computer
which I'll put the screen recording up from this computer for a second but you can see that it is the same sort of
thing so just kind of cool and the local network capabilities of this are very interesting and you can actually see
here in the terminal output on the actual jets in that it's saying hey um 125 is accessing this on Port 7860 on
this machine 125 being the IP address of that computer so overall this really quite cool and again this is just a sort
of brief light touch on some of these things and not really an in-depth tutorial as I want to get my feet wet
with some of the image stuff as well so we'll try I suppose one more thing um let's see if it sees that that
base over there I'll just call it a guitar to make things simple but yep very well that's very
interesting let me try book because I do have some books stacked up on my AC there and okay not quite it seems
like the chair is kind of getting in the way yeah well I could probably play with this for longer than you would want to
watch me on camera just do this so to wrap things up this was just sort of meant to be a sort of comparison but not
necessarily A head-to-head performance comparison but just kind of a comparison of the overall ecosystem and steps you
would need to take to actually go about using some object detection on either of these little AI powered or AI enabled
Edge devices there are some considerations when you're thinking of either of these namely price now this is
a pi 5 8 gig with the AI hat and this is the lower powered version of this AI accelerator overall when you factor in
micro SD card power adapter Etc this is going to run somewhere probably around $180 for everything you need to go to
Plug and Play not including the camera and of course the Jetson Orin Nano super is
$250 and then of course you also need to just make sure that you have the micro SD card for this as well and if you want
to put an SSD in it you can um but don't I haven't gotten to actually boot directly off the SSD on this yet I know
a lot of folks were interested in that that is something maybe I'll look into in the future and do a tutorial on but
for now I'm honestly okay with how the micro SD has been performing and basically this was just
kind of a cool test and this was one of my first real Hands-On in-depth experiences and actually using the image
and object detection classification capabilities of AI Edge devices and I have to say this was actually kind of
fun and I am going to ask those of you watching to do me a favor and I'm not going to say subscribe I don't do that
if you can think of a good use case for this Raspberry Pi telephoto lens preferably in conjunction with the
example we saw running on the pi with the AI kit I really would like to actually just have this running
somewhere like 24/7 along with this and seeing what it can do because this really was interesting to me and I
unfortunately could not get it working enough well enough to show um the image that I got out of the telephoto lens was
just super blurry and I attribute that to my lack of camera etiquette or knowledge so that's essentially going to
wrap this video video up I hope it was useful and helpful and happy new year thanks for watching
Es un dispositivo de AI diseñado para ejecutar modelos de aprendizaje profundo y aplicaciones de visión por computadora.
Necesitas instalar el AI Kit, clonar un repositorio y ejecutar unos scripts específicos.
Se recomienda utilizar una cámara USB para obtener los mejores resultados.
Sí, pero el rendimiento puede ser limitado en comparación con dispositivos más potentes como el Jetson.
Sí, desde la automatización del hogar hasta la seguridad y el monitoreo en tiempo real.
Heads up!
This summary and transcript were automatically generated using AI with the Free YouTube Transcript Summary Tool by LunaNotes.
Generate a summary for freeRelated Summaries
Comparativa entre Orange Pi 5B y Raspberry Pi 5: Rendimiento en LLMs
Descubre cómo se comparan el Orange Pi 5B y el Raspberry Pi 5 al ejecutar modelos de lenguaje. ¡Resultados sorprendentes!

OpenAI Lanza Modelos Abiertos de IA para Uso Local en Laptops y Teléfonos
OpenAI ha lanzado dos modelos de inteligencia artificial abiertos y avanzados que pueden ejecutarse localmente en laptops y teléfonos, revolucionando el acceso y control sobre IA. Estos modelos ofrecen alta capacidad de razonamiento, gran ventana de contexto y velocidad, abriendo nuevas posibilidades para aplicaciones seguras y personalizadas.
Alternativas al Raspberry Pi 4: Explorando los Mejores SBCs
Descubre las mejores alternativas al Raspberry Pi 4, desde el Banana Pi hasta el Orange Pi 5, y encuentra la opción perfecta para tus proyectos.
Nuevos Modelos de OpenAI: O3 y O4 Mini - Análisis y Comparativa
En este video se analizan los nuevos modelos de OpenAI, O3 y O4 Mini, destacando sus capacidades de razonamiento y mejoras en programación. Se comparan con versiones anteriores y se discuten sus aplicaciones y rendimiento en benchmarks.
Introducción a los Modelos de Lenguaje Grande: ¿Qué son y cómo funcionan?
Descubre cómo funcionan los modelos de lenguaje como ChatGPT y su impacto en la inteligencia artificial.
Most Viewed Summaries

A Comprehensive Guide to Using Stable Diffusion Forge UI
Explore the Stable Diffusion Forge UI, customizable settings, models, and more to enhance your image generation experience.

Kolonyalismo at Imperyalismo: Ang Kasaysayan ng Pagsakop sa Pilipinas
Tuklasin ang kasaysayan ng kolonyalismo at imperyalismo sa Pilipinas sa pamamagitan ni Ferdinand Magellan.

Mastering Inpainting with Stable Diffusion: Fix Mistakes and Enhance Your Images
Learn to fix mistakes and enhance images with Stable Diffusion's inpainting features effectively.

Pamamaraan at Patakarang Kolonyal ng mga Espanyol sa Pilipinas
Tuklasin ang mga pamamaraan at patakaran ng mga Espanyol sa Pilipinas, at ang epekto nito sa mga Pilipino.

How to Install and Configure Forge: A New Stable Diffusion Web UI
Learn to install and configure the new Forge web UI for Stable Diffusion, with tips on models and settings.

If you found this summary useful, consider buying us a coffee. It would help us a lot!